Introduction:
We have now covered what this solution does as well as its cost, at least from an ingestion standpoint. Now, we will finally be actually deploying something! In this article, we will be generating our sample data, using it to create our new tables and DCRs, granting the appropriate permissions on those DCRs, and performing an initial ingestion!
For those familiar with my W365 collectors or the learning series, this is effectively the same process.
In this section, we will cover…
- Requirements
- Zero: Complete the Requirements!
- 1: Sample Data
- 2: Validating Sample Data
- 3: Table and DCR creation
- 4: DCR Permissions
- 5: Let’s Upload some Data!
- 6: Validating Data Arrival
- Conclusion
Requirements:
Before you can proceed with this article, you will need to have completed and deployed the following items from the learning series.
- Log Analytics Workspace and Data Collection Endpoint
You will need a DCE (Data Collection Endpoint) to hold the Data Collection Rules (DCRs) we are about to create. You will also need a Log Analytics Workspace to put the data into. Both the DCE and workspace are “generic” in the sense that you just need one of each to exist in the right region and preferably inside the same Resource Group as everything else that will be set up. That said, I would highly recommend you get a Log Analytics Workspace just for custom PowerShell-based logging like this to separate it from any agent based logging you are doing. - Function App
You will need a setup Function App running the provided code. This is again a “generic” item in the sense that you just need one to exist in the right region and preferably inside the same Resource Group as your workspace. All (updated for new auth, including this series) collection scripts I make can use the same singular Function App and code which was deployed in the learning series V2.
Note: Completing the Function App section requires that you have a DCE setup first. Make sure you not only complete the deployment of the Function App but, also complete the permissions in the section named “Assigning the Function App Permissions”. - Intune Proactive Remediation compliant licensing
- Visual Studio Code with the PowerShell Extension. You can use ISE if you must. For sample data, you may need to run it as either system or elevate the account that enrolled the device to local admin. Other admins besides the System account and the person who enrolled the device may not have the right permission to read all values the scripts need to work.
- I would recommend you get familiar with the creation of a DCR and deployment of proactive remediation scripts although, these two topics will be covered in some detail/specifics as it applies to these scripts.
Zero: Complete the Requirements!
Again, make sure you have completed the above requirements! Again, the DCE (Data Collection Endpoint), Log Analytics Workspace, and the Function App along with correctly set permissions are required to progress beyond this point.
1: Sample Data
Like everything I seem to write about, this is a bit of a chicken-and-egg situation. We need to create a Table and DCR, three each actually. But in order to do that we need sample data, and in order to get that we need to use the scripts. As such, you first need to download the “ATTM Device Inventory Script V1.2.ps1” collector script onto a Windows Endpoint device.
Note: This was updated to V1.2 6/13/24. See here for more details.
Note: This device needs to be a real fleet device that is very representative of the organization as we will use it to generate sample data that then sets the flow for everything going forward!
Open the PowerShell script in Visual Studio Code (VSC from here on out) with the PowerShell extension installed. Additionally, you may need to run VSC as either system or, elevate the user who enrolled the device to a local admin and run it that way. Other admins besides System (admins accounts that did not enroll the device) may not have the right permission to read all values the scripts need to work. This concern only applies to when manually running things in VSC, not full deployment via Intune PR.
The script has a variables region near the top with many adjustable variables listed. I will go into more detail on what these do as part of the deployment section later. For now, locate $WriteLogFile (CTRL+F is your friend) and change it from $False to $True.
Next, locate $TenantDomain and $CustomTenantDomain as shown below.
$TenantDomain = "fooUser@YOURTENANT.onmicrosoft.com"
$CustomTenantDomain = "fooUser@YourDomain.net"
While not critical to the functionality of the script, it’s best to get these set now. In the first one, “YourTenant” is the .onmicrosoft.com version of your tenant you would have gotten when the tenant was created. “YourDomain.net” is whatever your custom domain is you would typically use to login. For Instance, FooUser@Contoso.OnMicrosoft.com versus FooUser@Contoso.com (do NOT replace FooUser). This controls part of the primary username location as sometimes these fake FooUsers values exist in the location we expect our data, but obviously aren’t what we want, thus if we find these we need to look elsehwere.
Once all set, run the script. You should see output like this.
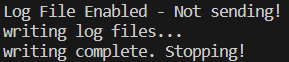
Importantly – You should see the notes about “Writing the log files…” – this means that it has written our raw sample data to the drive for us to now use.
2: Validating Sample Data
You should now be able to look in C:\Temp\LogAnalytics and have a set of SIX files. The RAW files are sample data!
- AdminInventory-Full.json
- AdminInventory-RAW.json – Sample data
- AppInventory-Full.json
- AppInventory-RAW.json – Sample data
- DeviceInventory-Full.json
- DeviceInventory-RAW.json – Sample data
Again, the RAW files are our sample data. Upload the wrong one later on and you’re gonna have a bad day. The Full files are what we would have sent to the Function App. Both need to be validated to make sure things are working as they should be. Open up all six files in your favorite text editor and follow along below.
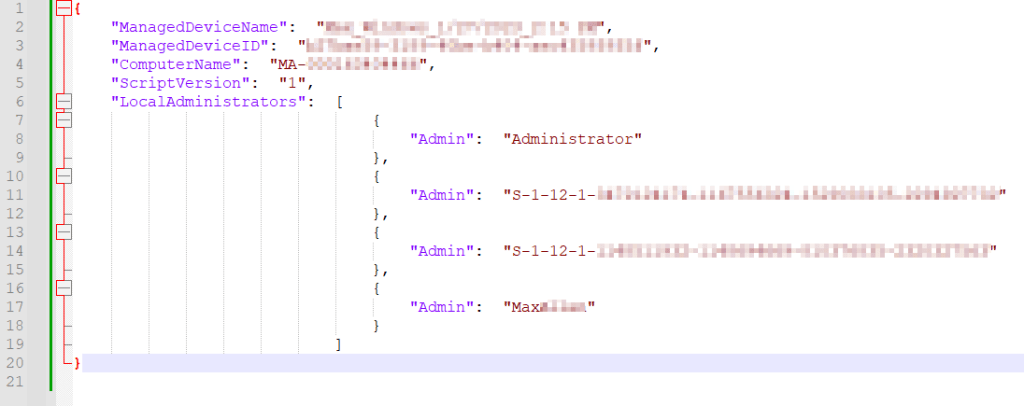
AdminInventory-RAW.json:
This file should have a single entry which has the information for the ManagedDeviceName, ManagedDeviceID, ComputerName, ScriptVersion, and an array named LocalAdministrators which contains all of the local admins found on this device. We are looking to make sure all of these fields have data and that the data makes sense.
Note: Some of the local admin names/values may look odd. Rest assured this is as good as they get and further discussion on what they are and what can be done about them will be found later in the workbook setup.
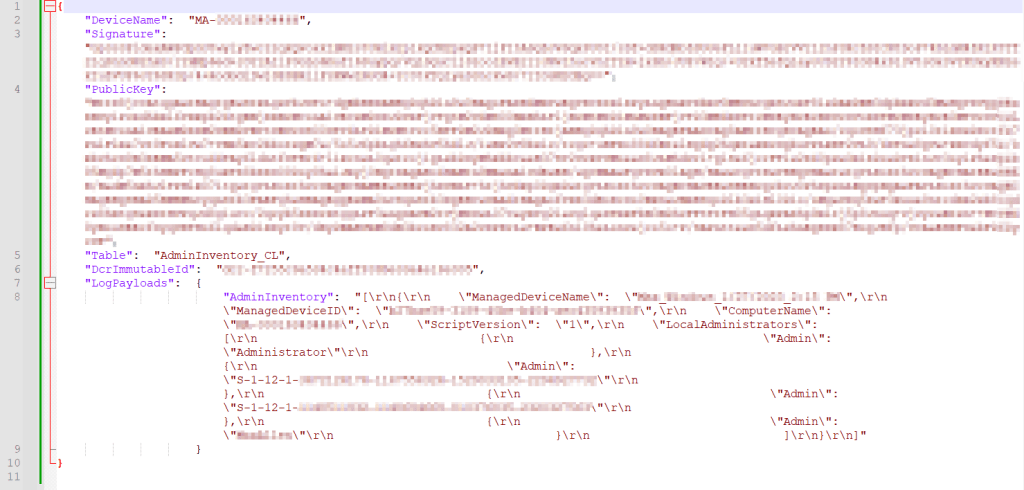
AdminInventory-Full.json:
This will look similar to the above except in a different format with additional data at the top. We have a different/new DeviceName field, a Signature, a PublicKey, and inside the LogPayloads is the AdminInventory where we again have the same data as from the RAW in a slightly different format.
Note: You will not have a Table or DCRImmutableID yet and that is normal/expected.
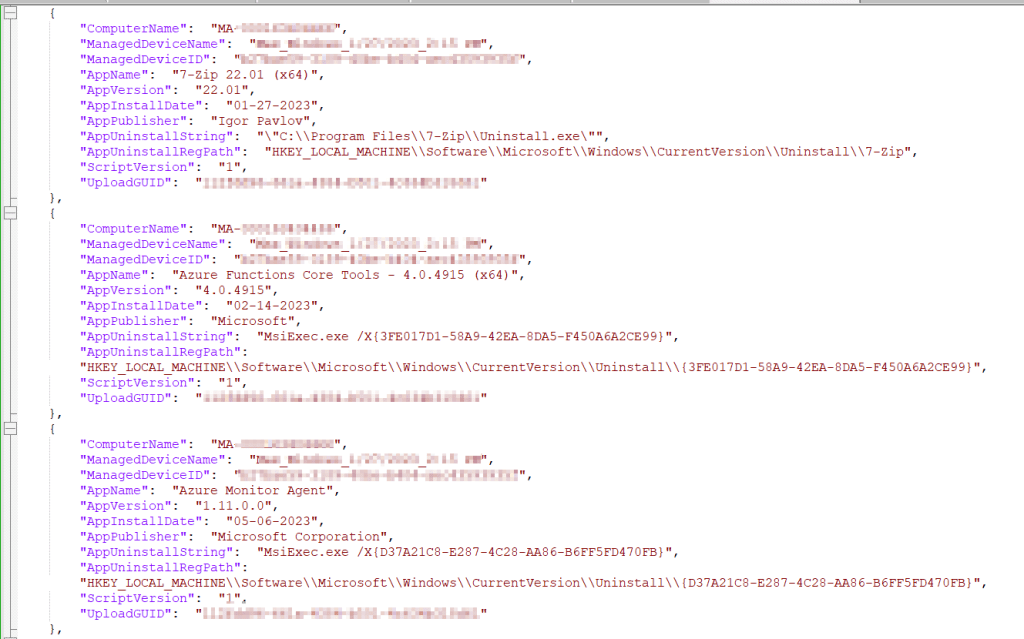
AppInventory-Full.json:
This one is again fairly straightforward and should look familiar. It’s all your apps! One entry per app. Again, we are looking to make sure all the fields have data and that the values they have make sense. Especially the ComputerName, ManagedDeviceName, and ManagedDeviceID. Feel free to Ctrl+F and look for any apps you have installed.
Note: Some apps don’t have an install date, that is normal as unfortunately some app makers choose to not add it. Additionally, at this time Windows store apps are not collected (future plans!).
DeviceInventory-RAW.json:
This one has a lot of values and fields to check, more than I can reasonably list out. Try to check through and make sure they are filling out like mine.
Note: My TPMThumbprint is empty, and yours may be too.


DeviceInventory-Full.json:
Again, just like the last Full.json, this will look similar to the above except in a different format with additional data at the top. We have a different DeviceName field, a Signature, a PublicKey, and inside the LogPayloads is our DeviceInventory containing the same data we just looked at, now in a different format. Again, we are looking to ensure these fields have values like those shown below. Obviously, I blurred a lot in this one. As long as they aren’t empty, you’re probably fine.

3: Table and DCR creation
Assuming your data looks good, you’re now ready to use the three RAW.JSON files as sample data such that you can create your DCR and tables. If you need an in-depth guide on this, refer to this blog post. That said, I will still detail the process almost entirely here.
- You need to open up your Log Analytics Workspace and look for Tables on the left-hand side.
You should have already created one of these as part of the requirements! - Then choose Create, New Custom Log (DCR-Based)

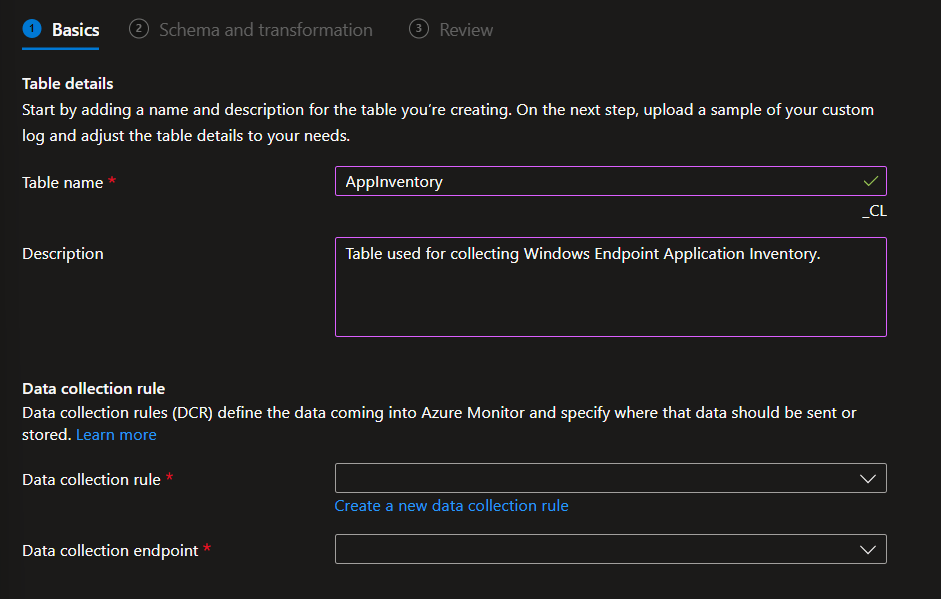
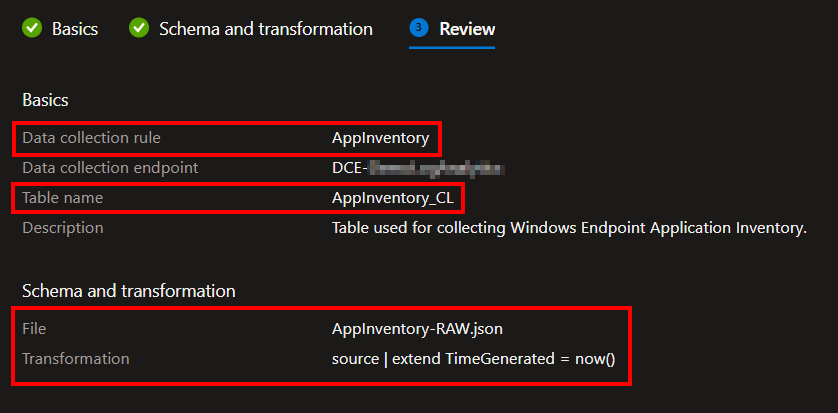
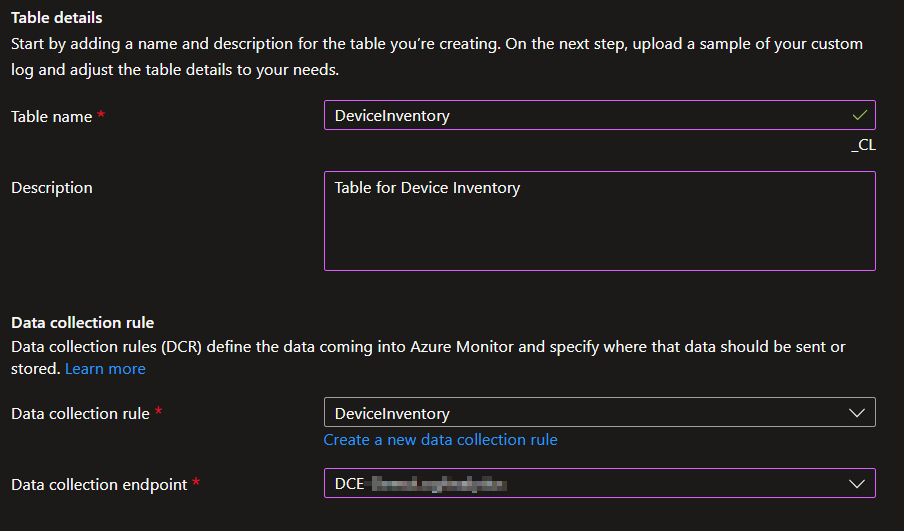
You will then be prompted for a Table Name and Description. The three Table Names we will be creating are…
- AdminInventory (NO _CL)
- AppInventory (NO _CL)
- DeviceInventory (NO _CL)
Warning:
- These table names are case-sensitive! Type them exactly or just copy-paste them. Failure to mirror this will blow the workbook queries out of the water and make a mess.
- The _CL is automatically appended to the table names. That’s expected, do NOT manually add the _CL yourself.
For the sake of example, I will be creating my AppInventory table first. Here is how that should look.
You then need to choose Create a new data collection rule. I would recommend you ALWAYS make a new DCR for every custom PowerShell table. That way, if you ever mess one up, you don’t take out too much.
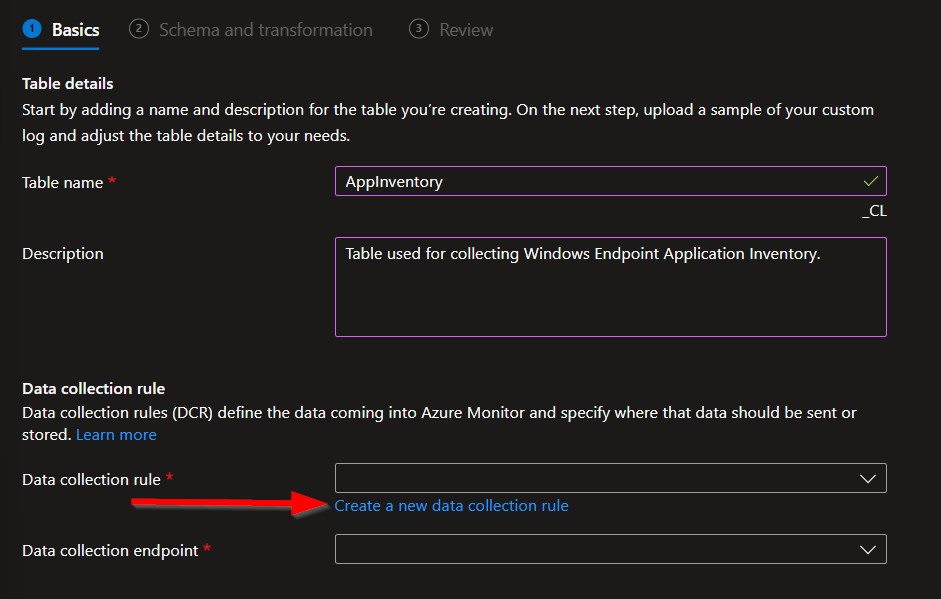
I always name my DCRs to match my table name, that way the two items correspond.

You then need to choose your existing Data Collection Endpoint (DCE). Again, you should already have one of these. In the end, it looks like this.
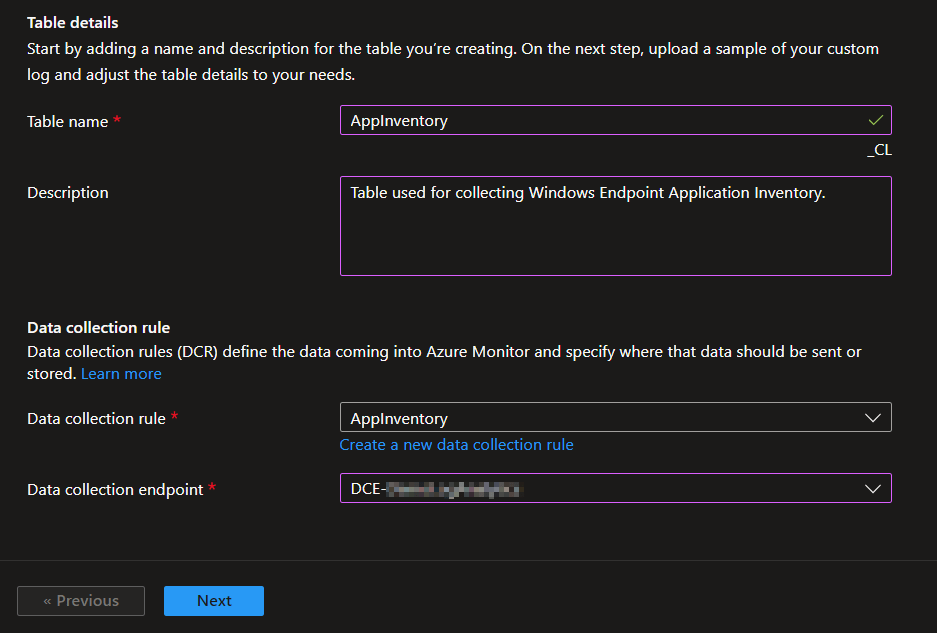
Once entered, hit Next.
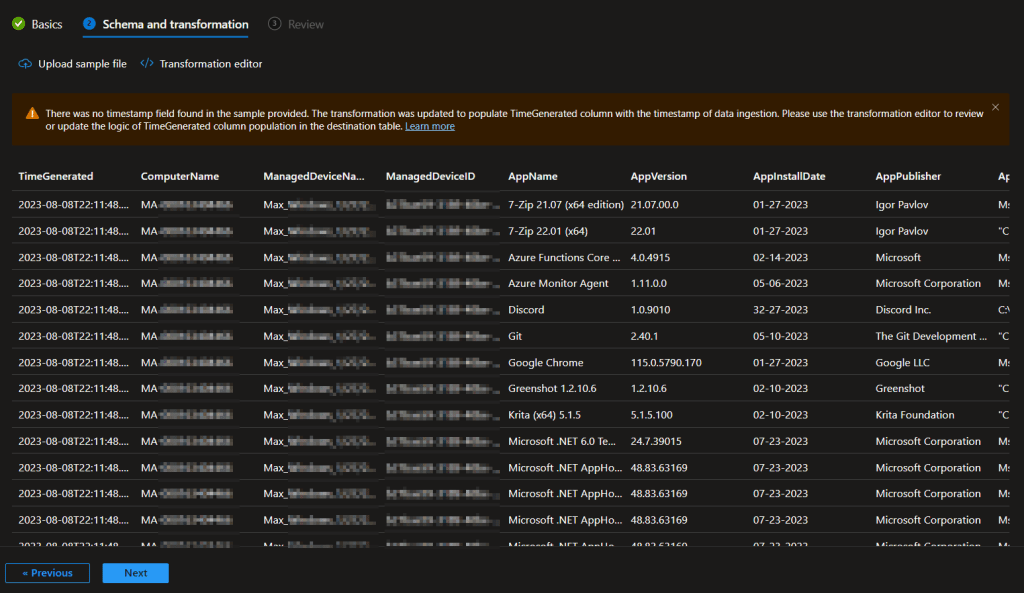
You will then be prompted for a JSON-formatted sample data file. Since I am making my AppInventory table, I will upload my AppInventory-RAW.json. Again, use the RAW file, not the full file.
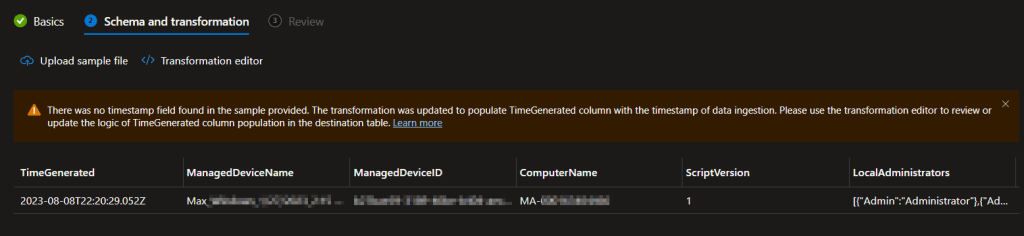
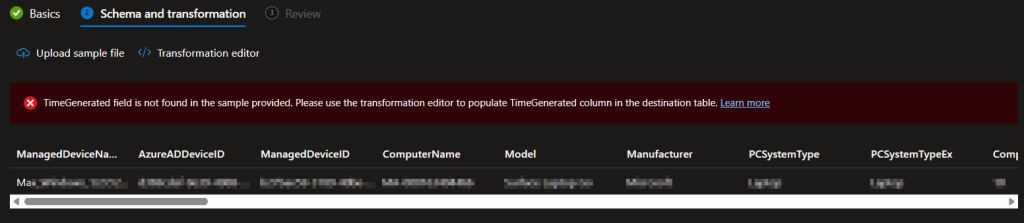
You should then see the same data with the same columns as in the RAW file appear. You will likely see the same orange warning as I did with a warning that TimeGenerated was automatically populated with the ingestion time. This is normal. Once you have confirmed the data looks good, press Next.
Note: If for some reason it’s red and just says it doesn’t know what TimeGenerated is, you need to manually specify it. Details can be found in my previous blog. CTRL+F that blog for TimeGenerated.
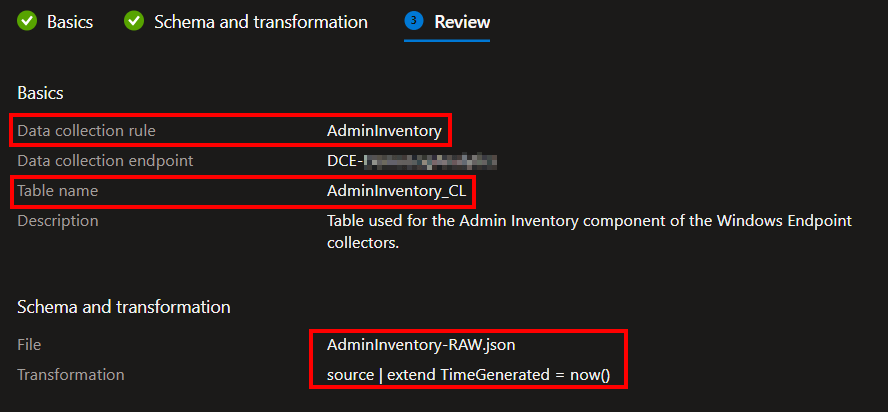
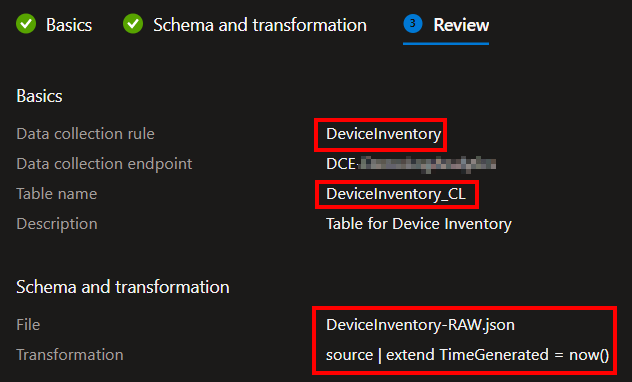
You will then see a confirmation of what you are creating. You should again see the DCR is named after the Table, the Table Name will now show its automatic _CL, the file you used should be the corresponding RAW file, and your TimeGenerated should be now().
You can then go ahead and hit Create at the bottom. This may take a moment to complete and will then spit you back out to the Tables view.
Your new custom Table might not be there when you get kicked out of the custom view. This is fine, watch the bell icon for status updates and be patient/refresh.
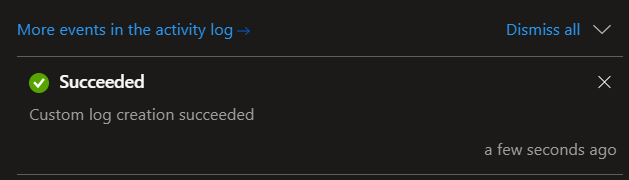
Eventually, your new table will appear…

Next, repeat all of that for the other two tables.
You need to repeat all those steps using the AdminInventory-RAW.json and AdminInventory table name, as well as the DeviceInventory-RAW.json and DeviceInventory table name. I will put brief screenshots below.
For AdminInventory…
Again, make a new DCR with the same name.
Use the AdminInventory-RAW.json file as sample data.
And your final settings should look like mine.
For DeviceInventory…
Again, make a new DCR with the same name.
Use the DeviceInventory-RAW.json file as sample data.
Note: This is the one that loves to not automatically do the transform. You may need to manually specify it. Details can be found in my previous blog. CTRL+F that blog for TimeGenerated. I also included the transform and steps below.
Transform steps:
source
| extend TimeGenerated = now()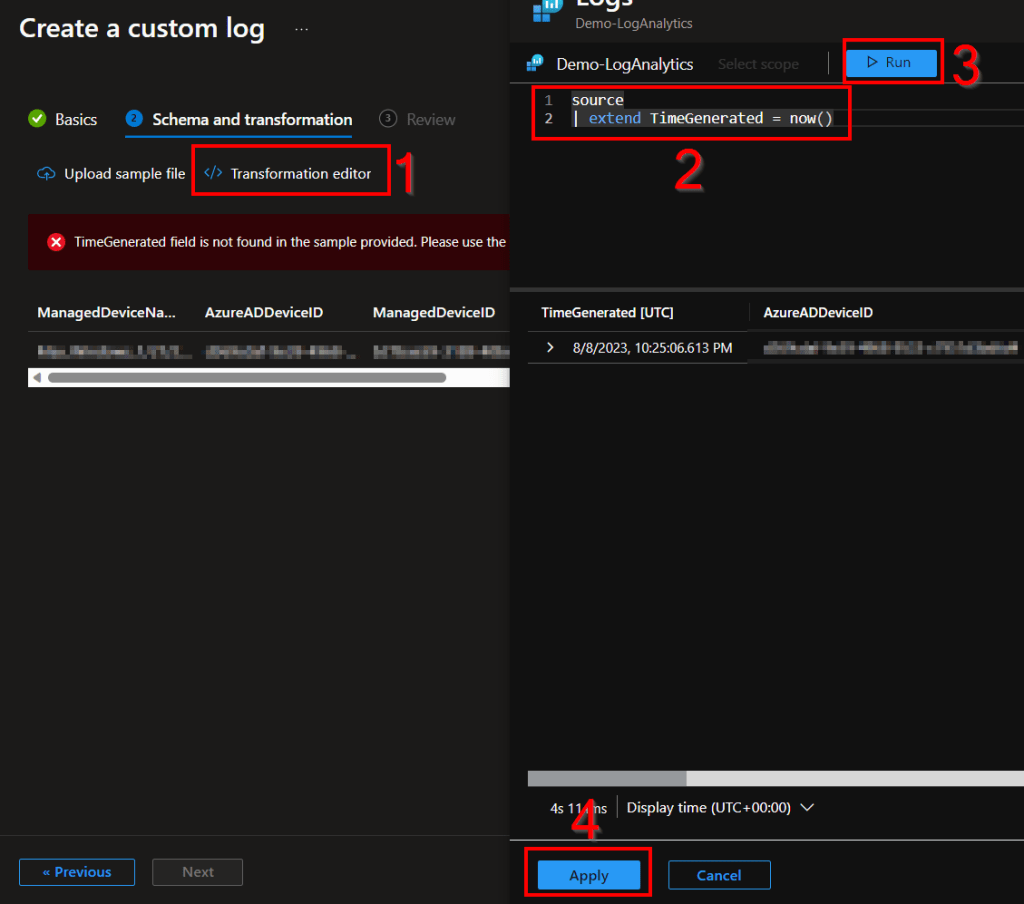
And your final settings should look like mine.
4: DCR Permissions
Once all your tables and DCRs are created, we now need to grant your existing Function App permissions to these new DCRs. Exact details on how to grant this permission can be found in this guide under the Granting DCR Permissions header. I will still detail it here.
Note: If you made an App Registration (very optional) as discussed in the learning series, you will also need to grant it permission to these DCRs if you want to be able to locally test and upload to them.
You need to open the Azure Monitor menu, scroll down to Data Collection Rules, and locate the three new rules we just made.
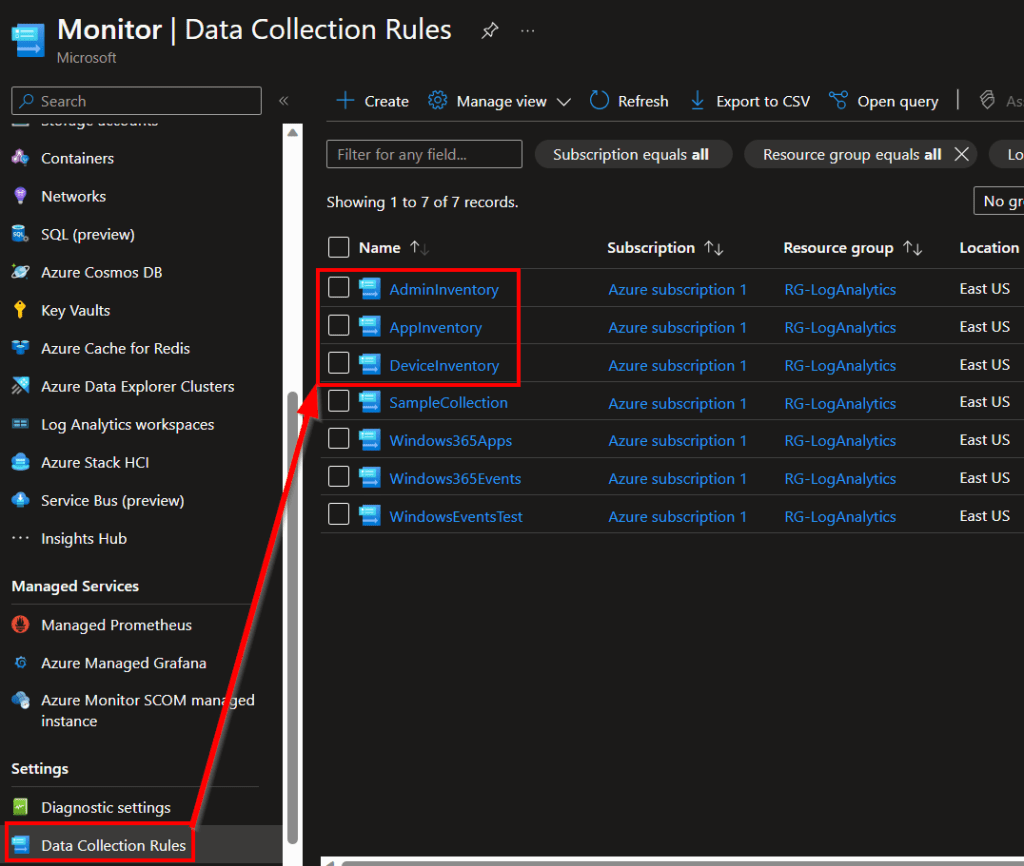
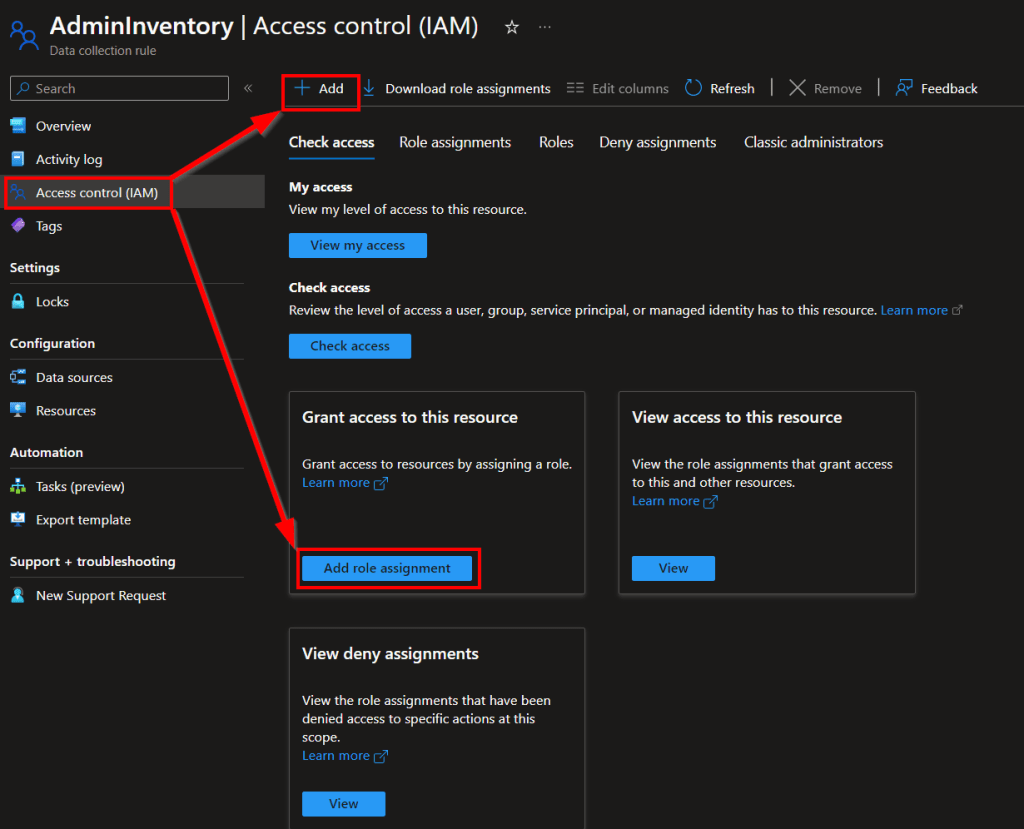
To start with, go into AdminInventory, go to Access Control (IAM), and Add Role Assignment. There are a few buttons that lead to the same thing here.
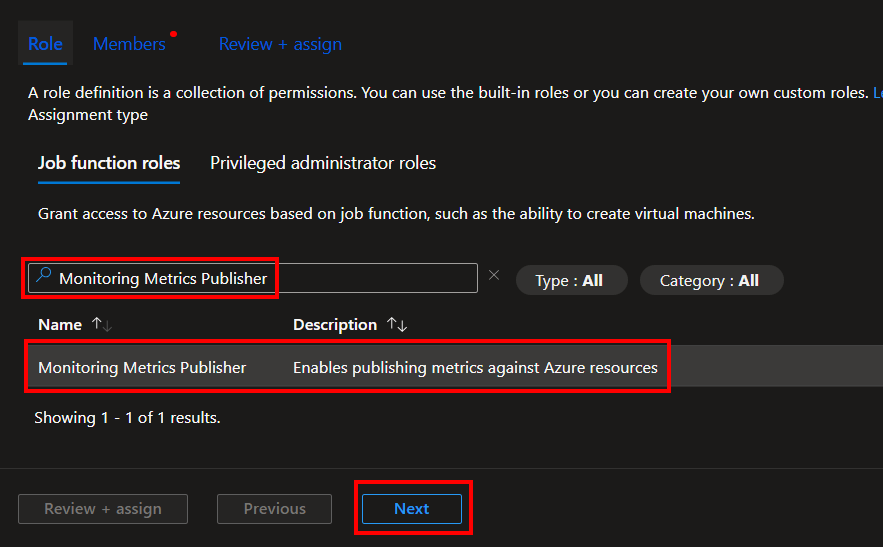
Search and select the Monitoring Metrics Publisher role, select it, and press Next.
The easiest route to find and select a Function app is by changing it to Managed Identity (1), choose Select Members (2), change to the Function App view (3), choose your function app (4) which will add it to the selected members section, and choose Select (5).
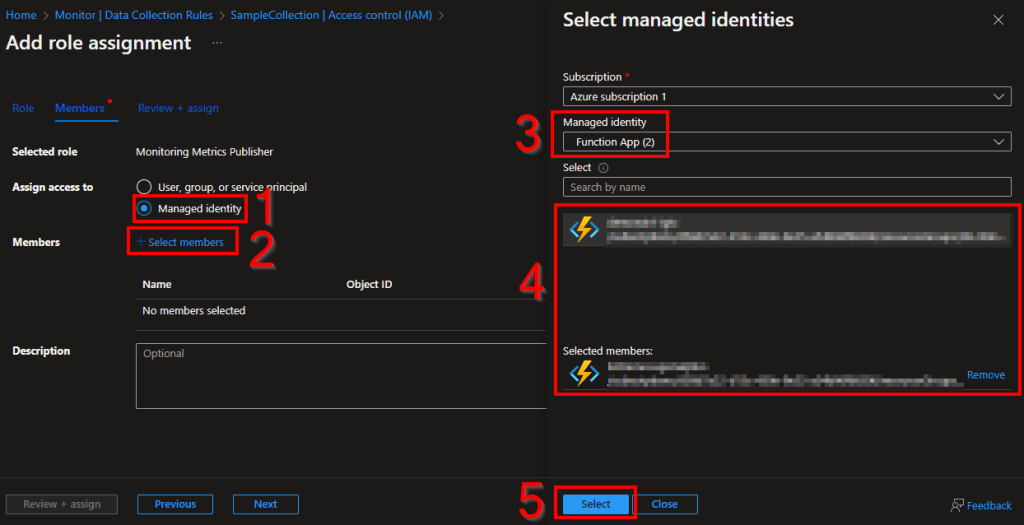
Finally, hit Review and Assign (may need to press it twice) to assign the permissions. Now your Function App has permission to upload data to this DCR we just made.
Now, repeat that same permission process for the other two DCRs (AppInventory, DeviceInventory).
5: Let’s Upload some Data!
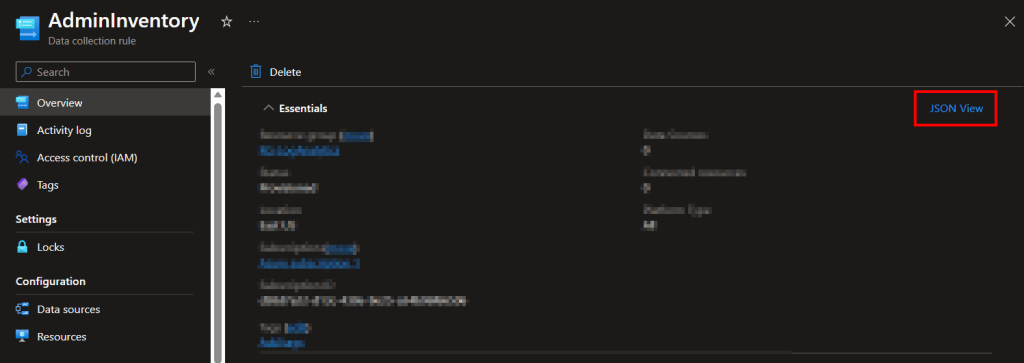
Still inside the Monitor menu, we will need to go back inside our DCRs, go to the Overview and choose JSON view on the far right.
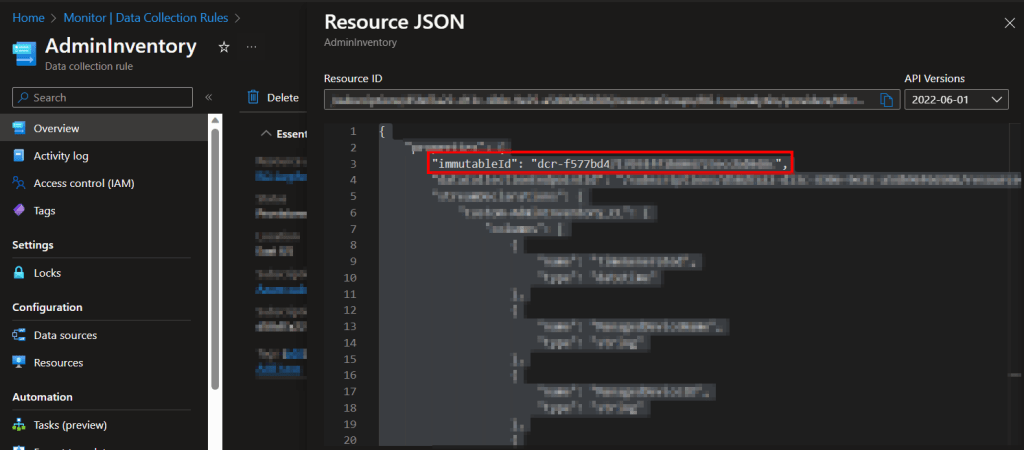
Inside the JSON view, grab the immutableId and notate its value for all three DCRs.
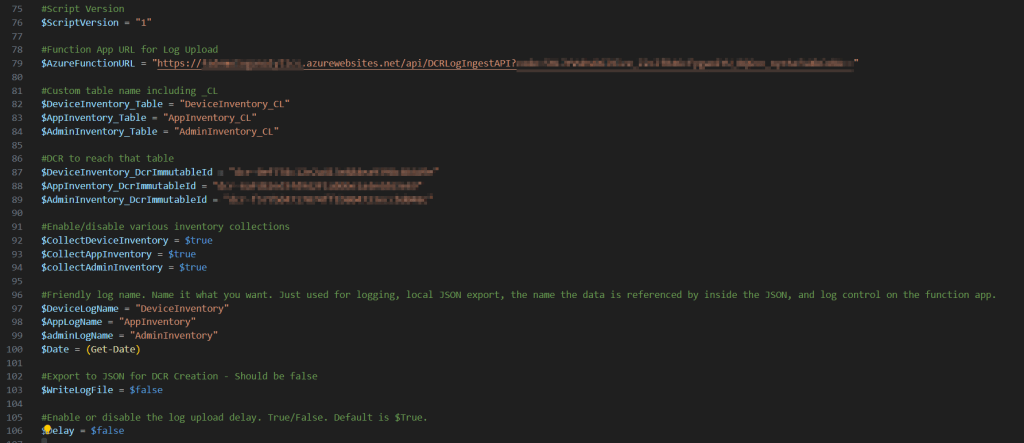
Now, head back into Visual Studio Code.
- In the variables section, change $WriteLogFile back to $False.
- In the same variables section, turn $Delay to $False, you can see this or just read the script comments to know what this does. We will eventually turn this back on.
- In the same variables section, you will find three variables for various DCR IDs. These are where you need to put the three values you just collected.
#DCR to reach that table
$DeviceInventory_DcrImmutableId = "dcr-XXXXXXXXXXXXXXXXXXXXXXX"
$AppInventory_DcrImmutableId = "dcr-XXXXXXXXXXXXXXXXXXXXXXX"
$AdminInventory_DcrImmutableId = "dcr-XXXXXXXXXXXXXXXXXXXXXXX"
- lastly, fill in $AzureFunctionURL with your Function Apps Function URI with the Default Function key. If you’re not sure where to get this, see the Getting the Function App URI section here.
Note: Microsoft decided to shake up the box and change this menu again, fun. I have written new details in the learning series linked above. See the section of that blog labeled “Update 8/8/23: Changes to the Function App Menu“
In the end, it should look like this.
You should then be able to run the scripts with F5 and they should both report back something like…
Note: if you did this all at once and re-ran on the same session of the same test machine, you might get some error like “New-PSDrive : A drive with the name ‘HKU’ already exists.” and that’s fine.
Sending Payload...
InventoryDate:08-08 19:10 DeviceInventory:OK @{LogName=DeviceInventory; Response=204: Upload payload size is 3Kb} AppInventory:OK @{LogName=AppInventory; Response=204: Upload payload size is 39.7Kb} AdminInventory:OK @{LogName=AdminInventory; Response=204: Upload payload size is .9Kb}Note: If you do not get a success status, see this article here for troubleshooting. The information in that article is primarily for the learning series but the same concepts apply. Assuming your Funciton App works, odds are it’s a Function App to DCR permission issue or, you got the various DCR IDs mixed around.
If you have a lot of trouble and this is your first attempt to use my Function App ever, I highly advise going through the learning series to make sure you can get its sample collector to work and thus we know your Function App works.
Once you get a success status, it’s time to move on to validating that data arrived.
6: Validating Data Arrival
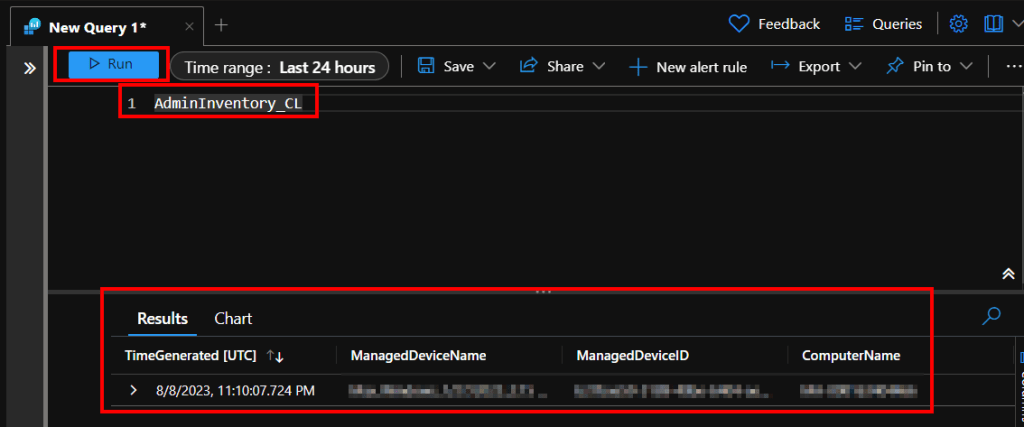
It may take up to 10 minutes for the new data to populate your tables. Eventually, you should be able to go into Log Analytics, choose Logs on the left, and view the records uploaded into your new tables. For example, here is my initial ingestion into the AdminInventory_CL table. Also check the other AppInventory_CL & DeviceInventory_CL for data.
If your tables don’t even exist yet (typing them gets you a red underline) or don’t have any data, try waiting and clearing cache. These menus are strange with updating when it comes to first receiving data to new tables or columns. If it goes over half an hour, the first thing I would suspect assuming you got a success message is that your DCR IDs were mixed around.
Once you see your data, congrats! All the hard work is done!
Conclusion:
You should now have your DCRs and tables created, and some initial data ingested! Next is the workbook importing, alteration, script control details, and deployment details.
The Next Steps:
See the index page for all new updates!
Log Analytics Index – Getting the Most Out of Azure (azuretothemax.net)
I will be putting the Windows Endpoint guides on the Log Analytics Index page under the Win365 series.
Disclaimer:
The following is the disclaimer that applies to all scripts, functions, one-liners, setup examples, documentation, etc. This disclaimer supersedes any disclaimer included in any script, function, one-liner, article, post, etc.
You running this script/function or following the setup example(s) means you will not blame the author(s) if this breaks your stuff. This script/function/setup-example is provided AS IS without warranty of any kind. Author(s) disclaim all implied warranties including, without limitation, any implied warranties of merchantability or of fitness for a particular purpose. The entire risk arising out of the use or performance of the sample scripts and documentation remains with you. In no event shall author(s) be held liable for any damages whatsoever (including, without limitation, damages for loss of business profits, business interruption, loss of business information, or other pecuniary loss) arising out of the use of or inability to use the script or documentation. Neither this script/function/example/documentation, nor any part of it other than those parts that are explicitly copied from others, may be republished without author(s) express written permission. Author(s) retain the right to alter this disclaimer at any time.
It is entirely up to you and/or your business to understand and evaluate the full direct and indirect consequences of using one of these examples or following this documentation.
The latest version of this disclaimer can be found at: https://azuretothemax.net/disclaimer/
