Welcome to part four, this is where things start to get serious and lengthy. In this section we will be going over the deployment of the Function App. I am covering this early on because it is a universal component which will/can be used by any data collection script. By the end of this article, you will have an Azure Function App which is ready to accept content from your devices that is destined to a DCE/DCR.
Note: To anyone who followed the original series and is now eagerly awaiting this new Function App such that they can update to its newer authentication, you can certainly setup this new Function App right now. BUT – using it requires major modifications to the client-side scripts. As such, you will not be able to cut over until those changes can be explained and shown. An article will be written on how to convert an old client-side script from use with the V1 to V2 Function App.
In this section we will cover…
- Proper Credit (now moved to part one of this series!)
- Warning – Security Concerns
- Can someone upload fake logs?
- Deploying the Function App
- How to verify a successful Function App Deployment
- Getting the Function App URI
- Update 8/8/23: Changes to the Function App Menu
- Assigning the Function App Permissions
- Bonus Material: How Does This Function Work?
- Bonus Material: But What About the Local Testing Support That Was Promised?
- Bonus Material: Creating an App Registration for Use With Local Testing
- Bonus Material: Local Testing Bugs
- Troubleshooting – This information is in the next article!
- FAQ
- Conclusion
Proper Credit:
As almost always the case, this project was built on the work of others. I decided to move this section to the start of the project to make sure it had easy visibility. Please see part one here.
Warning – Security Concerns:
Thanks to the new authentication methods, I largely get to delete this section from the previous guide. That said, it’s still worth covering what this Function App will have permissions to do. As always, see the disclaimer.
This Function App is going to have permission to read all device information in graph (Device.Read.All). It will also have permission to upload to whatever DCR’s (that comes later) you grant it permission to. Those DCR’s are only capable of ingesting the very specific data/formatting you will later teach them and are only capable of forwarding that data to the specific custom Log Analytics table set in its configuration.
Information on how the Function App authenticates device requests can be found in the article linked at the start of this section. Only once the device is authenticated will information be passed onto the DCE/DCR and then off to Log Analytics.
Can someone upload fake logs?
I wanted to directly address this since it’s something I see from time to time. With the previous version of the Function App, the authentication mechanism in place to validate log uploads was nowhere near as powerful as this new version. Importantly, the values needed to authenticate to the Function App could be accessed by the person who enrolled the device, even if they were NOT a local admin. So, this issue was a much larger concern – if still a small one in my opinion.
Technically, it is still possible to gather all the needed information to perform fake uploads and do so. However, in order to gather that information someone would need access to an enabled Azure joined device in your organization, the ability to login to the device, and local admin on the device, in order to have the permissions to even begin to get to said information. For obvious reasons, I am not going to detail that.
So, while possible, it’s the equivalent of saying “If the robber gets in the bank vault, they can start to pick the lock to my safety deposit box!” Sure, it’s not wrong. But, a lot of defenses (the vault door) would have had to already fail and/or basic best practices be not complied to. Simple things like bitlocker, strong passwords, 2FA, not giving everyone local admin, disabling missing devices, etc. Not to mention that there are much easier, effective, and faster things for a bad actor with local admin access to do. You’re a lot more likely to have someone give you Ransomewear at that point than decide to dive down a rabbit hole and mess with your application inventory reporting.
Deploying the Function App:
In previous guides I have explained the process of manually deploying a function in depth. If you really want to do this manually, you could follow that guide and simply pop in the different Function name and Code (run.ps1) but, I think everyone will appreciate this complicated setup being made a little bit easier.
To make this nice and easy, just click this link.

This will deploy the following:
- A Storage Account for the Function App with a name based off the supplied Function App name.
- An Application Insights workspace based off the supplied Function App name. You can save money by turning this on only when needed for troubleshooting.
- An App Service Plan with the licensing you selected and a name based off the supplied Function App name.
- A pre-configured Function App named as you chose with Managed Identity enabled. It will automatically pull its Function from the Github.
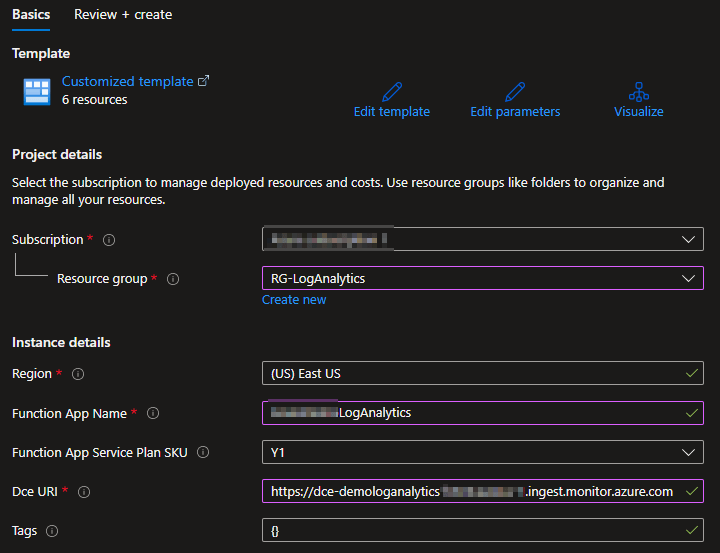
In order to use it you must supply the following:
- The Subscription to create all items in
- The Resource Group to place all items in
- The Region these resources will be created in
- A globally unique name for the Function App* – DO NOT SHARE THIS NAME!
- The SKU of the plan you want the Function App to run on. Default (Consumption) is Y1.
- The URI of your DCE**
- Any tags you wish to tag all the new content with
*The name of the Function App must be GLOBALLY unique (unique between all tenants) and will be used in the URL you use to call the app. So, don’t name your Function App “BETA-LogAnalytics” with the plan to one day put it into production. You’re going to be stuck with the name you choose. Again, the name of the Function App will also appear in your URL’s that you use to call it.
**If you don’t know how to get this, see the section Getting the Ingestion URL on the DCE from the prior blog.
It should look something like this one filled out.
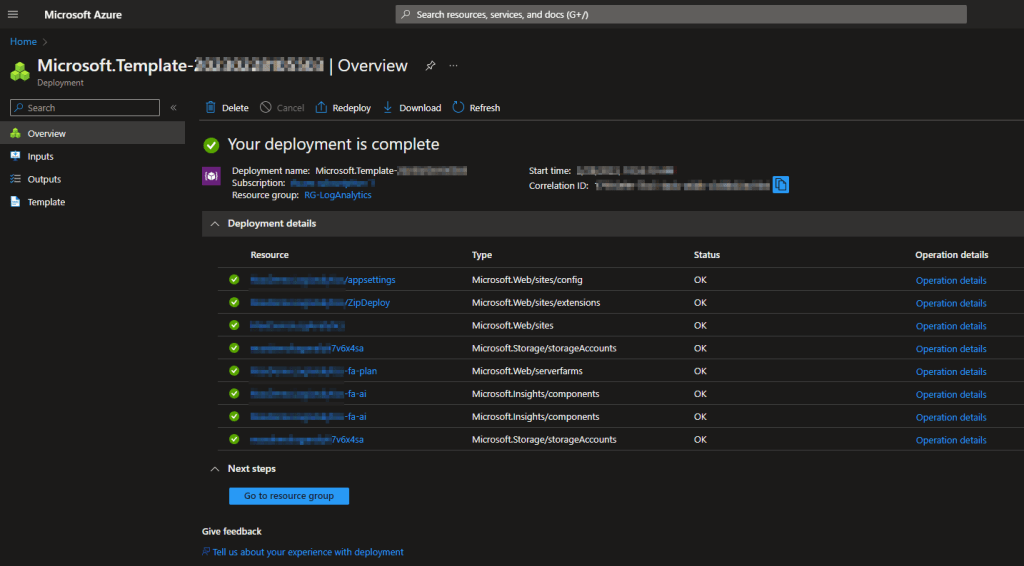
When ready, choose Review + Create at the bottom, wait for review to complete, and then hit Create.
All components will take a few minutes to complete but you should eventually come to a screen like this. You may need to expand the deployment details to see the full information.
Deployment Failure:
Unfortunately, while deploying a Function App manually does check to make sure the Function App name is available, a template does not. It will only tell you if the name meets the naming requirements for a Function App. As such, you may get a failure when you try to create it due to the name you choose. If this happens, I recommend cleaning up whatever it did create prior to re-running it. To confirm the name is the problem or find a different available name, refer to this article to deploy a Function App manually. You can choose to simply cancel out of the creation once you have found a suitable and available name, then enter that name into the auto-deploy package.
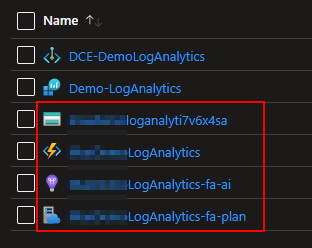
If your deployment went well, you should see a variety of new items have been created inside your Resource Group.
Note: A new “Failure Anomalies – FUNCTIONNAME-fa-ai” will also appear shortly. I haven’t had time to investigate this, but I believe it’s due to changes in application insights.
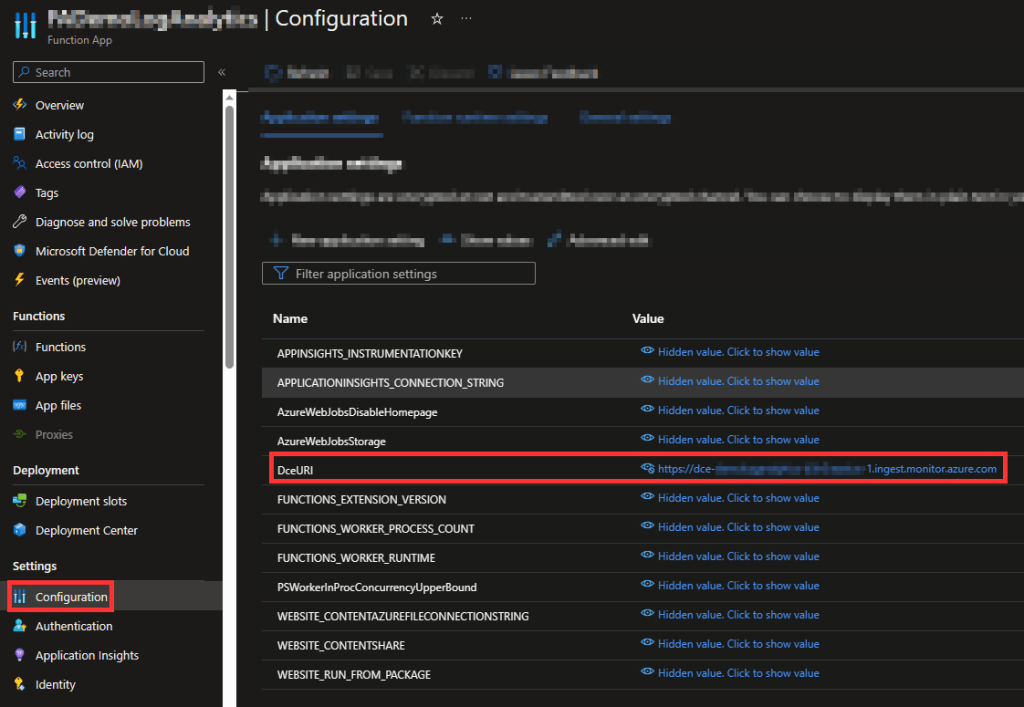
How to verify a successful Function App Deployment:
You can click into the Function App itself (lighting icon) and browse to the Configuration on the left-hand side. These are the variables passed to our code automatically. You should see that the DCE URI provided in the setup/deployment has now been populated into the DCEURI field.
No longer do we have a TenantID or Log Control fields.
- The Tenant ID was only ever needed for the previous authentication mechanism. While the variable still exists in several locations inside the code, the only times it is used is during local testing with an Application Registration.
- The Log Control option was needed as the legacy HTTP API would create a new table automatically if you attempted to upload to one that did not exist. DCR’s however can only send data to the specific table they are setup to go to, and they can only accept data of the proper format for that table. So, this is not an issue anymore.
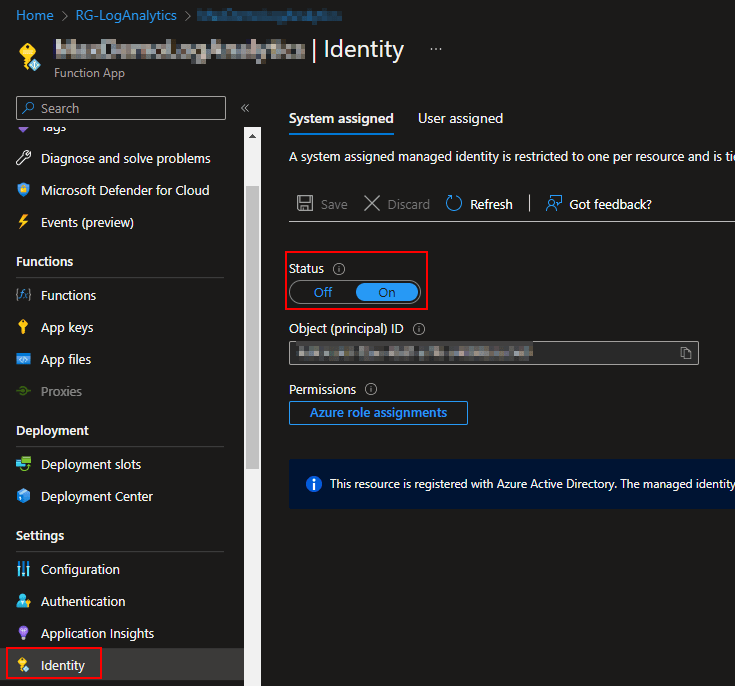
You can also confirm Managed Identify is enabled via the Identity menu. This is required to assign permissions to the Function App in the next section.
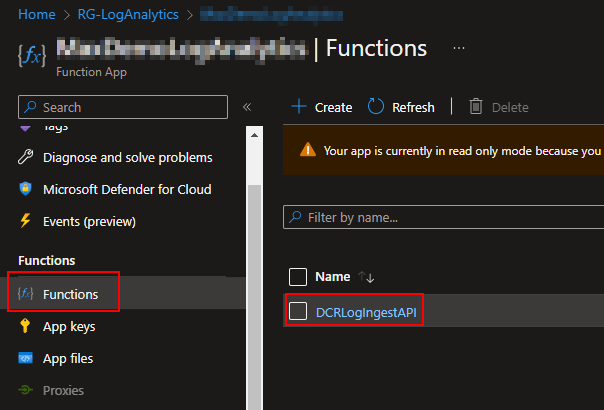
If you head to Functions, you can see that the DCRLogIngestAPI has automatically been created and added.
See section: Update 8/8/23: Changes to the Function App Menu
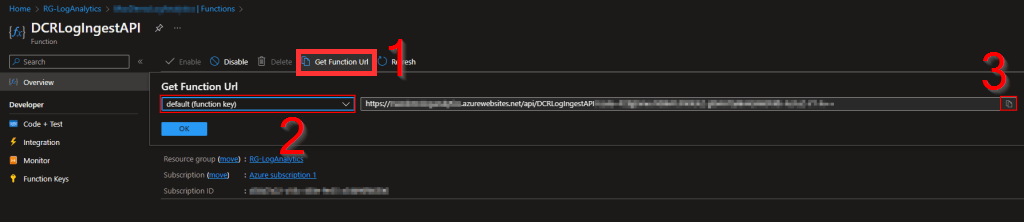
Getting the Function App URI:
Following the above picture (go to the Functions menu), If you click into the Function, you can get the URI to call it. This will be needed in future parts of the guide and can be looked up at any time.
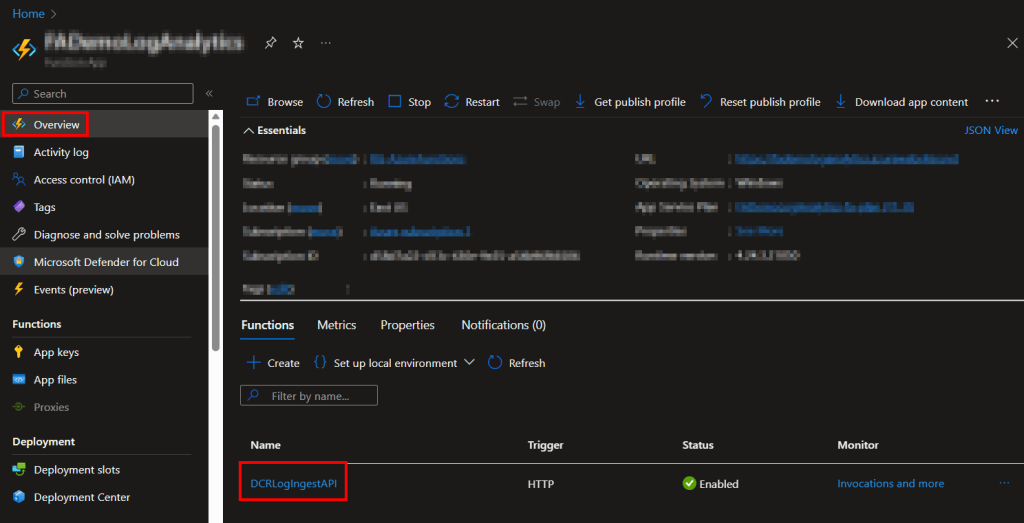
Update 8/8/23: Changes to the Function App Menu
Slight menu change. Rather than going under Functions (which no longer exists), you now just head to the Overview and your Function is listed there. Clicking this takes you to the same place clicking it inside the old Functions menu used to. This includes options like Code+Test and the Funciton URL.
Assigning the Function App Permissions:
Now we are going to assign our Function App permissions to perform graph calls. This is used in part of its validation of incoming data, more on that later if you care to know. Once again, thank you to the MSEndpointMGR team for this script.
You can get the Add-MSIGraphPermissions.ps1 here (three dots in top left, then download from the drop down). I recommend running this locally via Visual Studio Code due to the module requirement.
You do need to be a Global Administrator and have admin privileges to install PowerShell modules on your machine.
First, you will need to run line 3 (without the #) to install the Graph Module. This may take some time.
Install-Module Microsoft.Graph
Then, the script requires the following section to be manually filled out.
# Set Static Variables
$TenantID=""
$ServicePrincipalAppDisplayName =""
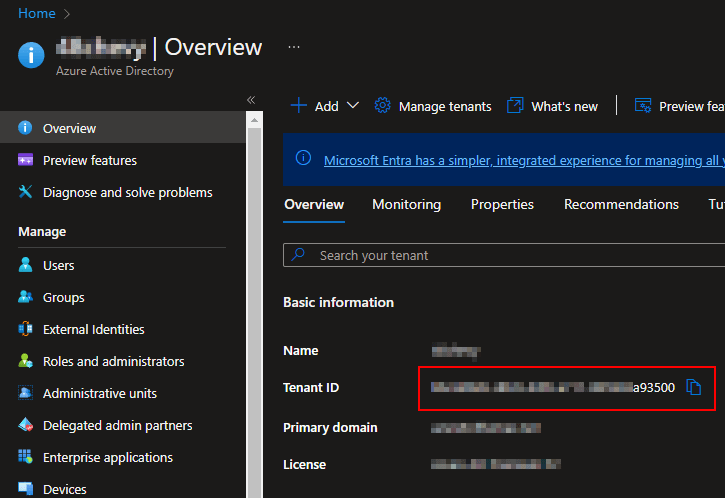
The TenantID can be found right on your Azure AD home overview page…
And the ServicePrincipalAppDisplayName is the name of your Function App. It’s exactly what you entered into the setup/deployment screen. To confirm this, you can go into Azure AD, choose Enterprise Applications on the left, change the filter to All Applications, and search for your Function App by name. You should see it come up as a result.

Once filled out into the script, you should be able to run it fully. I would again recommend doing this within Visual Studio Code. Depending on your Azure configuration, you may be asked to authenticate with further steps that are typically just opening a URL and popping in a code, or approving an MFA prompt, etc. In the end, you should see something like this.
I had to blur a lot of it, but it basically locates the ID of the role for Device.Read.All and grants it to the Function App.

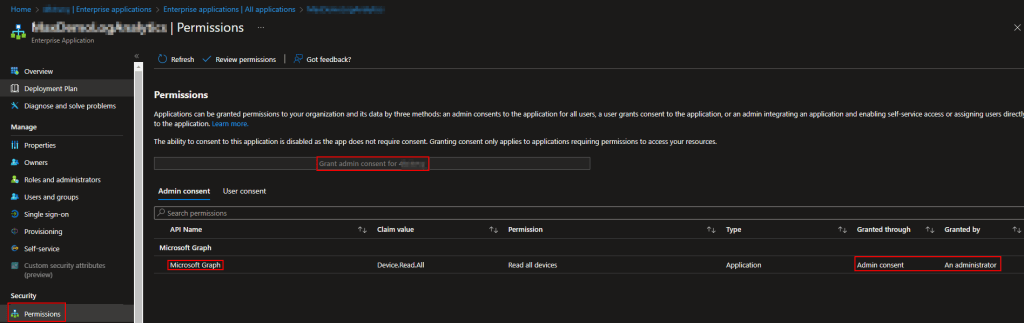
Now, go into Azure AD, choose Enterprise Applications on the left, change the filter to All Applications, and search for your Function App by name. You should see it come up as a result. Click on it.
Click into Permissions on the left-hand side. You should see that your Function App now has the Microsoft Graph Device.Read.All permission. However, to the right of that you should see a note about the consent status. If this says something about needing consent, you may need to click on the above Grant Admin Consent button or click on the permission itself (click Microsoft Graph for instance) and grant permission within there. I have never ever actually seen this be needed however, that doesn’t mean it couldn’t be needed in some configuration/tenant.
The Function App is almost ready for use. However, there is one more permission which will need to be granted to it. Unfortunately, that last permission it needs is to an item which does not yet exist. That is the DCR, something we will work to create in the next part.
If you wish, you can be effectively done with this article However, I wish to provide some insight and detail as to how this thing works for those who wish to play with it.
Bonus Material: How Does This Function Work?
You can download the code to play with and read here.
This is going to be more Indepth than the original part-1 overview is. The code itself is ridiculously commented out, because that’s who I am, so you can read it raw if you prefer.
First, we have ten functions. It used to just be five but, I had to include the five new/additional authentication functions directly in code rather than as a requirement/module. And yes, for those keeping track, this means our Function App has a Function that in itself has 10 coded Functions.
Get-SelfGraphAuthToken – Unchanged from previous V1.
This function was originally written by Jan Ketil Skanke (@JankeSkanke) who is with the MSEndpointMGR team. However, it was using an older 2017 API and I had to work out the use of the newer Logs Ingestion API anyways for some other items (Event Hubs) so, I went ahead and updated this as well. This will allow us to pull a token using the permissions assigned to the Function App (the Device.Read.All permission) which has permission to perform graph queries about devices.
Get-SelfUploadToken – Unchanged from previous V1.
In the tail end to the last section, I alluded that our Function App will also get permission to one more item that does not yet exist. That’s what this function calls to. This uses the permission assigned to the Function App to get a token to upload data to our DCE/DCR.
If you want to know more about the latest authentication API I used for these two functions, see here.
Send-LogAnalyticsData – Unchanged from previous V1.
And lastly the Function which does the final job of using our Upload Token to send the data to our DCE and corresponding DCR. This includes some size checking on the data just in case and it ultimately what sends the provided data to our DCE.
If you want to know more about how this works, you can see the PowerShell chunk here.
You may notice I used Invoke-WebRequest instead of Invoke-RestMethod. This is because the new DCR API returns an HTTP status 204 for success. 204 means no content and Invoke-RestMethod shows that by doing just that, giving you no content. I don’t like assuming a blank return value means success. So, instead I use Invoke-WebRequest which gives you the actual HTTP status code along with its meaning. I would much rather look for a “204” to know it was a success than a blank return.
Get-AppRegGraphToken & Get-AppRegUploadToken will be covered later in this same article as they are used for local testing.
Get-AzureADDeviceAlternativeSecurityIds, Get-AzureADDeviceRecord, Test-AzureADDeviceAlternativeSecurityIds, Test-Encryption, Get-AzureADDeviceIDFromCertificate – These are all part of the new authentication method which you can find details on in my blog here, as well as (currently) on my fork of the GitHub here.
#Start Script:
This line is where things really begin to process. First our value for our DceURI is pulled from the environment variables. This uses the information on the Configuration page you validated was present earlier.
You will notice a section under this talking about SecretsCSV and performing some “cloud” or “local” auth, more on this later.
Information is then pulled from the incoming request including the payload itself, the table that payload is destined to, the DCR ID required to reach that table (something you don’t yet have), the Devices Name, the Devices Signed Signature, and the Devices full public key.
The Function will then perform its authentication verification on the signature/certificate provided to validate the request. See prior section and the links to my blog post and the GitHub for information on how this works.
As long as it has the information needed (Table and DCR ID) it will then pull a token to upload to the DCE. It will then provide all information to our send function and send the payload to the DCE and return the status back to our client device.
That’s pretty much it. Below that you will find the various “else” answers to all the “if” statements, such as the device failing authentication or failing to provide the required information.
Bonus Material: But What About the Local Testing Support That Was Promised?
Again, you can download the code to play with here.
If you are interested in developing and testing with this Function locally, you may be interested in running this Function via Visual Studio Code (VSC) as explained in this blog post.
And if you are familiar with that post or Function Apps in general, you know that your local VSC (Visual Studio Code) is not going to have the same permissions as your real live Azure Function App. Obviously, you can’t grant Azure permissions to your VSC on your client machine.
But, if you read that prior article, you know I mentioned some idea about coding the Function to use an app registration when running locally and making it dynamically detect that. Well guess what, I did just that and it’s pretty cool.
This is where the functions Get-AppRegUploadToken and Get-AppRegGraphToken come into play. As the name suggests, these get the same kind of tokens (same permissions) but instead of using the permissions assigned to the Function App, they use the permissions of a Registered Application.
Near the top of the script (now clear down on line 602) is a section that reads…
$RunningComputerName = $env:COMPUTERNAME
$MyComputerName = "XXXX" #Your Computer Name
Replace XXXX with your computer name you want to develop on. When set and ran on your machine, the script passes through the loop which changes the $RunLocation variable to Local and thus tells all the token sections to use the app reg instead of self auth.
However, the values the script would normally pull from environment variables won’t exist now and the script also now needs an App ID and Secret Value.
This is where the Secrets.CSV comes into play. The template can be downloaded from GitHub here. You can go to the RAW and copy paste that to a TXT file and just save as CSV and re-open in Excel.
This file will house your AppID, AppSecret, DceURI, and TenantID. While not needed in the cloud, the tenant ID IS needed for using app registrations. You obviously don’t yet have a AppID and Secret, I will show you how to get that in the next section.
You need to fill this CSV out with those values (put the corresponding value under the header on line 2), save it on your system, and point this script to it.
If you are wondering why you don’t just put the values in the script directly, I would personally feel obligated to then scrub them from the script each time I push it to a real Azure Function. By storing them in a CSV, there aren’t any secrets in the raw code others with Azure permission could then view. Thus, you can push this without redacting anything. If you want to get really fancy, store them with a secure string.
Bonus Material: Creating an App Registration for Use With Local Testing
Again, this is only for those with an interest in local testing as the above covers. To do this you need an App Registration and Secret Value. Here is how you make that.
Head to Azure Active Directory, choose App Registrations on the left, and create a New Registration.
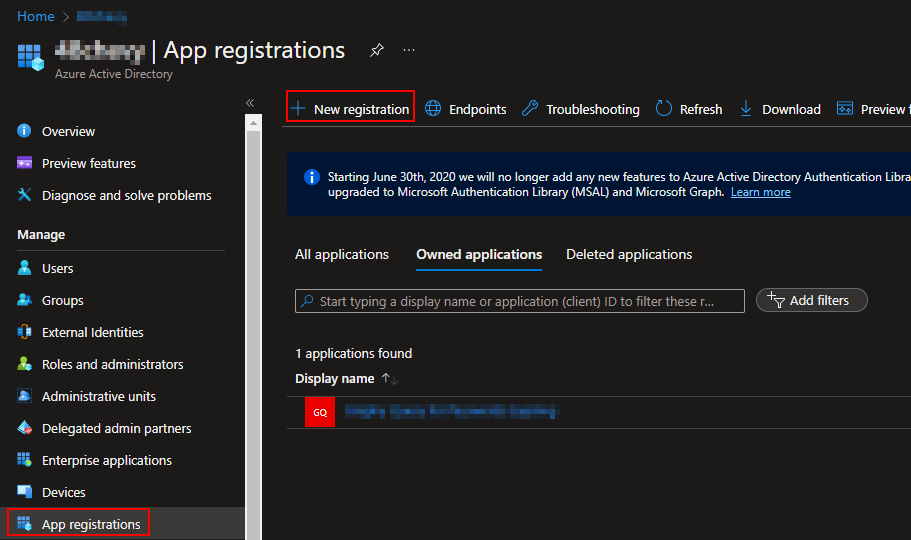
It will need a name, I will be using LocalDCRIngestionAPIToken. leave it as Single Tenant and hit Register.
This should automatically open you up to your new App Registration. Click API Permissions on the left and choose Add Permission.
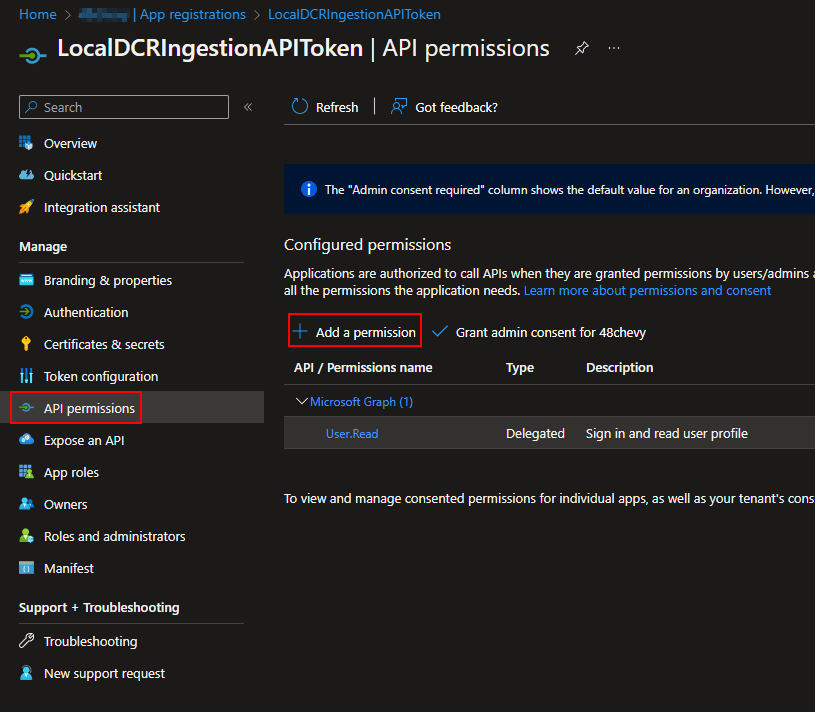
This will open a large and somewhat confusing menu. I can’t screenshot all of this but you should open up to the Microsoft API’s page. Near the top should be Microsoft Graph. Click on it.
Next it will ask if you need a Delegated or Application permission, choose Application.
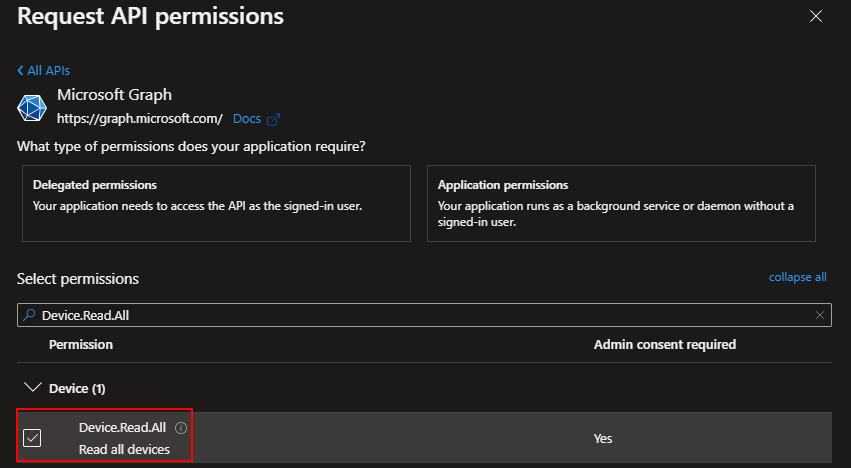
Locate Device.Read.All and add it using Add Permissions at the bottom.
You will then need to Grant Admin Consent for your tenant. Once granted the warning should be replaced with a happy green check.

You then need to go to Certificates & Secrets on the left and choose to New Client Secret.
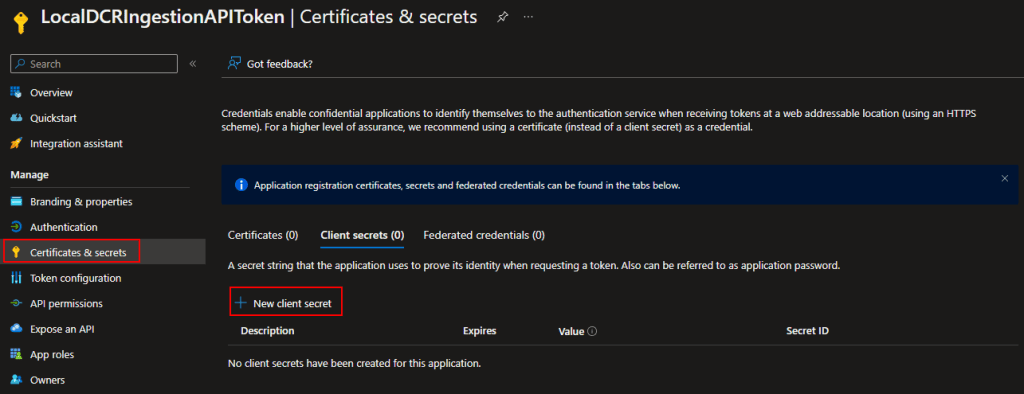
Give it a Description and pick an Expiration Date. This Secret will cease to function when the expiration is reached.
Then create the secret. You will then be presented with the Secret Value.
COPY THE SECRET VALUE NOW!
You can NOT retrieve the Secret Value at a later time. Save it somewhere safe! If not saved, you will have to make a new one. This is the AppSecret value for the CSV.

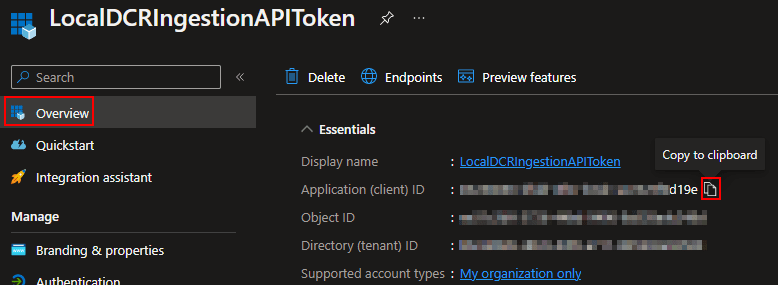
To get the App ID value for the CSV, change to the Overview and copy the Application (Client) ID.
You can then pop these values into the CSV. But, just like the Function App, there is one more permission your registration will need that we can’t yet grant.
Bonus Material: Local Testing Bugs
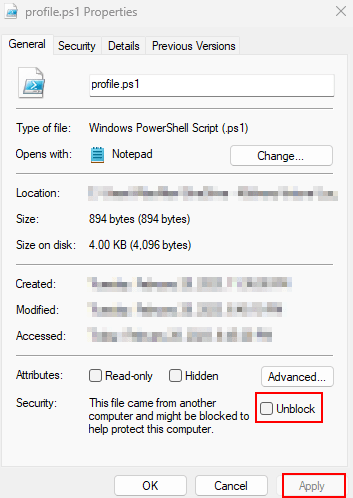
If you are trying to do local testing, you will probably run into this same problem I ran into while validating my own blog steps. It might crap out with a gigantic red error pointing to the Profile.PS1 file and the error “Exception: AuthorizationManager check failed.”
If this happens the answer is surprisingly simple if a pain to find an answer to. Just browse to your Porfile.ps1, right click it and go to Properties, and check the box to Unblock it and apply. This is what was preventing the script from running and once unblocked I was able to restart the local function and execute it without issue.
Troubleshooting:
For those looking for information on troubleshooting, that can be found in a future section (2.6). Check the index! While I considered putting it here, nobody following this series would yet be at a point where they can even attempt to run it to then even know if it’s working, let alone get the error codes.
FAQ:
I only have one of these so far.
Q: Do I need more than one Function App?
A: Possibly. They are hard coded to a single DCE so, if you need/want more than one DCE, you will need more than one Function App.
Conclusion:
At this point you should have a Function App up and ready for data, as well as possibly an App Registration should you be interested in local testing.
The Next Steps:
See the index page for all new updates!
Log Analytics Index – Getting the Most Out of Azure (azuretothemax.net)
Disclaimer:
The following is the disclaimer that applies to all scripts, functions, one-liners, setup examples, documentation, etc. This disclaimer supersedes any disclaimer included in any script, function, one-liner, article, post, etc.
You running this script/function or following the setup example(s) means you will not blame the author(s) if this breaks your stuff. This script/function/setup-example is provided AS IS without warranty of any kind. Author(s) disclaim all implied warranties including, without limitation, any implied warranties of merchantability or of fitness for a particular purpose. The entire risk arising out of the use or performance of the sample scripts and documentation remains with you. In no event shall author(s) be held liable for any damages whatsoever (including, without limitation, damages for loss of business profits, business interruption, loss of business information, or other pecuniary loss) arising out of the use of or inability to use the script or documentation. Neither this script/function/example/documentation, nor any part of it other than those parts that are explicitly copied from others, may be republished without author(s) express written permission. Author(s) retain the right to alter this disclaimer at any time.
It is entirely up to you and/or your business to understand and evaluate the full direct and indirect consequences of using one of these examples or following this documentation.
The latest version of this disclaimer can be found at: https://azuretothemax.net/disclaimer/
