Yes, this part is going to cover a lot. But, by the end of this you will actually have sample data being ingested to Log Analytics! Unfortunately, this process is one of those things that makes a lot more sense to do and then explain.
This information is all based on this article from Microsoft, and the sample data collection script itself is a slimmed down (and API / authentication updated) version of Intune Enhanced Inventory client-side script from Jan Ketil Skanke of the MsEndpointMGR team. For the sake of a generic guide, it’s easier to start small.
In this section we will cover…
- Creating Sample Data
- Creating your Table and DCR (Data Collection Rule)
- Granting DCR Permissions
- How to Verify DCR Permissions
- DCR Immutable ID
- Ingesting Your First Sample Data
- Troubleshooting – further section details under header.
- Conclusion
Creating Sample Data:
First, you need to download the SampleCollectionScriptV3.ps1 (Version 3!) from GitHub (triple dots in top-right, hit download). There may be other newer sample scripts by the time you read this, use V3!
Open this file up is Visual Studio Code and make sure you have the PowerShell Extension installed. At the top of this script, you will find a variety of variables to configure. Locate $WriteLogFile (line 49) and set it to $True. Then, run the script using F5.
You should get some output like…
writing log file
Log File Enabled – Not sending!
Next, browse out to C:\Temp\LogAnalytics. You will have two files here now.
- SampleCollection-Full.JSON
This file is the “full” JSON that would be sent to our Function App if your curious about how it’s formatted and the contents it has. If you are curious about the authentication information, you can read more about what that is here. - SampleCollection-RAW.JSON
This is going to be our sample data we use to create our DCR (Data Collection Rule) later.
Open up your DeviceData-RAW.JSON and you should see something like this.
{
    "ManagedDeviceName":  "User_Windows_Enrollment/date/time PM",
    "AzureADDeviceID":  "Azure Device ID",
    "ManagedDeviceID":  "Intune Device ID",
    "ComputerName":  "Computer-Name",
    "ActiveUser":  "Currently logged on user",
    "ComputerUpTime":  "Computer up time in days",
    "NetworkAdapters":  [
                            {
                                "NetInterfaceDescription":  "Intel(R) Wi-Fi 6 AX201 160MHz",
                                "NetProfileName":  "Network-Name",
                                "NetIPv4Adress":  "192.168.36.X",
                                "NetInterfaceAlias":  "Wi-Fi",
                                "NetIPv4DefaultGateway":  "192.168.36.X",
                                "MacAddress":  "XX-XX-XX-XX-XX-XX"
                            }
                        ],
    "ScriptVersion":  "3"
}
This file contains (and thus the script collects) the following information. This is not super exciting info but again it’s just the generic demo. More exciting stuff will come later.
- The Manage Device Name (as seen in Intune)
- Azure AD Device ID
- Managed (Intune) Device ID
- Computer Name
- Active User (runner of Explorer.exe)
- Computer Uptime (in days)
- The Network Adapter information for all adapters
- Script Version (So you know what version of the script caused that ingestion)
I will go into more detail on the script at a later time, for now just know that this is our sample data and the various fields we are collecting.
Warning: If your JSON is missing some of the data like the Azure/Intune ID’s, this must be resolved before moving on! First, try running the script as the user that enrolled the device into AAD. If that fails, try making that user a local admin and again running it as the user who enrolled the device. If that does not work, try running the script as an another Azure account with administrative privileges. If that still doesn’t work, see this blog to run it as System. You can’t progress without this data being properly filled in. Understand that deploying via Proactive Remediations uses the System account so, this is not a deployment blocker/concern.
Creating your Table and DCR:
Next, head to Azure and open up the Log Analytics Workspace you created.
Look for Tables on the left and choose Create, New Custom Log (DCR-Based).
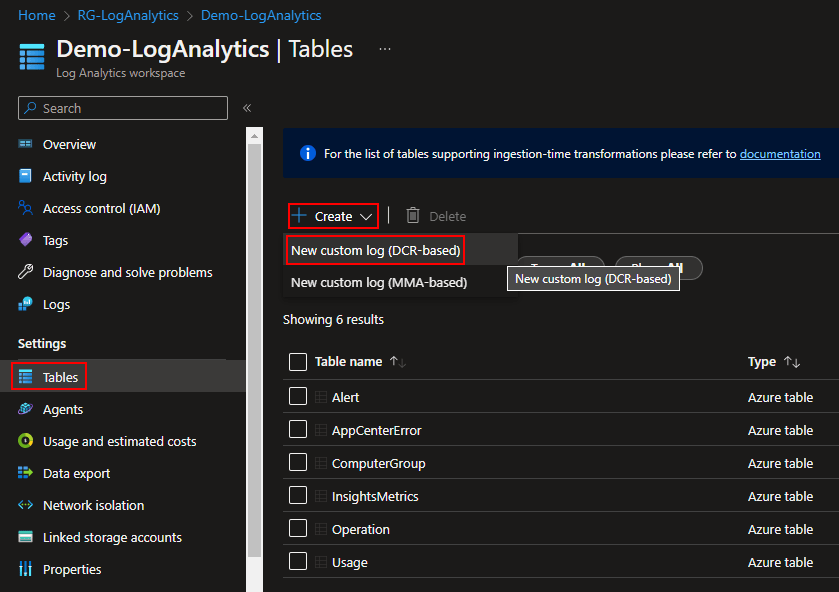
Give the Table a name and good Description. Know that whatever you name it will be appended with _CL for Custom Log. I will be naming mine SampleCollection and thus SampleCollection_CL will be the full name.
Under the Data Collection Rule, choose your existing Data Collection Endpoint we made in a prior article and, choose Create a new Data Collection Rule.
You will be prompted for a Subscription, Resource Group, and Name. This is the name of the Data Collection Rule and I would recommend naming it the same as the Table it will go with (in my case SampleCollection). This just keeps it easy to know what DCR goes to what Table.

Then, choose Done at the bottom to confirm the DCR information, and choose Next.
You will now be asked for a JSON file. Drag and drop the SampleCollection-RAW.JSON. Use the RAW file NOT the FULL file.
This teaches the DCR what columns to expect and what kind of data to expect in those columns. Additionally, you can create a transform to automatically change the data prior to passing it over for ingestion – this is not needed but good to know. You can edit this transform and columns at a later time but it’s not the easiest thing, that will be its own blog.
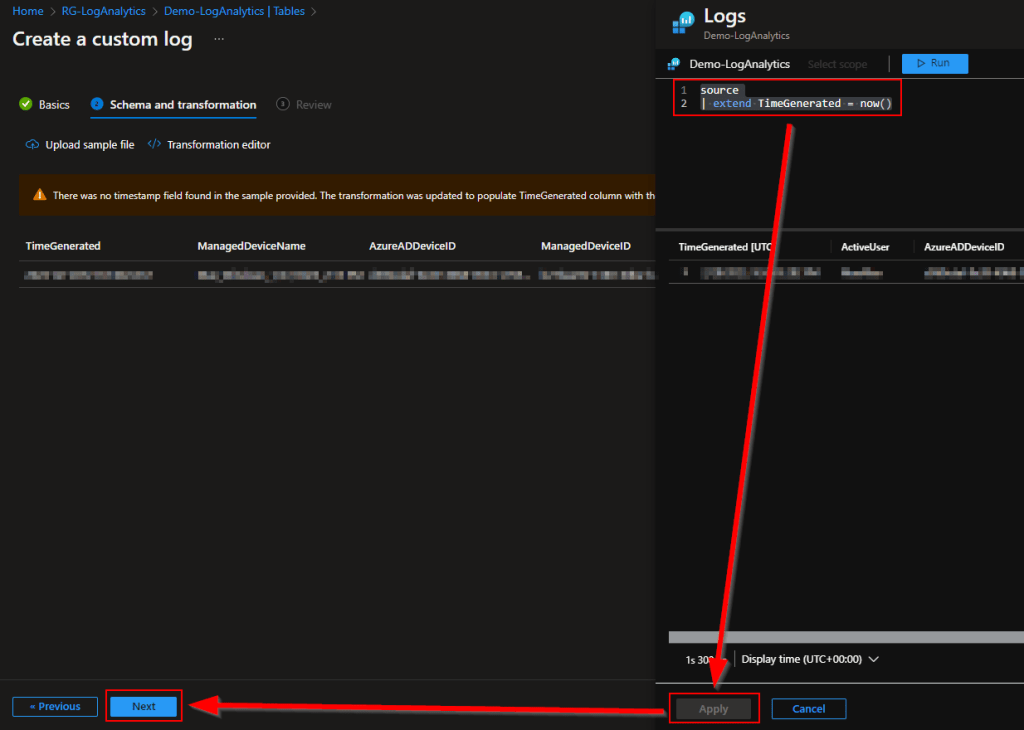
You should see your data appear similar to this.

You can see on mine that it reported a warning about the TimeGenerated column. This is expected however, I oddly see that it sometimes shows up as a warning and autofill’s a transform, and sometimes it errors and complains it’s missing.
If for some reason it’s ever missing (it won’t let you click next and the warning will be red), click Transform Editor and drop this in. This marks the TimeGenerated column (the timestamp of the data) as the server’s time (UTC) of data ingestion.
source
| extend TimeGenerated = now()
Once this is satisfied (or if it was already), press Next and Create. This will create your Table and DCR (Data Collection Rule).
You will then be kicked back to the Table view. Your new Table likely will not be there right away, it’s not instant. That’s okay, we have more to do in the meantime.
Granting DCR Permissions:
Now, we need to grant your Function app (and App Registration if you made one) permission to the DCR you just made. Without this they can’t upload the data.
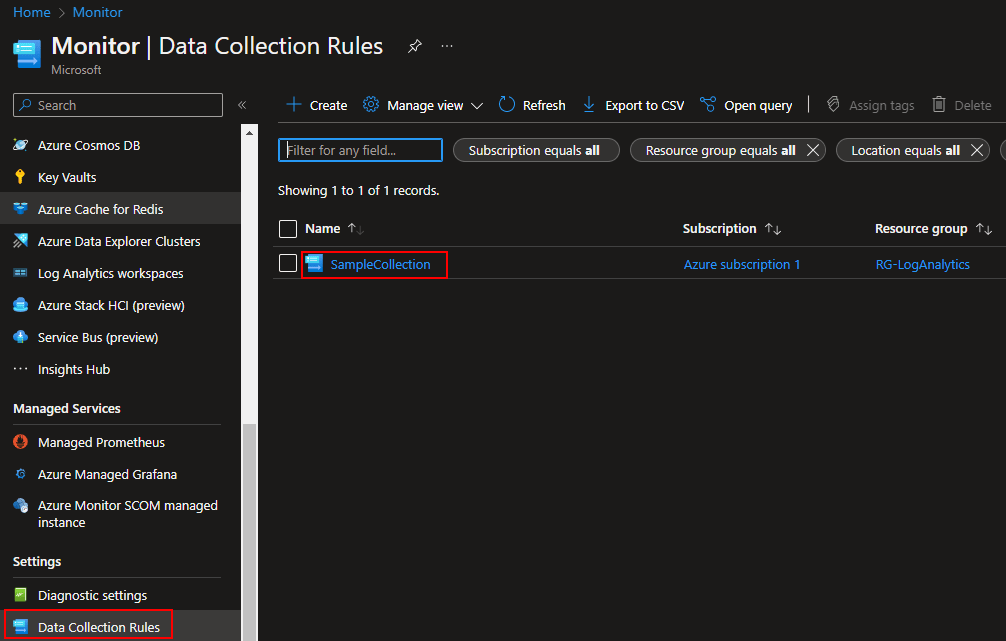
Head to the Azure Home and open up the Monitor view. You can use the search at the top to locate it if need be, it’s the little speedometer icon.
Way down on the left you need to find Data Collection Rules. I don’t know why these are not inside the DCE they are attached to, but they aren’t. Your DCR you just made should be quickly visible in here, click on it.
Locate Access Control (IAM) on the left and then choose Add Role Assignment.

Make sure it is set to Job Function Roles, search for and locate the role Monitoring Metrics Publisher, and choose Next at the very bottom.

To grant your Function App Permission:
The easiest route to find and select a Function app is by changing it to Managed Identity (1), choose Select Members (2), change to the Function App view (3), choose your function app (4) which will add it to the selected members section, and choose Select (5).

To grant permissions to an App Registration:
If you want to do local testing with the Function App (see previous article regarding the Function App) and made an App Registration, you will need to grant it permissions here as well.
To do so, leave it on User, group, or Service Principal (1) then choose Select Members (2). Now enter and select the name of your Application Registration if you made one (3/4), and choose Select (5).

Either route you went (Function App or App Registration), once complete, Choose Review + Assign and Review + Assign again to assign the permissions.
This is a step you have to do for every DCR you make. I recommend one DCR per every table, which means you need to do this every time you make a new Table.
How to Verify DCR Permissions:
This is mainly used for later troubleshooting if needed.
If needed, you can verify the permissions were appropriately applied by hitting the View option on the IAM menu.

The upper icon with the cloud is the app service plan of the Function App. The second item is the App Registration (Again, not everyone will have this, it’s for local testing only). Off to the right, we can see both of them have the Monitoring Metrics Publisher role.

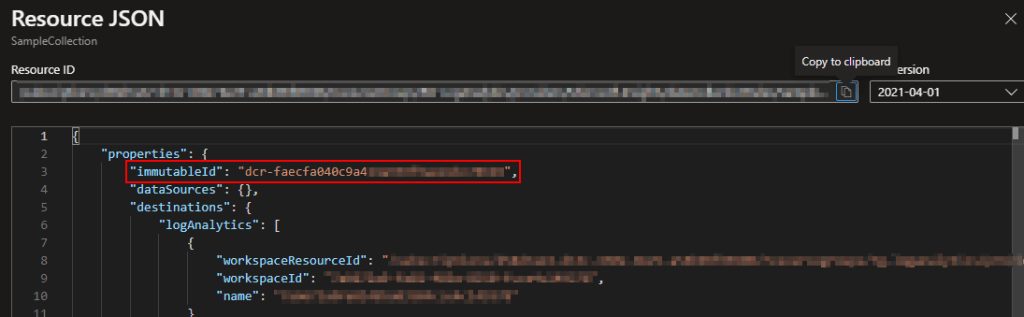
DCR Immutable ID:
We have one last thing we need to do while inside the DCR. Change back to the Overview view and select the JSON view in the top right.
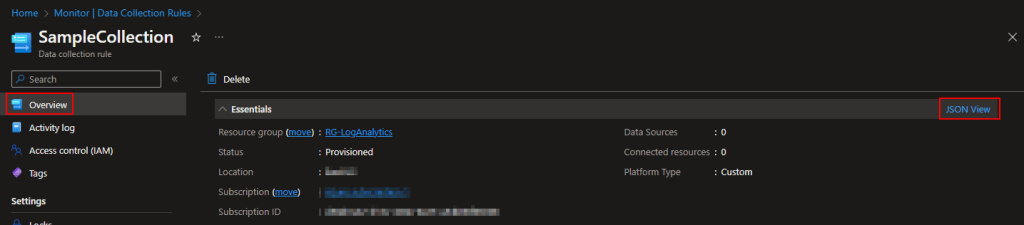
Next, look for an immutableId that should start with DCR-. Copy this somewhere safe as you will need it in the next step. This value is unique for every DCR.
Ingesting Your First Sample Data:
Alright, now we are back to the Sample Script. Again, make sure you are running the script as whatever account successfully generated all data earlier in the sample data creation. I would again recommend the user of Visual Studio Code with the PowerShell extension.
First things first, we need to talk about and configure some of the other variables near the top. There are comments around each variable to explain what they do but, here are the important ones you need to change now.
- $AzureFunctionURL – This the URL/URI to call your Function. See the previous blog if you are not sure how to get this.
- $Table – The full name (including _CL) of the table you just made. In my case, SampleCollection_CL.
- $DcrImmutableId – The ImmutableId you just collected from the DCR JSON.
- $WriteLogFile – Set this back to $False. If it’s false, that means upload the data. True is what we use to generate sample data JSON’s.
- $Delay – For the sake of this test, set this to $False. I would not deploy this in a False state, this is just for our testing.
- $LogName – This value actually doesn’t matter. Consider it a friendly log name. It’s used really only by LogControl which details can be found about in the prior blog.
Once these are set, run the full script with F5.
You should get an output like this…
Sending Payload...
InventoryDate:28-02 18:09  SampleCollector:OK @{LogName=DeviceData; Response=204: Upload payload size is .9Kb}
If you get an error, see the next article 2.6 which covers upload failure troubleshooting! That article can be found here or on the index here. It is worth knowing that permissions do take time to apply so if you are again speed running through this, you may just need to be patient. That said, it’s worth reviewing the errors and solutions in troubleshooting, then waiting if everything seems correct.
Your data now needs to ingest and perform first time column creation within the Table. This isn’t fast and seems to have some caching problems.
Eventually (5-10 minutes), you should be able to open up your Log Analytics Workspace and head to Logs, then type in the name of your Custom Table (mine is again SampleCollection_CL) and run the query. You should then see your data come back. I did two ingestions while testing this.
If you don’t see your data, restart your browser, clear cache, etc. You would think that these pages wouldn’t cache given they are letting you query a database of sorts, but they do, and they cache very oddly.

Troubleshooting:
Again, see the next article (2.6) here or at the index page here.
Congratulations and Conclusion:
You just successfully ingested your first bit of data!… Now what? Next, we need to cover how this collection scripts internals work, as well as discuss deployment of it via proactive remediations. Those are two items that actually go hand-in-hand and will be covered in the next blog(s).
The Next Steps:
See the index page for all new updates!
Log Analytics Index – Getting the Most Out of Azure (azuretothemax.net)
Disclaimer:
The following is the disclaimer that applies to all scripts, functions, one-liners, setup examples, documentation, etc. This disclaimer supersedes any disclaimer included in any script, function, one-liner, article, post, etc.
You running this script/function or following the setup example(s) means you will not blame the author(s) if this breaks your stuff. This script/function/setup-example is provided AS IS without warranty of any kind. Author(s) disclaim all implied warranties including, without limitation, any implied warranties of merchantability or of fitness for a particular purpose. The entire risk arising out of the use or performance of the sample scripts and documentation remains with you. In no event shall author(s) be held liable for any damages whatsoever (including, without limitation, damages for loss of business profits, business interruption, loss of business information, or other pecuniary loss) arising out of the use of or inability to use the script or documentation. Neither this script/function/example/documentation, nor any part of it other than those parts that are explicitly copied from others, may be republished without author(s) express written permission. Author(s) retain the right to alter this disclaimer at any time.
It is entirely up to you and/or your business to understand and evaluate the full direct and indirect consequences of using one of these examples or following this documentation.
The latest version of this disclaimer can be found at: https://azuretothemax.net/disclaimer/
