Here is a scenario: You might need to update an app, say a very critical app like a VPN application, and make sure you do it at a time that won’t interrupt the user.
Unfortunately, Intune is not really capable of scheduling app deployments. You won’t be able to say “install this app only between 9 PM at 7 AM” or anything fancy like that. You can make the app available at a certain time, but that doesn’t really do anything other than control the earliest devices can start to install it.
You could use PowerShell and add some logic to the app that makes it not run if the app is in use with something like this, which will only proceed through the script if Adobe Reader is currently not in use…
#Verify Adobe Reader is not running
if (Get-Process AcroRd32){
write-host "Acrobat Reader is currently running!"
Add-Content 'C:\temp\log.txt' "$(get-date): Adobe Reader (AcroRd32) is currently running - Cancelling update!" -Force
exit 1
} else {
$date = Get-Date
Add-Content 'C:\temp\log.txt' "$(get-date): Adobe Reader (AcroRd32) is NOT currently running, continuing." -Force
}
…But, that doesn’t really work for service-based apps, again like a VPN application. So, what can you do?
Your best bet is to kick them off at startup of the machine. That way, it’s either done by the time the user logs in or, it will be done as quickly as it can be and at least we won’t have interrupted them.
But, how on earth do you configure a Win32 app to run at startup? The answer is you don’t, at least not through Intune. Instead, we have to get a little bit tricky and do some of our own PowerShell.
Overview:
In order to accomplish this, we will have Intune deploy a package to the machine. I call this first script the “Drop” script as it will drop the update/install media to a temporary location, drop a script to execute that media, and create a scheduled task to run that script at next startup. Intune will then be set to require a soft reboot for the app and will thus not run detection immediately.
On next startup, the task runs the script we dropped, installs the app/update using the media we dropped, verifies the app installed, cleans up the install media, and deletes the scheduled task. The only thing left behind was the script used to execute the install and any log files you made. Optionally you might also place an uninstaller.
Please know: If you need to be capable of scratch installing this app, especially during ESP, you’re going to need a second package capable of installing the app immediately but only when the app isn’t present, and your upgrade should only be capable of running when the app is present.
Easier said than done.
Drop Script Example:
Obviously, this is going to require an example. That can be found at my GitHub here, please make sure you grab it so you can follow along with this explanation. Unfortunately, I had to pull the MSI out of the example as it was too large. You can grab a 64-bit Firefox MSI here and will just need to adjust the version numbers and MSI to execute in the script(s). Details to follow.
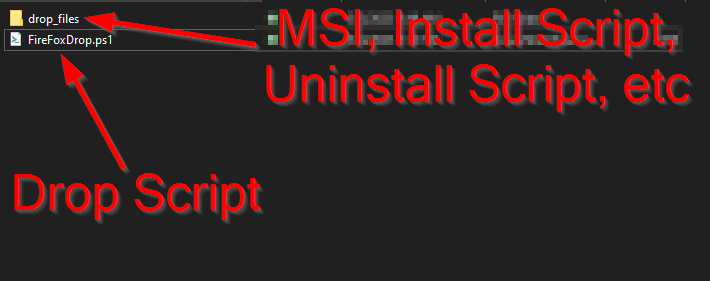
First, let’s talk about the structure of this package. At the root level, AKA the level you would want to point to when running the package utility, we have the FireFoxDrop.ps1 and a Drop_Files folder. Everything else is inside that Drop_Files folder.
Go ahead and open the drop script. Let’s take a look at what this code does section by section. I will put the section of code being discussed under the explanation however, I highly suggest you open the code in your own editor as it will be much easier to read than on the website.
First, we have a large section to establish our various paths to be used in the script. We have our Common Log Path which is the place you will use to then house logs created by all your Intune Apps, scripts, etc. I am using C:\Windows\AzureToTheMax as my common location.
Second, we establish the folder inside our Common Log location that this specific script will use to store logs and files. Here I used Firefox so, all logs and items created/stored by this script will be placed in C:\Windows\AzureToTheMax\Firefox.
Lastly, we pick the name of the log file itself. I chose Firefox-At-Startup.log so all logs this script makes will be stored in C:\Windows\AzureToTheMax\Firefox\Firefox-At-Startup.log.
You can see just below these variables how I then combine them to create the more complete storage and logging path we will need. These variables save us from having to punch these values in all over the script and instead make these locations dynamic and easily adjustable.
#Common log folder path
$CommonLogPath = "C:\Windows\AzureToTheMax"
#Individual log folder
$IndividualLogPath = "Firefox"
#Log File
$LogFile = "Firefox-At-Startup.log"

$FullLogPath = "$($CommonLogPath)\$($IndividualLogPath)"
$FullLogFile = "$($CommonLogPath)\$($IndividualLogPath)\$($LogFile)"
Next, we create our common storage directory and individual storage directories if needed. The directories will then be hidden automatically.
#Create storage dirs if needed
if (Test-Path $CommonLogPath) {
    write-host "Common log folder Folder exists already."
    } else {
    New-Item $CommonLogPath -ItemType Directory -ErrorAction SilentlyContinue > $null
    $folder = Get-Item "$CommonLogPath"
    $folder.Attributes = 'Directory','Hidden'
    }

    if (Test-path $FullLogPath) {
    write-host "$($FullLogPath) Folder exists already."
    } else {
    New-Item $FullLogPath -ItemType Directory -ErrorAction SilentlyContinue > $null
    $folder = Get-Item $FullLogPath
    $folder.Attributes = 'Directory','Hidden'
    }
Now that we have our storage directories, we can begin to log to our file. We also go ahead and copy anything inside of Drop_Files to the storage folder (C:\Windows\AzureToTheMax\Firefox).
Add-Content "$($FullLogFile)" "

$(get-date): Firefox install dropping on $($env:COMPUTERNAME)" -Force


#Copy all the files
Copy-Item ".\drop_files\*" "$($FullLogPath)"
Next, we create our scheduled task. This one is set to…
- Run at startup
- Use the System account
- Run as Administrator
- Don’t allow the task to be run on demand
- Allow the task to start even if the machine is on battery
- Don’t kill the task if the machine changes to battery mid-run
- Don’t stop because the machine is no longer idle
We name the task “Firefox Install” and feed it the argument to launch PowerShell and point it to our dropped script. Don’t try to use a variable in the path to the run/install script! This does need to be manually adjusted should you change the storage path! If you want to follow along and have downloaded a Firefox MSI, you will likely need to adjust this!
#Create the scheduled task
$action = New-ScheduledTaskAction -Execute 'Powershell.exe' -Argument '-NoProfile -WindowStyle Hidden -executionpolicy bypass "C:\Windows\AzureToTheMax\FireFox\FireFox-Install.ps1"'
$trigger = New-ScheduledTaskTrigger -AtStartup
$principal = New-ScheduledTaskPrincipal -UserID "NT AUTHORITY\SYSTEM" -LogonType ServiceAccount -RunLevel Highest
$conditions = New-ScheduledTaskSettingsSet -DisallowDemandStart -AllowStartIfOnBatteries -DontStopIfGoingOnBatteries -DontStopOnIdleEnd
Register-ScheduledTask -TaskName "Firefox Install" -Action $action -Trigger $trigger -Principal $principal -Settings $conditions
And lastly we make a log and exit always with zero.
#Log it
Add-Content "$($FullLogFile)" "$(Get-Date): Firefox drop complete on $($env:COMPUTERNAME)" -Force

exit 0
After running this, we have our install script and install media along with an uninstall script sitting in our storage location and, a task is created to kick off our install script on next startup.
Install Script Example:
Now, go ahead and open the drop_files folder and locate the Firefox-Install.ps1 inside and open that.
This script may look scary but, it really does just two things…
- Run the install
- Delete the scheduled task and install media
However, I like to take measures to ensure that those two things are successful.
Please understand: You could most definitely eliminate and simplify portions of this script. My goal here is to provide one that is very complicated and thus should meet even the most complex needs such that you can strip it down to only what you need.
We have the same set of storage/path variables as before, no need to recover those. However, we do have some new variables now too.
- $AppName needs to be the exact DisplayName of the app as seen in the registry. That can be found in the below locations. You will have to find the key corresponding to your app, and inside that will be these values.
32-Bit apps: Computer\HKEY_LOCAL_MACHINE\SOFTWARE\WOW6432Node\Microsoft\Windows\CurrentVersion\Uninstall
64-Bit app: Computer\HKEY_LOCAL_MACHINE\SOFTWARE\Microsoft\Windows\CurrentVersion\Uninstall - $AppVersion needs to be the exact DisplayVersion of the app as seen in the registry. You will find this in the same location. If you want to follow along and have downloaded a Firefox MSI, you will likely need to adjust this!
- $ProcessName needs to be the name of the process of the app. This can be a bit tricky and may require some testing to figure out, more on this later.
- $MSIBusySleepTime is how many seconds you want to wait if the MSI Installer is busy. More on this later.
#Registry app name
$AppName = "Mozilla Firefox (x64 en-US)"
#Registry App version
$AppVersion = [Version]"112.0.2"
#Executable name
$ProcessName = "firefox"

#How long to sleep is MSIExec is busy
$MSIBusySleepTime = 30
Like last time, we create our storage directories. They should obviously already be there, but having it go again won’t hurt anything.
We then have the Function CheckMSIStatus, I won’t paste the full function here but in short, the MSI Installer can only do one operation at a time and could thus be busy. This function checks to see if it’s available and will wait until it is. More about this can be found in this article.
We then begin to log again to our log file, noting the process has started.
We then check to see if the process name provided is running, and if it is we kill it. As apps like Firefox can have a dozen PIDs just for one visible instance, we have to cycle through the array of PIDs and end them all.
You will likely need to install and launch the app and can then test to make sure you have the right process name by running “Get-process name” and making sure it finds it. You can also just run this section of code to then make sure it correctly ends it.
#Kill FireFox - cycles through all instances.
#Use this to verify a process is not running or kill it if it is.
if (Get-Process $ProcessName){
    write-host "$($ProcessName) is currently running!"

    Add-Content "$($FullLogFile)" "$(get-date): $($ProcessName) is currently running! Ending process(s)!" -Force
    Get-Process $ProcessName | ForEach-Object {
    write-host $_.ID
    Stop-Process -Id $_.ID -Force
    }

    } else {
    Add-Content "$($FullLogFile)" "$(get-date): $($ProcessName) is NOT currently running. Continuing." -Force
    }
Next, we call our CheckMSIStatus to make sure the MSI installer is available. It will verify it’s available, or wait until it is, then proceed to our next steps in the script to log the start of the MSI and execute the MSI. We then log when the MSI is complete.
#Check for busy MSI
CheckMSIStatus
#Upgrade or install Anyconnect Core
Add-Content "$($FullLogFile)" "$(get-date): Firefox MSI starting." -Force
Start-Process -FilePath "$($FullLogPath)\FireFoxSetup.msi" -ArgumentList "/qn" -Wait
Add-Content "$($FullLogFile)" "$(get-date): Firefox MSI complete." -Force
We briefly sleep to ensure everything is complete and then we actually run a fancy detection section using the provided app name and version. This will check that the app we desired, either 32-bit or 64-bit, was indeed installed and that its version is greater than or equal to the number we provided.
I learned after re-inventing this wheel it’s the same logic OG Patch My PC often used, at least in terms of locating apps. Oh well, I learn a lot from re-inventing things.
#verify install worked
#32-Bit
$value1 = (Get-ChildItem 'HKLM:\SOFTWARE\WOW6432Node\Microsoft\Windows\CurrentVersion\Uninstall\*') | Get-ItemProperty -name 'DisplayName' -ErrorAction SilentlyContinue
$value2 = $value1 | Where-Object {$_."Displayname" -eq "$($AppName)"} | Select-Object PSChildName -ErrorAction SilentlyContinue
$value2 = $value2.PSChildName

    If ($value2 -eq $null){
        Add-Content "$($FullLogFile)" "$(Get-Date): No 32-bit $($AppName) found." -Force

    } Else {
    $value2 | ForEach-Object -Process {
    $value3 = "HKLM:\SOFTWARE\WOW6432Node\Microsoft\Windows\CurrentVersion\Uninstall\" + "$($_)"
    $value4 = Get-itemproperty $value3 -name "displayversion"
    $ver = $value4.displayversion

    $value5 = Get-itemproperty $value3 -name "DisplayName"
    $ProgramName = $value5.DisplayName

        #Verify app is now right verion or greater
        if ($ver -ge $AppVersion){
        Add-Content "$($FullLogFile)" "$(Get-Date): 32-Bit App found and version check passed.
        AppName: $($ProgramName)
        MSI code: $($_)
        Version: $($ver)" -Force

        Add-Content "$($FullLogFile)" "$(get-date): $($AppName) install successful!"
        $tracked = $tracked + 1

        } else {
        Add-Content "$($FullLogFile)" "$(get-date): No 32-Bit app found."

        }
    }
}

#64-Bit
$value1 = (Get-ChildItem 'HKLM:\SOFTWARE\Microsoft\Windows\CurrentVersion\Uninstall\*') | Get-ItemProperty -name 'DisplayName' -ErrorAction SilentlyContinue
$value2 = $value1 | Where-Object {$_."Displayname" -eq "$($AppName)"} | Select-Object PSChildName -ErrorAction SilentlyContinue
$value2 = $value2.PSChildName

If ($value2 -eq $null){
    Add-Content "$($FullLogFile)" "$(Get-Date): No 64-bit $($AppName) found." -Force
} Else {
$value2 | ForEach-Object -Process {
$value3 = "HKLM:\SOFTWARE\Microsoft\Windows\CurrentVersion\Uninstall\" + "$($_)"
#write-host "Value3 = $($value3)"
$value4 = Get-itemproperty $value3 -name "displayversion"
$ver = $value4.displayversion

$value5 = Get-itemproperty $value3 -name "DisplayName"
$ProgramName = $value5.DisplayName

        #Verify app is now right verion or greater
        if ($ver -ge $AppVersion){
            Add-Content "$($FullLogFile)" "$(Get-Date): 64-Bit App found and version check passed.
            AppName: $($ProgramName)
            MSI code: $($_)
            Version: $($ver)" -Force

            Add-Content "$($FullLogFile)" "$(get-date): $($AppName) install successful!"
            $tracked = $tracked + 1

            } else {
            Add-Content "$($FullLogFile)" "$(get-date): No 64-Bit app found."

            }
}
}
Only if the app was found and version correct, we then delete the install media, delete our scheduled task, and end the script.
If we did NOT find the app, we do NOT delete the task or install media. This way, since it seems the install failed, it will be already staged to run again at next startup.
You could remove this logic and simply make it always delete the media and task. Worst case, it will fail, Intune will see it’s missing, and Intune will re-run the drop and stage it to go again (assuming the app is required).
#Only if the app was found do we perform cleanup and complete correctly.
if ($tracked -ge 1){
    Add-Content "$($FullLogFile)" "$(Get-Date): App detected, cleanup starting." -Force

    #remove items
    Remove-Item "$($FullLogPath)\FireFoxSetup.msi" -Force

    start-sleep -Seconds 3

    #remove scheduled task
    Unregister-ScheduledTask -TaskName "Firefox Install" -Confirm:$false

    Add-Content "$($FullLogFile)" "$(get-date): Cleanup complete on $($env:COMPUTERNAME).
Ending." -Force

    exit 0

} else {
    Add-Content "$($FullLogFile)" "$(Get-Date): Failure: Tracked staus indicates failure to detect app. Cleaup will not proceed!" -Force
    exit 1

}
Uninstall Script Example:
I won’t cover this, feel free to take a look at the one I provided as it’s rather fancy too.
However, I want to note that this can/should be dropped into our storage location that way it can be called to at a later time. You could also just directly plug in the uninstall command for the app into Intune assuming its simple (Which Firefox is). Again, I am aiming for fancy and allowing you to dumb it down as you see fit.
Packaging it for Intune:
You will need to wrap this into an IntuneWin file. The folder to package is the root “Firefox at startup” and the installer to point to is the FireFoxDrop.ps1.
Go ahead and head into the new Win32 app in Intune, hopefully anyone reading this knows how to do that already. There isn’t anything important on the App Information page.
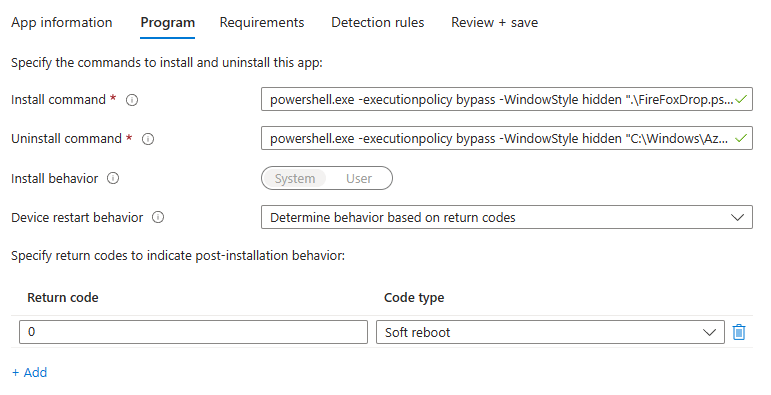
Program:
- An install command like: powershell.exe -executionpolicy bypass -WindowStyle hidden “.\FireFoxDrop.ps1”
- An uninstall command like: powershell.exe -executionpolicy bypass -WindowStyle hidden “C:\Windows\AzureToTheMax\Firefox\Firefox-uninstall.ps1”
This is calling to the local uninstall that was dropped. Again, you could alter this to just a direct uninstall command if it’s simple. - Very importantly, you need to set the app to run off of return codes and you need to set code zero to a soft reboot. This is what makes the app always require a reboot and thus Intune not run detection until after that reboot.
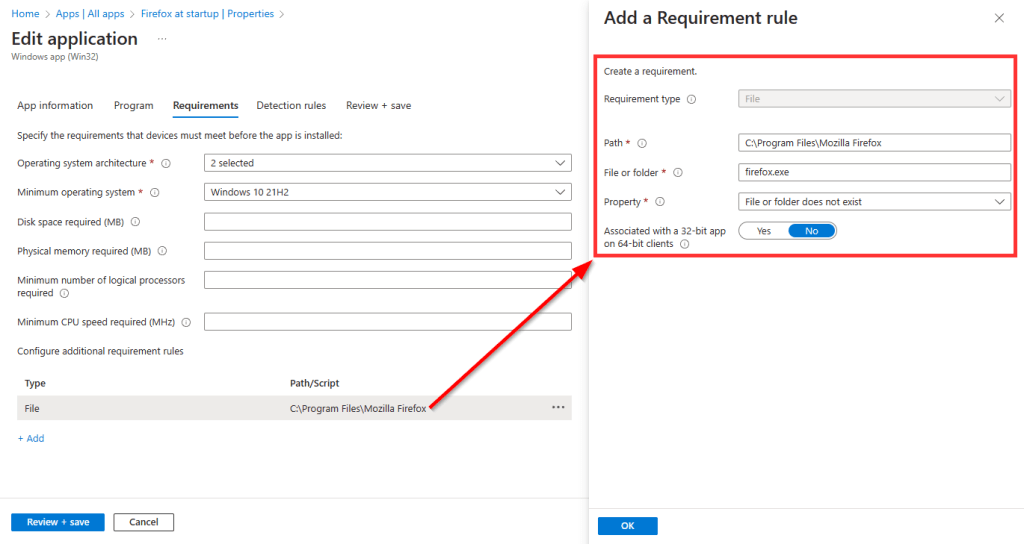
Requirements:
This depends on your circumstances however, typically, the only time I worry about installing at startup is when I am doing an update. The only time to do an update is when the app already exists so, I have a requirement set that the app must exist by simply looking for the EXE.
Note: If making a secondary scratch install package which runs immediately rather than at startup, this is where you would instead say that the file must NOT exist.
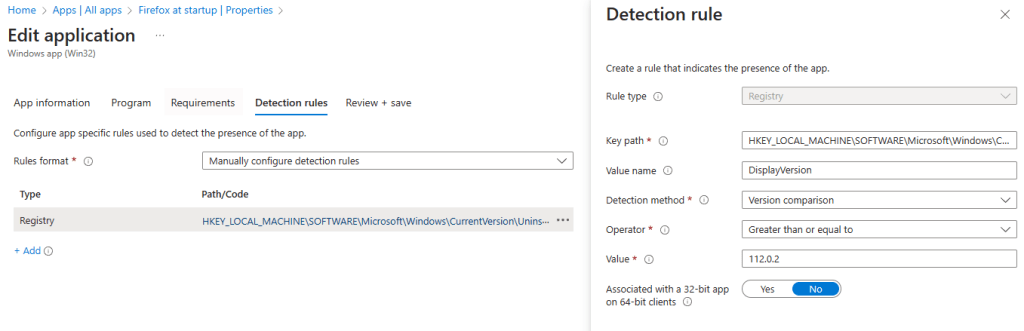
Detection:
Get as fancy or not fancy as you want here. I plan to release some fancy ways of doing this in the coming days. For now, I am just looking at the Firefox DisplayVersion just like on the check during the install. This works nicely as Firefox has a static registry path (doesn’t use MSI code in path).
And that’s about all there is to this.
Detection:
I do want to have a quick discussion regarding Intune detection. This will take place shortly after the restart. It’s not typically instant but, if your installer is slow enough and Intune is fast enough, Intune could potentially notice that the app is missing and briefly changed to a failed status.
That said, required apps have some delay (not documented) before they try again and, they always run detection before anything else to first verify again that the app is not there. So, there should never be a scenario where Intune re-runs the package and weird things happen because the initial detection failed – assuming your install doesn’t take 3 hours.
Running It:
Covering this again with hindsight knowledge…
- You install the app or have it forced upon you.
- The drop script runs.
- The directories are made.
- The log starts.
- The files are dropped in place.
- The scheduled task is created.
- The script exits and Intune detects this as reboot required.
- Reboot happens.
- Startup script runs the dropped install script at startup.
- Logging starts.
- Processes are detected and stopped.
- MSI exec is checked to make sure it’s not busy.
- Install happens.
- Detection happens (inside the install script)
- If found, the media is cleaned up and scheduled task deleted.
- If not found, the task and media is left alone so it can run (As it seems to have failed.)
- Intune detection is ran to locate the app.
- App changes to a success status
And this is what a successful log looks like.
05/04/2023 20:40:55: Firefox install dropping on Your-PC
05/04/2023 20:40:58: Firefox drop complete on Your-PC


05/04/2023 20:42:10: Firefox install starting on Your-PC
05/04/2023 20:42:10: Firefox is NOT currently running. Continuing.
05/04/2023 20:42:10: MSI Installer is NOT busy! Proceeding.
05/04/2023 20:42:10: Firefox MSI starting.
05/04/2023 20:42:30: Firefox MSI complete.
05/04/2023 20:42:30: Firefox install complete on Your-PC
05/04/2023 20:42:33: No 32-bit Mozilla Firefox (x64 en-US) found.
05/04/2023 20:42:33: 64-Bit App found and version check passed.
            AppName: Mozilla Firefox (x64 en-US)
            MSI code: Mozilla Firefox 112.0.2 (x64 en-US)
            Version: 112.0.2
05/04/2023 20:42:33: Mozilla Firefox (x64 en-US) install successful!
05/04/2023 20:42:33: App detected, cleanup starting.
05/04/2023 20:42:43: Cleanup complete on Your-PC.
Ending.
Conclusion:
You should now have a solid tool belt to go forth with and make your own startup packages. Happy scripting!
Disclaimer
The following is the disclaimer that applies to all scripts, functions, one-liners, setup examples, documentation, etc. This disclaimer supersedes any disclaimer included in any script, function, one-liner, article, post, etc.
You running this script/function or following the setup example(s) means you will not blame the author(s) if this breaks your stuff. This script/function/setup-example is provided AS IS without warranty of any kind. Author(s) disclaim all implied warranties including, without limitation, any implied warranties of merchantability or of fitness for a particular purpose. The entire risk arising out of the use or performance of the sample scripts and documentation remains with you. In no event shall author(s) be held liable for any damages whatsoever (including, without limitation, damages for loss of business profits, business interruption, loss of business information, or other pecuniary loss) arising out of the use of or inability to use the script or documentation. Neither this script/function/example/documentation, nor any part of it other than those parts that are explicitly copied from others, may be republished without author(s) express written permission. Author(s) retain the right to alter this disclaimer at any time.
It is entirely up to you and/or your business to understand and evaluate the full direct and indirect consequences of using one of these examples or following this documentation.
The latest version of this disclaimer can be found at: https://azuretothemax.net/disclaimer/
