Hyper-V is a wonderful thing, as I really don’t like having 16 laptops and chargers around me to perform testing on. No, I much prefer creating a VM, using checkpoints, blowing them up, and recreating them or reverting them as needed.
For a long time, I had a simple process to create Golden Images for Hyper-V Windows endpoint Lab testing, largely for Autopilot and Intune testing, and that process resulted in a simple means to create new VMs for testing from said image. Sadly, that process recently broke, forcing me to find some answers and a new solution.
In this article, I will cover my personal history with this topic, what broke, and the new solution I have determined to move forward with. I’m willing to bet I did a little wheel re-inventing here, but it was a fun learning experience!
- How It Used to Work
- How It Broke
- The Microsoft Case
- Surely There Is a Better Way?
- It’s Never That Easy
- Changes to .Net Assemblies
- It Works (Running the Script)! – Skip here for download.
- The End Result
- FAQ and Known Issues
- Conclusion
How It Used to Work:
I’ll be very honest in saying that this is one of those processes that someone gave to me, and I followed without question because it worked. Where the person who gave it to me got it from, and how concrete that instruction was, I have no idea.
The old process to create a golden image from scratch was to…
- Get an ISO
- Create a new Hyper-V machine with said ISO attached
- Install Windows from the ISO
- Boot to the OOBE and get an Internet Connection
- Run Windows Updates via PowerShell to get the machine fully updated
- Install any needed apps (a step I never did, but could be done)
- Run “
%WINDIR%\system32\sysprep\sysprep.exe /generalize /shutdown /oobe/Mode:VM” to generalize and shut down the machine - Mount the VHDX file
- Drop files onto the machine (like the get-autopilothardwarehash script)
- Unmount the VHDX
This is now your Golden Image VHDX file. Simply copy and paste it, then attach the new VHDX copy to a new VM, and boot it, to create a new VM in seconds.
You could also always boot back into the initial VHDX file, re-run Windows Update, and shut it back down with Sysprep to re-update the image whenever needed.
How It Broke:
In the spring of 2024, while attempting to create a new image from scratch with the above process, everything went fine… Until I attempted to reset a machine born from that image.
Instead of restarting and entering the reset (Resetting this PC XX%), the machine booted to WinRE. If I let it boot back to Windows, I got a message indicating that “There was a problem resetting your PC, no changes were made.” This happens whether you initiate this as an Intune Wipe, a local reset (both for Cloud download or using local media), or right from within WinRE where the error is “There was a problem resetting your PC.”
WinRE attempts to use the reset option:

Post-failure login message from attempting a Wipe or Settings Menu reset:

At first, I thought this was an ISO problem, so I tried a 24H2 ISO from February, March, and April, and the problem existed in each version. Then I thought it was a me problem, so I contacted some friends who follow the same process, and they all had the same problem. Further testing revealed that this wasn’t an issue on new 23H2 ISO’s, nor on devices upgraded from 23H2 to 24H2, and I don’t believe on the initial 24H2 ISO, but has been in more recent ISO’s of 24H2.
So, I began thinking this was some sort of WinRE problem in recent ISOs, and fell down a rabbit hole of repairing WinRE that looked like this…
- Boot the VM and attach the ISO
- Take the ISO, extract it, and copy the Install.wim from inside sources to C:\Temp
- Mount the ISO
DISM /mount-wim /wimfile:C:\temp\install.wim /index:X /mountdir:C:\temp\mount
Determine the mount index value with
DISM /get-wiminfo /wimfile:C:\temp\install.wim
- Copy the Winre.Wim from within the ISO to the
COPY C:\temp\mount\Windows\System32\Recovery\winre.wim C:\Recovery\WindowsRE\Winre.wim - DISM /unmount-wim /mountdir:C:\temp\mount /commit
- Run the Reagentc commands to set up the new WinRE
reagentc /disable
reagentc /setreimage /path C:\Recovery\WindowsRE
reagentc /enable
reagentc /info
And guess what, it didn’t work! So, I figured this was some sort of Microsoft bug, which I figured before, but now I needed help as I didn’t see a way forward.
Note: For anyone who asks, no, I never found a way to fix existing machines with this issue. I had to blow all those VMs away and recreate them with my new process.
The Microsoft Case:
So, I opened a Microsoft Case and it did not go very far. Turns out, if you actually read the Sysprep documentation…
“To generalize an image, you have to first boot into Audit Mode.”
…It’s very clear that you should not run Sysprep and generalize an image from OOBE, only from Audit mode. As my process did not involve booting into Audit mode, it was not supported, so the fact that it stopped working is a SOL issue.
Okay, so lets boot into Audit mode, that’s gets us a working VHDX file too!…. right? No, wrong. Step 4, “After the computer shuts down, capture your image with DISM.” And what does that entail? Well, the actual name of the article that links to is “Capture and apply a Windows image using a single .WIM file.” So we get a WIM file, not a VHDX file.
Okay… so, I guess we could…
- Get an ISO
- Create a new Hyper-V machine with said ISO attached
- Install Windows from the ISO
- Boot to the OOBE
- Reboot into Audit mode
- Run Windows Updates to get the machine fully updated (need to get on the internet)
- Install any needed apps (a step I never did, but could be done)
- Run “
%WINDIR%\system32\sysprep\sysprep.exe /generalize /shutdown /oobe/Mode:VM” to generalize and shut down the machine - Convert our now generalized image to a WIM with DISM
- Plop the WIM into an ISO
- Generate an answer file for the ISO
- And alter a script to automatically create the VM, attach the ISO as the first boot method, boot the VM, let the answer file install the OS, and then the VM should land at OOBE.
And that idea is what I proposed to Microsoft, and they gave me the thumbs up.
Surely There Is a Better Way?
The above process is much more complicated to do (create or update the image), and much longer to perform (new VM creation now has to install the OS). Looking for a better way is a question I brought to MMS, and after hearing a lot of talk about Sysprep, I decided to ask that presenter about the process I had and the problem I ran into.
His advice was to use Nerdile’s Convert Windows Image to change the ISO or WIM file to a bootable VHDX file. So, now with hindsight vision, that process would look like…
- Get an up to date ISO
- Optionally, you could use DISM to mount the WIM and make changes such as adding scripts/files/etc now.
- Use Nerdile’s Convert Windows Image to change the ISO or WIM file to a bootable VHDX file.
- Or, optionally, mount the output VHDX to drop the scripts now.
And that’s it! Because this process never involves actually booting the ISO, we don’t need to worry about generalizing it, and thus no need to Sysprep. Awesome!
It’s Never That Easy:
So, after a long day working on this, I have learned that Nerdile’s script is a fork of the original Convert-WindowsImage made by Microsoft some unknown years ago. Long ago, Microsoft stopped updating that tool and the original project is now gone. Nerhile themselves hasn’t updated their copy in 8 years (December 17th, 2017). And guess what, It doesn’t work anymore.
Some googling revealed other, more recent attempts to update this same script, like Hyper-ConvertImage on the PS Gallery. Unfortunately, when I attempted to run it, I fell upon the same errors.
Changes to .Net Assemblies:
I ended up working from Nerhile’s project simply because that’s the one I knew of first from the original reference at MMS. I later found newer versions, like the one above mentioned in the PS Gallery, but only hindsight is 20-20 and so far I’ve been to do what I wanted regardless. In any case, attempting to execute it would barf dozens of errors such as…
error CS0234: The type or namespace name 'RegularExpressions' does not exist in the namespace 'System.Text' (are you missing an assembly reference?) using System.Text.RegularExpressions;

 error CS1069: The type name 'XDocument' could not be found in the namespace 'System.Xml.Linq'. This type has been forwarded to assembly 'System.Xml.XDocument, Version=0.0.0.0, Culture=neutral, PublicKeyToken=b03f5f7f11d50a3a' Consider adding a reference to that assembly.

error CS0246: The type or namespace name 'List<>' could not be found (are you missing a using directive or an assembly reference?)         public List<WimImage>

error CS0246: The type or namespace name 'Win32Exception' could not be found (are you missing a using directive or an assembly reference?)

error CS0246: The type or namespace name 'Match' could not be found (are you missing a using directive or an assembly reference?)
What the heck are these?
Well, to make a long story short, I learned that this script is calling on some pretty fancy .Net code, at least for something housed in a PowerShell script. Part of that is using the Add-Type commandlet to import some .Net assemblies that are then used by the .Net sections of code in the script. As best I understand it, this is a lot like importing PowerShell modules so you have more commands.
Unfortunately, .Net has changed how they handle a lot of this. No longer can you just install .Net version X or Y and be good to go. Instead, they are now handled as individual NuGet packages like this System.Text.RegularExpressions. This was explained here, “starting with .NET 5, these components have been moved to other namespaces and become independent NuGet packages.”
So…
- Determine the new names of the packages/assemblies/namespaces
- Install them with NuGet
- Import the assemblies for use in the code from what NuGet just pulled
And this is how I did that. Keep in mind, this is all hindsight knowledge going forward.
First, we declare the new class names that need to be installed. I’m doing so in an array to make our next steps easier. This was very much a trial and error of Googling the class in the error, finding its new class name, double checking it against the code, etc.
$RequiredPackages = @(
                'System.ComponentModel',
                'System.Globalization',
                'System.IO',
                'System.Linq',
                'System.Runtime.InteropServices',
                'System.Text.RegularExpressions',
                'System.Threading',
                'System.Xml.Linq',
                'System.Xml.XPath',
                'Microsoft.Extensions.Primitives'
                )
We then pass the required assemblies above to this function. It will then check for and install the corresponding packages if not present. More on those code comments later.
Function Check-Package {
                # Author: Max Allen, AzureToTheMax
                # This Function checks for required .Net Assemblies and adds them if needed as these are now handled via Nuget, not installing .Net XYZ.

                param(
                [Parameter(Mandatory = $true, ValueFromPipeline = $true, Position = 0)]
                [ValidateNotNullOrEmpty()]
                $Package
                )

                #For each package in our $package array...
                ForEach ($SinglePackage in $Package) {

                    # Why am I running PS 7.0 and not getting the get-package command?
                    # Import-Module -name "C:\Program Files\PowerShell\7\Modules\PackageManagement" -Verbose
                    # Somehow, just restarting VSC for the 3rd time fixed this????

                    #Check if the pacakge is installed
                    $CheckPackage = Get-Package $SinglePackage -Destination ".\Packages" -ErrorAction SilentlyContinue

                    if ($CheckPackage -notlike "*No package found for*"){
                        #If yes, good
                        Write-Host "Required package $($SinglePackage) is installed." -ForegroundColor Green
                    } else {
                        #If not, try and install it.
                        Write-Host "Required package $($SinglePackage) not installed, installing." -ForegroundColor Yellow
                        #ignore the errors from it already being present.
                        Install-Package $SinglePackage -Force -Destination ".\Packages" -ErrorAction SilentlyContinue
                    }

                }
            }
Then, we cycle through and import ALL the assemblies (DLL’s) from the packages we just downloaded. Thanks to Travis Parks for this one (internet find).
# Thank you to Travis Parks
                # Add our packages/assemblies from our locally installed copies resulting from the above function call
                Get-ChildItem .\packages\ -Recurse -Filter "*.dll" | % {
                    try
                    {
                        write-host "Importing package $($_.FullName)" -ForegroundColor Green
                        Add-Type -Path $_.FullName
                        }
                        catch [System.Exception]
                        {
                    }
                }
If you are wondering why I dump the packages to a custom .\Packages location, it’s because I couldn’t find a clear way to target specific DLLs to import. What I did find was a way to import all DLLs/assemblies in a given folder, and to ensure that’s as safe as possible, I dump only what we need into custom .\Packages location, rather than importing every class in your default package location. I am sure there is a better way to do this, but this works for the once in a blue moon need.
It Works (Running the Script)!
And with that solved, the script once again functions! It will first download what it needs, import that downloaded content, and then execute like normal without issue.
Download: The script can be found in my fork of Nerdile’s project here.
Again, if it wasn’t clear enough, credit to Microsoft for the original code, Nerdile for their improvements (look at their repo), and simply credit to me for the above shown code that fixed the .Net issues.
For this example, I will use this command… Edition 1 refers to the 1st index on the WIM file, you can also specify something like “Professional” or “Enterprise”. I think the rest is obvious. You can also specify a name like Professional. All this is explained by Microsoft’s original code comments within the script.
.\Convert-WindowsImage.ps1 -SourcePath "C:\Hyper-V\WIM\Win_11_24H2.wim" -VHDPath "C:\Hyper-V\Templates\Win11_24H2_test.vhdx" -Edition 1 -VHDFormat VHDX -VHDPartitionStyle GPT -VHDType dynamic -SizeBytes 128GB
First, it installs the missing packages. This only has to happen once. It’s around 200MB and takes a hot second.

It will then import the assemblies from said download.

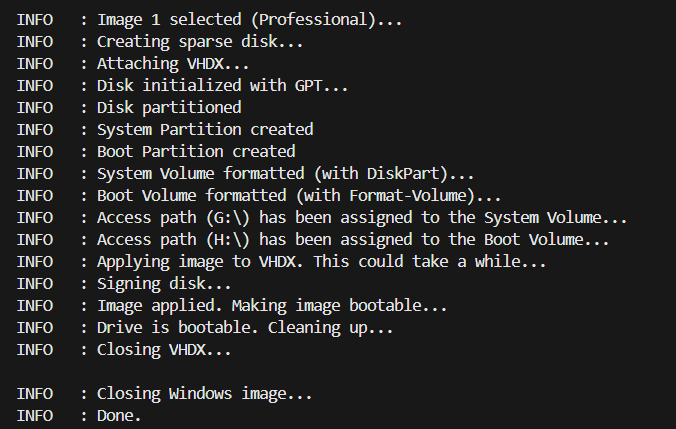
And lastly, the actual bulk of the script executes, performing the desired operations from the command.
And yes, -ShowUI works too if you want to use the script that way.

The End Result:
The end result of this is indeed a VHDX file which we can again just copy paste like a template, attach to new machines, and get machines with different IDs for use with Autopilot.
If you want to get really fancy, pair this with something like Oliver Kieselbach’s Create-MyVM script for even easier deployment, effectively automating the copy, new VM creation, and attaching of the copied VHDX file.
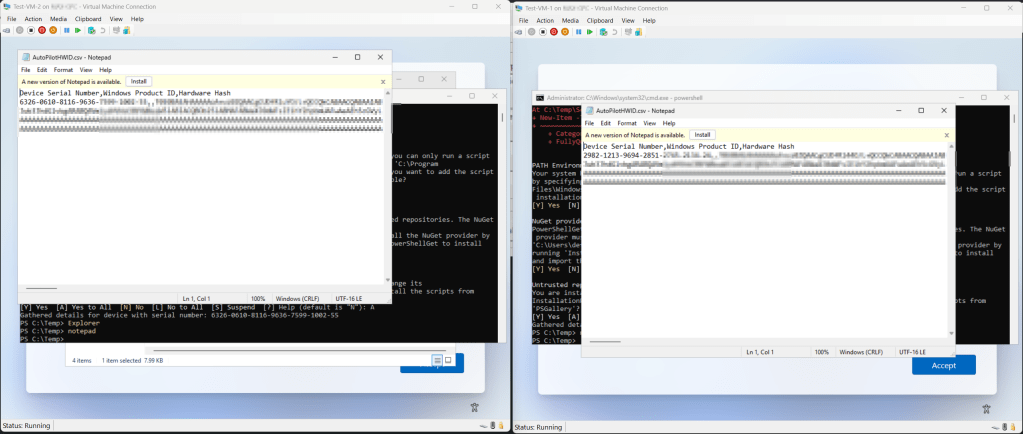
And yes, the records can be imported as separate devices into Autopilot without issue.

FAQ and Known Issues:
- PowerShell Requirements:
This script does require PowerShell 7 to run. On that note, read the below. - Get-Package commandlet not found:
I had a very weird issue on two devices when initially testing this script in that PowerShell 7. Specifically, PowerShell could not find the default command of Get-Package. I believe the problem was that I had just installed PowerShell 7, but I had restarted VSC and all other instances of PowerShell after doing so, and ensured that VSC was using PowerShell 7, so it’s still really odd to me. I even ran the below to force it to import…
Import-Module -name “C:\Program Files\PowerShell\7\Modules\PackageManagement” -Verbose (Forgive my lack of code block, I can’t do that in a list)
…Which showed that I had the module, yet it still couldn’t find the commands. A reboot of the machine and/or several reboots of Visual Studio Code solved this. - Your Anti-Virus may hate this script:
This script is creating/populating a Windows image in the form of a VHDX. To create a Windows image, one must have and move every piece of what makes Windows, well, Windows. The problem is, your AV solution will see this weird script moving and interacting with known protected OS files. Do you see the problem? Again, the whole of this script is to build a template Windows machine, which involves interacting with copies of known system files, because you can’t make Windows without those files. So, this operation is the very purpose and point of the script.
I wish the AV was smart enough to go “Oh, that’s not the real OS registry hive in C:\Windows\etc, it’s a copy of it being moved from an extracted WIM to mounted VHDX G:\”, but that’s asking too much apparently. - Usage Information:
Read the code comments, all the switches are explained very clearly in Microsoft’s original writing.
Conclusion:
You should now have a pretty slick and easy way of creating your new lab Golden Image. Happy testing!
Disclaimer:
The following is the disclaimer that applies to all scripts, functions, one-liners, setup examples, documentation, etc. This disclaimer supersedes any disclaimer included in any script, function, one-liner, article, post, etc.
You running this script/function or following the setup example(s) means you will not blame the author(s) if this breaks your stuff. This script/function/setup-example is provided AS IS without warranty of any kind. Author(s) disclaim all implied warranties including, without limitation, any implied warranties of merchantability or of fitness for a particular purpose. The entire risk arising out of the use or performance of the sample scripts and documentation remains with you. In no event shall author(s) be held liable for any damages whatsoever (including, without limitation, damages for loss of business profits, business interruption, loss of business information, or other pecuniary loss) arising out of the use of or inability to use the script or documentation. Neither this script/function/example/documentation, nor any part of it other than those parts that are explicitly copied from others, may be republished without author(s) express written permission. Author(s) retain the right to alter this disclaimer at any time.
It is entirely up to you and/or your business to understand and evaluate the full direct and indirect consequences of using one of these examples or following this documentation.
The latest version of this disclaimer can be found at: https://azuretothemax.net/disclaimer/
