Intro:
One of the age-old issues we in IT face is the employee who thinks rebooting their machine is a quarterly process, or at most a monthly process forced by Windows Updates. As we all know, lengthy up times have a tendency to create system instability and sluggishness, prevent application updates from processing (because much like nobody reboots, nobody closes Acrobat), and generally cause unusual issues.
This tool aims to solve that problem by introducing Automated Reboot Maintenance through PowerShell and Intune Proactive Remediations that either remind employees to reboot or, if necessary, force the action.
Note: This tool is based off the Automatic Disk Space Alerts. If you are familiar with that tool of mine, this will all seem very similar.
In this article we will cover…
- The User Pop-up
- User Pop-up Customization
- Image Customization
- Auto Close (Timeout)
- The “No User” Scenario, The System Script
- Logging
- Pre-Deployment Testing
- Policy Requirement – Disabling Fast Startup
- Deployment
- Conclusion
- Disclaimer
The User Pop-up:
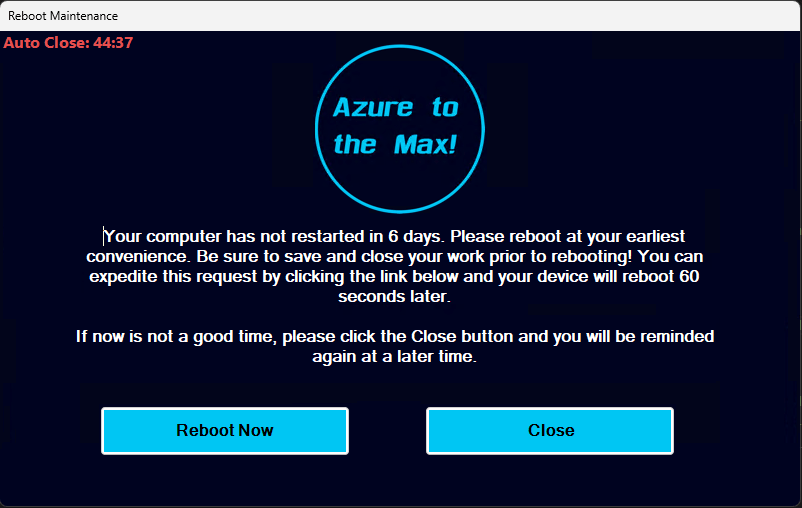
Getting right to the point, here is the pop-up in its default configuration. As you can see, the pop-up can take on two flavors.
- A Warning
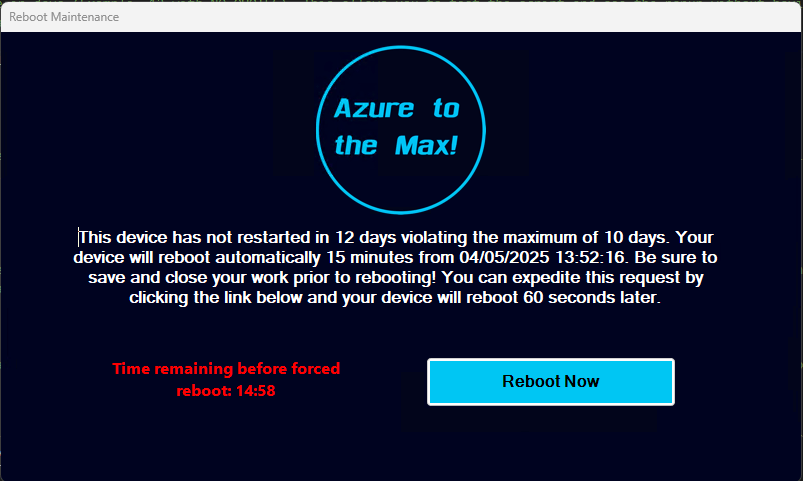
In this situation, the prompt displays as optional, suggesting you reboot, and providing a means to close the pop-up to dismiss if now does not work. - A Forced Action
In this situation, the prompt changes to a forced reboot, which will execute in a certain number of minutes automatically, and provides an option to reboot now to speed this up. This version of the pop-up does not provide a means to dismiss it. When the timer runs out, an additional full-screen and all-screen notification is generated by Windows indicating a scheduled shutdown will process in one minute as yet another final warning.
Furthermore, this pop-up appears over the top of other windows and is centered on the primary screen to ensure it is visible. While it can be dragged around to move it, it cannot be moved behind other windows. Note that the pop-up cannot be closed using the X in the top right as it is hidden. The pop-up will also not appear on your taskbar to prevent a right-click style close. This is such that it can only be closed (less task manager by finding PowerShell) using our close button, at least in the optional warning scenario. This is done to enable clear logging, as explained in the logging section.
User Pop-up Customization:
Before I say anything else, this script is around 700~ lines at the time of writing. I certainly tried to make it as friendly as possible, but there are many things that simply don’t want to be made friendly, or have to be explained in a certain order to understand.
The majority of basic customization can be done using the large variables region near the top, which is commented in full with explanations of what everything is and how it should be configured. Additionally, some of these elements have enough to say about them that I have broken them out into other sections. So, I will keep this section to a lighter overview.
- The first step in customization is to configure a minimum uptime to trigger the alert via $MinimumUptime. If the machine’s uptime in days is not equal to or greater than this value, the pop-up will not appear at all.
- Second, configure the maximum uptime, which if matched or breached, triggers the forced version of the pop-up via $MaximumUptime.
- Controls are provided to adjust the amount of time to wait before a forced reboot takes place via $ForcedRebootTime, with the default being 15 minutes (900 seconds).
- You can also configure whether the auto-close timer is visible on the pop-up or not ($AutoCloseVisible), but the timeout will always execute and close the script when it runs out, regardless of the timeout being visible. Why this exists is explained in the next section. You can customize the timeout duration ($TimeOutDuration), but you must be careful with what you set, which is again explained in the next section. Furthermore, the timeout is forcibly hidden in the forced version of the prompt to prevent confusion with there being two red timers on screen.
- The pop-up will cache the company logo image, as well as create log files, of which the paths used for this caching and log file names can be adjusted. ($LogFileParentFolder, $LogFileFolder, $LogFileName)
- For branding, easy customization options are provided to change the background color of the overall form, text box (our message), and buttons, as well as controls for the text color on the buttons and text box. ($MainFormBackgroundColor, $ButtonBackgroundColor, etc)
- For customizing the text, you will have to locate where that text is set in the script as those fields rely on variable values that must be declared first, such as how long your uptime is, so it’s difficult for me to raise their position in the script to the variables region as those dynamic values have yet to be set.
That said, this whole pop-up is all PowerShell and can thus be truly tweaked however you want if you are willing to put the time into figuring it out. I won’t claim that Windows Forms are the most intuitive thing, but you can likely accomplish whatever you desire. You can change the fonts, background colors, text colors, text content, text formatting, button colors, the shapes of the whole pop-up or different elements, placement of elements within the window, add additional or remove existing buttons, change what actions the buttons take (open a web page, open a document, etc), and change what image to use (more on this later) and/or create/remove other branding.
You can, and should, go crazy with it.
Image Customization:
This topic has a multitude of things we do need to get rather detailed on. I will say that I had a lot of fun coding some of this just to do it.
What image to use:
By default, the image I use is 175×175 pixels and I would highly recommend using something of that height, with a width up to around 500 or 600 pixels. While this may seem incredibly low resolution, Windows Forms are a pixel-alignment system and do NOT scale elements. By default, the form is only 800×450, hence (unless you change the size of the overall window) you’d want to stay around 500-600 at a max width.
For example, if you wanted to feed it a crisp 1080p image, you would need a Windows Form that is greater than 1080p in size such that the display of the image can be contained within the form. This would cause the pop-up to entirely cover a 1080p screen – obviously, not ideal.
The image will attempt to auto-center itself given the default form width but, if you need more height for the image (and thus need to increase the form height overall and push other elements down), or plan to change its width, you will have to manually adjust it.
Controlling how we get the image:
Proactive Remediations introduce an interesting challenge when it comes to needing other files, as Proactive Remediations are simply uploading a .PS1 script. They aren’t like Win32 apps where we can bundle up all the other PNGs, JPGs, and secondary scripts we want – it all must fit in a single PS1.
So, that makes getting our image(s) for branding tricky. To that, there are two options I have provided. In either case, the system first checks if the image is already present, then performs the following if it is missing.
- Download the image:
Using $UseImageDownload in the variables section, along with setting the $Imageurl in the same section, we can tell the script that we need it to download the image from an online source if it is not present. This could be your company site, a GitHub repo like I am using in the demo, an Azure storage blob – really anything that will be accessible from the devices. - Just make it Base64!
Alternatively, we can embed our image right in our script by changing it to a base64 string, pasting that string into the script (The value we set for $ImageB64), and letting the script turn that back into an image file when it executes. The giant blob of random chaos in the middle of our script isn’t very pretty, but it works really well for having an all-in-one solution, especially when dealing with small images like mine, at all of 16KB
I fully admit writing this option just because I had the idea, thought it was cool, and wanted to make it. That, and I think it will be very useful for some other ideas of mine.
Ensuring Image Enforcement:
There are two problems I foresaw while making this.
- Technically we are placing this image in a location the user could locate and edit it. While deleting it would cause the script to simply recreate it, they could instead alter it with the result now being their favorite clip-art being on the company notification.
- In the event we need to update the image, that could be a real pain. You would either need to add a line to delete the image, then have the script get the new image, then also add something to prevent it from doing this each time it runs… OR – change the image name in the script, upload a new image to wherever, call to download that new image, etc etc etc. It’s just not fun.
So, to solve all of this, I added hash validation to the image file. Adding to the above explanation, the script first checks if the desired image file exists and if not, it then either downloads it or creates it from base64 (depending on which option you enable of the two).
If the image does exist, it performs hash validation on that image to make sure it’s the right file. If not, it will re-download the image or, it will recreate it from Base64, again depending on how you have the script sent. It will then validate that the new image has the correct hash post-re-download/re-creation.
This way, for deploying an updated image, you don’t need to do anything other than update the hash, along with the Base64 code if you are using this option. This is assuming if you are downloading the image that you put the new image at the same exact URL as the old image. If not, you will need to update the URL as well. In either case, the script will spot that the file no longer matches and re-download it or re-create it.
Similarly, should someone modify the image, the script will again spot the difference and reapply the corrected one.
Note: Yes, I accounted for the fact that earlier versions of PowerShell don’t have Get-FileHash. It was a pain, but it’s accounted for and works with a custom function (Get-SuperFileHash) which will attempt to pull it using get-filehash and resort to more manual methods if that fails. Fun!
Auto Close (Timeout):
The Auto Close (or timeout), which is seen by default in the top left of the pop-up, exists because Intune will kill proactive remediations after roughly 60 minutes with the assumption that it somehow failed to execute properly. While I was fairly confident this was fact, I decided to triple-check this by setting the script to create an additional log line for every tick of the timer, and yes, it always stops right around the hour mark. I left that line present, although commented out, if someone else really feels the need to fact-check this.
So, we have our own auto-close timer going such that the pop-up can be gracefully terminated, and we can log that graceful termination, rather than the log just mysteriously ending. Additionally, the fact that it times out is written as an error to the command line. This causes the information to make its way back to Proactive Remediations which can be seen by doing an export of the detailed run status. This will help you differentiate between true execution failures, should one occur, and simple timeouts likely because an account was active but no user was present to interact with it (machine locked, etc).
Again, these are controlled by $AutoCloseVisible and $TimeOutDuration.
Note: Do not configure a timeout shorter than your forced reboot timer, or your forced reboot will never process.
The “No User” Scenario, The System Script:
Up till this point, we have been talking about executing a script that creates a visible pop-up to the user. To do this, the script must actually be run as the user. While this can still function even if the machine is locked or say, an RDP session is disconnected, it can’t work if there are truly no user sessions on the machine.
Well, what about something like VMs where someone might not log in, and the machine is still running for weeks? In other words, how can we perform reboot maintenance when an employee isn’t logged into the station? The answer is that we need a second script which does not execute as the user and is not reliant on them.
The good news is that because it has no visible elements, this script is much simpler. It simply checks if there are any active sessions on the device (this includes RDP sessions, locked sessions, disconnected RDP sessions, etc).
If the answer to that question is no, meaning there are no users on the machine, and the machine violates a configured maximum uptime ($MaximumUptime), the script will automatically schedule the device to reboot in X seconds ($ForcedRebootTime). This does still create a system-wide on-top notification through Windows that the reboot is coming, just in case there is somehow someone present or someone logs in during said countdown.
This script contains similar logging controls ($LogFileParentFolder, $LogFileFolder, $LogFileName). Note: Make sure you do NOT configure the LogFileFolder and/or LogFileName to be the same as the user script. This could cause issues as, if the system creates those files and folders first, the user may not have permission to them to create logs.
Logging:
Both the system and user scripts includes a lot of logging, both to the console for testing/troubleshooting, as well as to a file for future reference.
User Script:
By default, the user script creates “C:\ProgramData\AzureToTheMax” then “C:\ProgramData\AzureToTheMax\DiskSpaceAlerts“, setting both to hidden folders. In that storage directory, a log file is created “RebootMaintenance.Log” which creates entries such as the ones below. Feel free to change this, but know that the folder needs to be in a standard-user accessible location, hence the use of ProgramData, as the script again runs as the employee.

To detail it in full, the script logs… (all log entries include a timestamp)
- Script startup indicating the user it is executing on and the device name
- Log the timeout duration setting in seconds (the auto-close)
- If the logo PNG file already exists or if it has to be downloaded (including a log of download completion). This can have and log many scenarios.
- The current uptime in days of the machine
- What scenario the machine falls into. For example, “Machine uptime of 2 days is not greater than the maximum uptime of 10 days, or the minimum uptime of 5 days – exiting.”, “Machine uptime of 12 days is greater than or equal to the configured MAXIMUM threshold of 10 days – prompting for FORCED reboot.“
As well as several other possible error/warning conditions such as if you tried to configure settings in a problematic way, or if the image had to be downloaded, or the hash didn’t match and it had to be recreated, etc.
Again, this is all for helping you troubleshoot, and helping you check the log to see what actions were being taken (did the person ignore the pop-up for days and then get force rebooted, etc).
System Script:
By default, the user script creates “C:\Windows\AzureToTheMax” then “C:\Windows\AzureToTheMax\RebootMaintenanceSystem“, setting both to hidden folders. In that storage directory, a log file is created “RebootMaintenanceSystem.Log” which creates entries such as the ones below. Feel free to change this, but again, do NOT use the same location as the user script.

The system script contains similar but equally lighter logging in reflection of how the script itself is light.
- Script startup indiciating the time and device name
- The current system uptime
- If an active user is found or not. If yes, the script exits.
- What scenario the machine falls into. For example, “Forcing a reboot in 300 seconds as the uptime of 12 days is greater than or equal to the configured maximum threshold of 10 days.”
Pre-Deployment Testing:
Obviously, needing to let a machine sit online for X days isn’t ideal for testing. So, a configurable variable named $TestingMachineUptimeValue is provided to aid in this. This value is by default set to equal $Null. When set to $null, it has no effect on the script, and this is how it should be set for deployment.
However, when set to a value such as 12, (no quotes!) it will override the true value for the machine uptime in days, thus allowing the pop-up to be thrown, assuming you go violate your configured thresholds.
WARNING: For reasons I truly cannot explain, ONLY when testing the code locally in something like Visual Studio or ISE, timers do very odd things. They have a tendency to skip around 20-30% of the time set such that a value of 60 might only produce a 40-second timer. Additionally, it will move at an incredibly accelerated and uneven rate, maybe going one digit down at a time, but at 2-10x the speed it should (not 1 digit per second), resulting in it moving in 2-15 digits down in a single second or more. Sometimes the timer will just immediately slam to zero and immediately close the pop-up. This will affect both the timer for the auto-close and the forced reboot. Additionally, the script will often open behind Visual Studio, and may not layer over top of other windows either as it should.
None of this behavior happens when run from Intune, or when executed manually (start-process powershell.exe .\yourfile.ps1). As such, calling to the file is how I suggest you test the script instead of using something like F5 to execute it through Visual Studio or ISE.
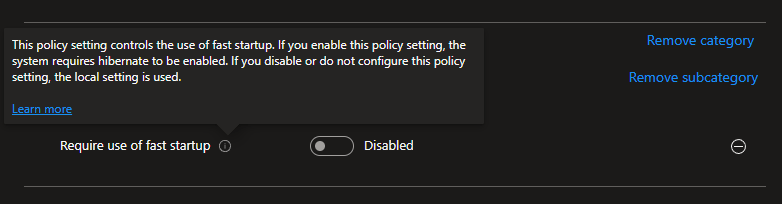
Policy Requirement – Disabling Fast Startup:
Before we can deploy these scripts, there is a problem we need to solve. Fast Startup is… an interesting topic. Google it at you’ll find everything from people screaming about turning it off, to people screaming about turning it on. Don’t get me wrong, I like it when my computer boots up in half a second. However, this magic works by effectively not actually ever shutting the computer down and instead putting it into hibernation. That both makes reboots not actually reset things, which defeats the purpose, and importantly, does not reset the uptime. Meaning, if you have fast startup on, you could be “restarting” daily and have a two-week uptime because those aren’t real restarts. Obviously, that’s a problem for this script and will cause it to appear over and over when the employee thinks they are doing nothing wrong.
Note: Odds are you’ll be just fine without fast startup on a machine with SSD storage. If you’ve got a good old Best Buy PC with a 5200 RPM platter drive, well, you might need to consider an equipment refresh anyway…
So, how do we turn it off? Let’s just create a settings catalog to control this setting… right? Nope. In classic Microsoft “recommended” fashion, they’ll give you a way to turn it on, but not off.
Instead, we need to deploy a registry key to turn this off. I’ve actually already made an Intune Win32 app to do this for a previous series that ran into this same issue. That can be found here under the section “Update Regarding Fast Startup.”
Alternatively, you could also repackage the commands into another proactive remediation. I’d also recommend seriously considering deploying the key as part of an initial setup script on all your devices.
Note: This does take a reboot to apply, so I wouldn’t just throw the registry command onto the start of the disk space notifications script and hope for the best.
Deployment:
Once you have done all your configuration and local testing, deploying this is as simple as deploying any other Proactive Remediation. As always, do some test phases before rolling this out to everyone!
Note: Make sure that fast startup is ALREADY disabled and that you give time for devices to reboot to apply that (how ironic). See the above section for more information.
You can find the scripts on my GitHub here.
Proactive Remediations do have requirements, including licensing requirements, which you can see here.
To deploy the remediation…
- Head into Intune
- This menu is currently located under Devices -> Scripts and Remediations (Microsoft won’t stop moving it)
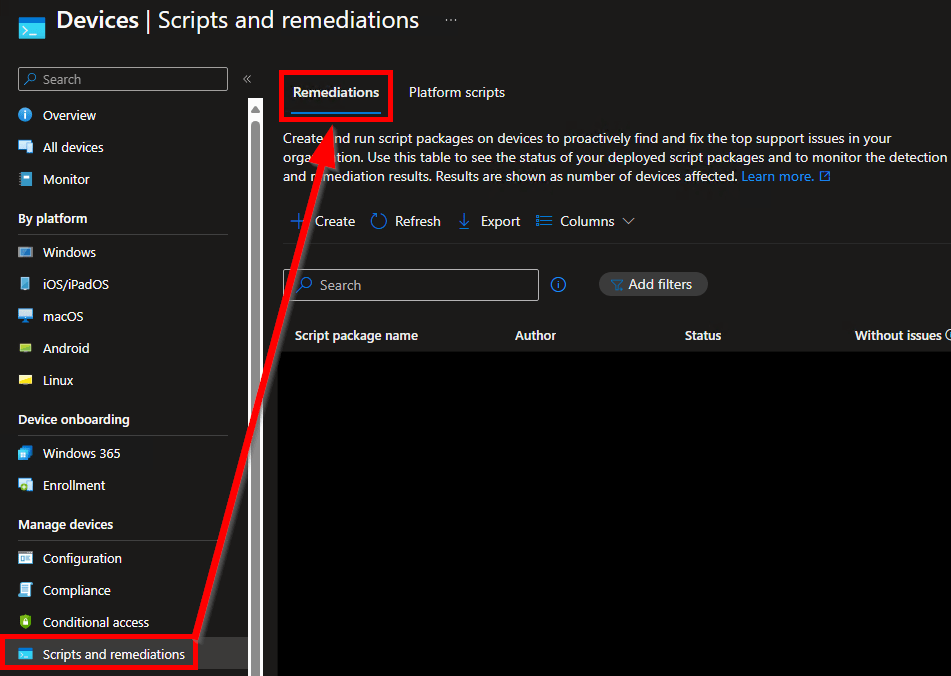
- Choose Create while under the Remediations tab (See the above and below image).

- You will need to give the script a Name and Description. These are just friendly values.
You will then be prompted for a multitude of values. These are the only ones you need to set / change.
- Detection Script File.
This is either the User or System script.
We do not have a remediation script. You’re welcome to break this all up into four scripts total if you really want to. - Run Script in 64-Bit PowerShell
Change this to yes. Without it, you can’t query 64-bit registry locations and do other 64-bit-only commands and actions. - Run the script using the logged-on credentials
For the User script, change this to Yes.
For the System script, leave this at No.
Script Signature Check is something you will have to look into on your own and make your own determination.
When the information has been entered, hit Next.
User Script:

System Script:

Filling in Scope Tags, if any, is up to you. When done, hit Next.
For groups, you need to select either a user group or a device group. Know that if you select a user group, it runs on any device that the user logs into, not devices they own, and in my experience, not devices they aren’t logged into actively. Additionally, if you scope to a user/device group, you can (or should) only exclude a matching group. Don’t scope to devices and try to exclude users, and don’t try to scope to devices and then apply a user-based filter.
I would highly recommend scoping to DEVICES, not users, on both scripts for better control over where it is executing.
Note: In the event you do need to make an exception for someone, know that the unscoping takes just as long to reach and process on the device as the scoping did (hours). So, they will likely see the pop-up several more times before it stops.
You can deploy to all devices using the upper drop-down Selected Groups box or pick individual groups using the Select Groups to Include hyperlink.
All Devices:
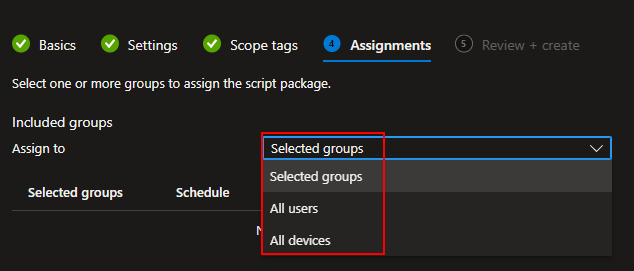
Selected Groups:

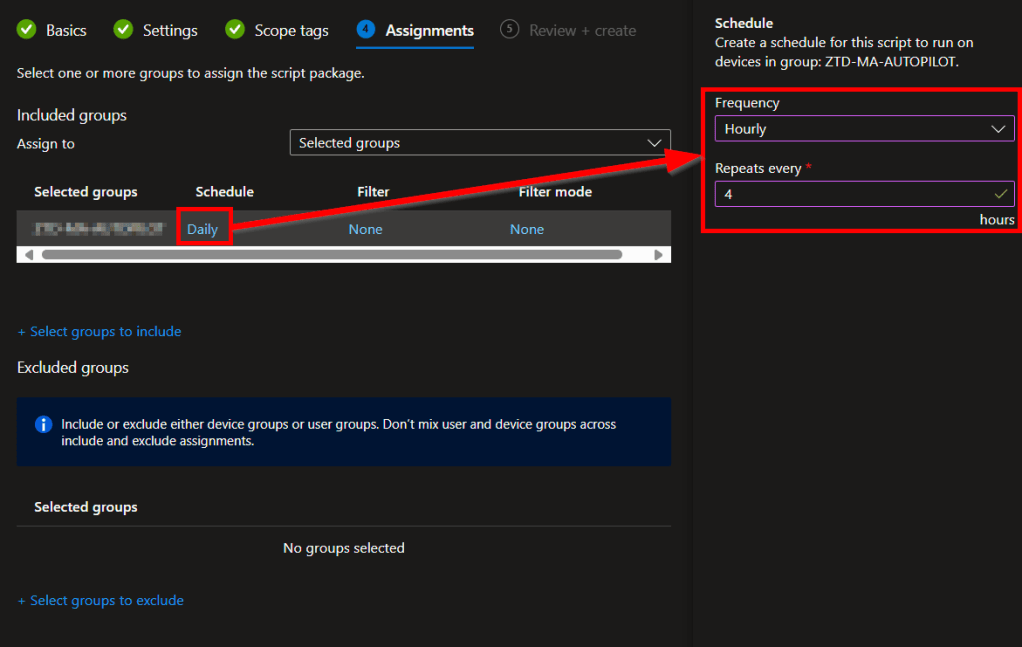
Once a group is selected, you can then alter the schedule for that group.
That begs the question: how often should you run it? Keep in mind that you want an employee to see this at least once in their shift. The pop-up can only stay on screen for around an hour (default is 45 minutes). So, for example, let’s say your employees all work 8-hour shifts. One option would be to set the pop-up to run every 4 hours as shown below, with the hope being that they see it twice, or at least once, in their shift.
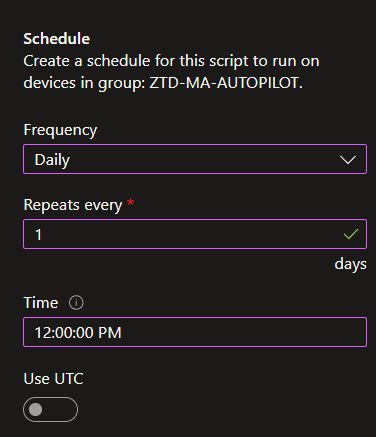
As another option, you could configure it to run at a specific time every day. If you want this to happen at multiple specific times every day, you could upload multiple copies of the script and set each copy for the desired different times.
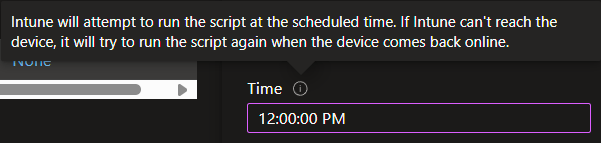
However, I want to point out one shortcoming in aiming at a specific time of day. Some machines, like Amazon Workspaces and Windows 365 Cloud PCs, by default* adjust their time zone based on the client connecting to them. When a client is not connected, they default back to UTC. This means the local time gets swung wildly when clients disconnect and connect. It might be 11 AM UTC, which is effectively the device’s local time, then a German connects and sends the local time to 1 PM, skipping entirely over a desired time of say, 12 PM. In this scenario, I do not believe the pop-up will appear, but I have little ability to test this. While the information icon on the scoping time does suggest it will try ASAP if the machine is offline, I don’t know how it handles a time skip like this.
*Note: I know this can be adjusted for Amazon Workspaces to always retain a certain configured timezone. See “Disable time zone redirection for DCV” here. I am not sure if this exists for Windows 365 devices.
One solution to this timezone skipping problem would thus be to aim for a certain UTC time, rather than a certain local device time. That then runs into the issues of wanting to prompt everyone at say 12 PM, but some people being on the East coast, the West Coast, in India, etc. That might mean you have to create separate groups for those in each time zone, or at least country, then create multiple copies, scoped accordingly. It’s a pain, but it would work. It’s either that, or just set it to every X hours and accept some randomness. After all, is it really that big of a deal? You can either dismiss it, or you have ignored it for days, and I don’t feel sorry.
Conclusion:
All in all, you should now have a robust framework with which to customize and deploy to your environment to ensure folks actually restart their machines. Happy scripting and alerting!
Disclaimer:
The following is the disclaimer that applies to all scripts, functions, one-liners, setup examples, documentation, etc. This disclaimer supersedes any disclaimer included in any script, function, one-liner, article, post, etc.
You running this script/function or following the setup example(s) means you will not blame the author(s) if this breaks your stuff. This script/function/setup-example is provided AS IS without warranty of any kind. Author(s) disclaim all implied warranties including, without limitation, any implied warranties of merchantability or of fitness for a particular purpose. The entire risk arising out of the use or performance of the sample scripts and documentation remains with you. In no event shall author(s) be held liable for any damages whatsoever (including, without limitation, damages for loss of business profits, business interruption, loss of business information, or other pecuniary loss) arising out of the use of or inability to use the script or documentation. Neither this script/function/example/documentation, nor any part of it other than those parts that are explicitly copied from others, may be republished without author(s) express written permission. Author(s) retain the right to alter this disclaimer at any time.
It is entirely up to you and/or your business to understand and evaluate the full direct and indirect consequences of using one of these examples or following this documentation.
The latest version of this disclaimer can be found at: https://azuretothemax.net/disclaimer/
