This Article Has Been Retired!
Warning: I have chosen to “retire” this article. As time has marched on, and more information has been revealed, the blogs in this series have slowly become less and less up-to-date, and frankly, more and more of the information I was told as gospel has proved flawed or muddied. As such, I’m creating a new article to bring all of that hindsight together and document the saga this topic has become. To be clear, the tools for automated detection and removal are still up to date, but I am putting out new articles to cover them as well as the history and information surrounding this topic. Once available, I will link it below.
Take a look at my new article on Everything I Know on Subscription Activation.
Introduction:
Simply put, I was not expecting to get to write this article, at least not in this form or any time soon. I am however quite happy that I can though!
This article is to discuss the new detection script and the beta fully automated remediation of devices with multiple Microsoft accounts. This will be covered in the following sections.
- Detection Script V2, Now With Emails
- Before You Remediate, Tell Your Devices No More!
- The New Automated Remediation Script (BETA!)
- Expected Results
- Figuring Out What to Target (How to Know What to Code)
- Automating it (How the Script Works)
- Troubleshooting
For those wanting part one, it can be found here. Part two, (just an update on the Microsoft experience) is here
Detection Script V2, Now With Emails:
DOWNLOAD: GitHub
Note: As of writing, the latest version is 2.3 which includes several fixes and enhancements. I would recommend grabbing whatever edition is the latest. Change notes are in the code.
In part one of this series, I released a detection script that would answer if multiple accounts were present on a machine with a simple yes or no. More specifically, the script would report either “A workplace account has been detected” or, “A workplace account was not detected“. While the detection was sound, we were simply stuck taking it at its worth about what it saw and had little ability to understand what secondary accounts had been added to our machines. With this update, that changes!
With version 2 of the detection, when exporting the remediation detailed run status, the PreRemediationDetectionScriptOutput column (that’s a mouthful) will have something akin to “The following workplace joined accounts were detected: Bob@Contoso.com test@anothercompany.org” where multiple accounts are separated by a space. With this, you will be able to much more clearly confirm that secondary accounts are truly present, as well as digest and understand what accounts these are.
Those curious how this works may notice some surprisingly complicated code in here compared to version one. Without getting into the weeds, that’s because it’s using some of the same code as the automated removal. Of course, this script can’t remove anything, we are just using the same logic for detection and understanding what accounts are present. As such, how this work will be covered in the same section that explains the full remediation.
Deploying the Script:
The new detection script can be downloaded using the link at the top of this section and is ALMOST deployed in the same fashion as the script from part one. You can follow the same instructions from part one, HOWEVER, obviously use the new script instead, and tell it to NOT run as the logged-on credentials. See below.
I would recommend doing some initial testing with a limited audience, then rolling this out to your devices in full so you can see what devices have a secondary account and what those secondary accounts are. Understanding your detection results is CRITICAL before attempting any remediation as this script IS the detection script that determines what devices and accounts will be targeted by the account removal remediation.

Before You Remediate, Tell Your Devices No More!:
WARNING: It is CRITICAL that this policy/remediation is deployed to devices to set the BlockAADWorkplaceJoin registry key BEFORE you ever attempt executing the full account removal remediation. Failing to do this will send devices into an extremely ugly sign-in loop where apps will repeatedly prompt for authentication.
Before I go on to provide the remediation script, I need to clarify that removing accounts is NOT enough to solve this problem. You MUST put the registry keys in place to prevent accounts from registering as Work or School accounts going forward. Otherwise, when folks sign back into apps after the accounts are removed, they will wind up simply reconnecting them. This is why it is so important to deploy this policy before the remediation, as otherwise folks would simply sign back in, rejoin the accounts/devices, and then the remediation would nuke it again, and again, and again.
The below is copied from part one of this series and will guide you through deploying the registry key (as there is no corresponding policy currently) to prevent this.

To recap from part one, signing into an app causes this prompt by default, and by accepting the default options and choosing “OK”, you connect your machine to the other tenant and allow the account to be added to your machine, thus breaking Enterprise Activation.
While no policy is available to stop this, Microsoft has made a registry key to outright prevent this popup. This key is well documented by Microsoft, if not very easy to find, and was provided to me through my prior case over activation issues caused by the April update.
Microsoft Entra device management FAQ
Microsoft’s recommendation is to deploy the following key which will prevent devices from showing the above popup at all. Instead, Windows will automatically/invisibly choose the option to sign into that app only. This also prevents manually adding a second account on the device through the Access Work or School or the Email & Accounts menu.
HKLM\SOFTWARE\Policies\Microsoft\Windows\WorkplaceJoin, “BlockAADWorkplaceJoin”=dword:00000001
I really wish I could tell you the name of a policy that you can go configure in Intune, deploy, and all will be well…. but I can’t because for some reason Microsoft seems to have chosen to not actually make this a deployable policy. Instead, you need something like a script, or in my case a Proactive Remediation. The good news is I have put this together and you can just go deploy it. This is a straightforward Intune remediation (detection and remediation script pair) which will check if the key is present and if not, put it in place. When deploying it, run it as admin/system (not logged-in credentials) and in 64-bit mode. As always, test before you deploy!
DOWNLOAD: GitHub
Credit to MS Endpoint MGR team and their article I linked above and on my prior article, I largely took their script and simply reconfigured it as a Proactive Remediation, which probably wasn’t an option when they wrote their script.
The New Automated Remediation Script:
First, I have a story to share.
Have you ever Googled something, and Googled it some more, and some more, never finding what you needed – only to have a friend come along and find it on the first try? There should be a word to express that emotion because boy did I have it after this experience. Allow me to explain…
Truth be told, the script output screenshot you see in my part one update from 9/30/24 was where my script sat for a month. That was until Roody Ooms hit me up to share his new article on this same issue just a few days into November. Grossly oversimplifying the many back-and-forth IMs that ensued, we got to talking. I looked at his work, he expressed a desire to create a more granular version, I shared my prior work from September which had aimed to do just that, and he shared a work-in-progress version of his script with that same aim. In any case, that preview code he shared had something very important.
In my update from September 30th on part one of this series detailing my work, I wrote about how my script was great at identification but weird things happened when I let it try to truly remove secondary accounts. Specifically, I wrote…
In short, as best I can tell, removing the account this way causes the AAD broker to get very confused as an account just vanished without it understanding why that happened or understanding that it should have just happened.
I went on to explain that I believed this was caused by me missing some element that needed to be removed, or there just being some magic communication to the plugin to communicate this change despite the dozen Process Monitor traces I had run on both DSREGCMD and hitting the disconnect button in the settings menu to understand everything that happened to remove an account.
Well, I quickly spotted a line in Rudy’s preview code and that line was…
Stop-Service -Name "TokenBroker" -Force -ErrorAction SilentlyContinue
…And I quickly had that dreadful “Oh god, please tell me it wasn’t that obvious” feeling. So, I dropped that one line into my code for kicks and giggles, hit go, admittedly got a couple errors from one line of the deletion due to me missing a -force, fixed that, ran it again… and it worked fully. With a quick refresh of the settings menu, all the secondary accounts were nuked without any weirdness. In the words of Todd Howard, “It just works.” in the moment, I couldn’t decide if I should be happy or angry.
So, to recap, the reason it was doing weird things and the AAD Broker plugin was getting so confused was not because I had missed the deletion of something, or because of some invisible magic. No, apparently I had correctly figured out how to identify and delete EVERYTHING. Rather, it wasn’t working because I never realized there was a service I needed to stop. Honestly, I largely believed this because the processes I saw interacting with the Settings.dat file seemed to spin up and down on demand, rather than be a constantly running process. So, I figured if the Settings.dat file of the AAD Broker Plugin was not in use (something I had a function ensuring was the case), then this should work. Apparently, that was stupid. Now knowing what I know, I believe the real explanation for the issues I saw was that the Broker Plugin was internally caching some of this information from the Settings.dat, so by stopping it and doing our work then, that cache wasn’t an issue, and the deletions caused expected results.
All in all, it was still a great learning experience in all ways. Not just in coding, troubleshooting, or reverse engineering, but in remembering to bother my community pals when I run into a brick wall 🙂
Second, here’s the script!
WARNING: This script is a BETA version and is NOT authored or supported by Microsoft – Execute it at your own risk! See the disclaimer!
WARNING: Do NOT deploy this remediation without first deploying the prior remediation’s!
First, you ABSOLUTELY MUST deploy the policy/remediation in the “Before You Remediate, Tell Your Devices No More!” section to set the BlockAADWorkplaceJoin registry key BEFORE you deploy the account removal remediation or you will send your employees into a very ugly sign-in loop.
Second, you need to make sure you deploy the detection script from the prior section to understand what you are targeting to fix.
DOWNLOAD: GitHub
Note: As of writing, the latest version is 0.4. Until this goes to 1.X or higher, this is a beta version still in testing.
Credit:
Obviously, a huge thanks to Rudy for ultimately being the guiding light to the puzzle piece I had missed, although I’m still quite proud of everything else I did figure out. Additionally, a huge thanks to ExpendaBubble and ChrisDent on the WinAdmins Discord for helping me parse out and correct the undeclared data type inside the Settings.dat registry hive. (I’ll explain what on earth I just said later.)
Configuring the script:
The script has a Variables region near the start to configure some of its basic functions. This is self-contained, rather than passible via switches because this is meant to be deployed as a proactive remediation remediation script (say that 5x fast).
- $RemoveSecondaryAccounts – This determines if secondary accounts are only looked up ($False) or looked up AND DELETED ($True). For testing, I would try this as $False a few times just to see what it sees.
- $Load & $UnLoad – Unless you are modifying this code for testing, don’t touch these. They control whether we attempt to load and unload the found settings.dat file (The application registry of the AAD Broker Plugin). The only reason to turn these off would be because you want to manually load, and leave loaded, a copy of a Settings.dat for testing. Do NOT load and leave loaded the real Settings.dat for a significant period of time.
- $LogFileParentFolder, $LogFileFolder, $LogFileName – As explained more in the code, these control where the script stores its logging as well as the log file name.
- $CreateTranscripts – Turn this on if you really want granular transcripts to generate for each execution (files named by date and time). This is primarily for testing, including test deployments to your first few devices.
Deploying the Script:
WARNING: Do NOT skip straight to deploying this out, test it manually first!
Remember, this is still a Beta script where I have limited ability to validate it in all the various circumstances that may exist. Do yourself a favor, install Visual Studio Code, run it as an admin (or as System if you feel like being fancy), open this remediation script, install the PowerShell extension (it will prompt for this when you open the PS1 file), and do some testing. Try it with $RemoveSecondaryAccounts set to $False so you can see what it WOULD remove, examine that information for correctness, and then try manually running it with $RemoveSecondaryAccounts on $True so it can truly delete it. See how this affects your device, the apps that were using that account (like Teams or Outlook), and if the account is gone from your Work and School accounts settings menu). Try it on some physical devices, try it on some virtual devices, etc. Be aware of the known issues detailed within the script’s internal description.
Once you are ready to test deploying the script…
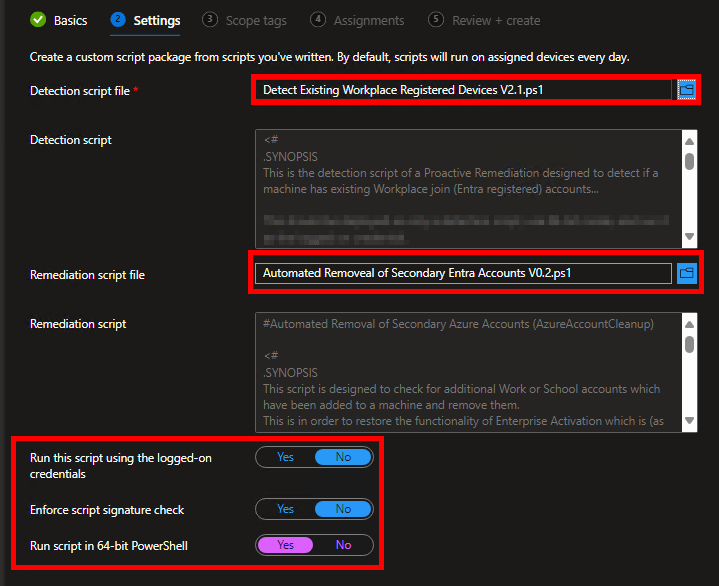
This script is deployed in the same manner as the V2 Detection script detailed above (Proactive Remediation, run as 64-Bit PowerShell, do NOT run as the currently logged-on user.) This is because the detection script above is the detection script that goes with this remediation script. That is why it is so important to understand what the remediation script is seeing first, as it determines the “what” and “where” of the action that will occur. Once filled in, it should look like this.
Note: I would recommend having TWO Proactive Remediation’s in Intune. One that has just the detection script, and one that has both the detection and remediation script. This is so your data collection with the detection script can be handled/scoped independently from the full remediation script.
Expected Results:
In this section, I want to review what it looks like to put this all in place.
To recap: The policy above will cause the popup in the above section to simply not appear. Instead, the machine will automatically and silently choose to sign into “This app only.” This does NOT prevent the use of that account, you can still absolutely sign into Teams or Outlook as Bob@Contoso.com and use it like normal, you just can’t add it to the machine as a whole and thus get automatically signed into other apps. In other words, that account doesn’t get machine-wide automatic SSO into various Microsoft apps. However, that policy does NOT remove existing accounts. That’s why the remediation exists.
The effect of the remediation is that those secondary accounts will be removed from the Work or School accounts menu, and thus break that effective SSO. This causes apps to stop working until you sign back into them.
App Prompt Example A: Teams
For example, Teams will gain an exclamation mark both on the taskbar and in the accounts list informing you something is wrong.


Once you swap to the now broken profile, you will see a prompt like this along the top.

Clicking “Sign In” will trigger a sign-in window asking for only the password to the account. When you sign in, the policy from the prior section will invisibly force the “this app only option” thus preventing the account from being rejoined to the machine. Once signed in, this does NOT prevent the app from working like normal and the employee won’t have any idea that something has changed. From their perspective, they just signed in and it worked again.
App Prompt Example B: Outlook
As another example, Outlook will throw a sign-in prompt for the account along with the “Need Password” button at the bottom of the Window.

Again, this is a standard O365 login window with the username already filled in. When you sign in, the policy will invisibly force the “this app only option” thus preventing the account from being rejoined to the machine, and the app will again work like normal.
The Employee Experience in Summary:
The only thing an employee will notice is that each app they have been using via the joined account will individually ask them to sign back in, then work like normal. This will be annoying, but in the grand scheme of things it could be a lot worse.
Enterprise Activation:
Additionally, and very importantly, once the script has run to clean up additional accounts, Enterprise activation should function normally again. However, the scheduled tasks for this run at startup, so it likely will not change back to Enterprise until after the next reboot. As such, it may be several days before devices that have been targeted are both cleaned up and then back to an Enterprise OS.
Figuring Out What to Target (How to Know What to Code):
In this section, I’ll go over how I figured this out which is very important for understanding what the script does.
Overview:
When I first started work on this in mid-September, I promised myself I would share all the nitty-gritty details of how I figured it out for those who wanted to learn. Unfortunately, now more than a month later, that’s a lot harder to remember. I almost certainly will not be able to exactly retrace my steps in the exact order I went in, but the key points are obviously still memorable so I’m going to do my best to at least recap it in a general overview.
The incredibly short version is that you run Process Monitor, take the action you want to understand while Process Monitor is monitoring, and then devour the Process Monitor log. That will at least give you a lot of hints.
Applying the Method:
In this case, that was achieved by using DSREGCMD to remove the accounts (please don’t look into this, it’s not a good rabbit hole), as well as using the settings menu’s “Work and School Accounts” menu to Disconnect the secondary accounts, then look through the logs to see what happened.
One of the key things to look at is what else those utilities then call (Process Create, Process Start, Process Exit)…
DSREGCMD:

Disconnect from the Settings Menu:

The thing I immediately noticed was that SVCHost and BackgroundTaskHost popped up immediately after starting either method. These are fairly common executable’s though so while my hindsight vision knows at least one of these is important now, I likely didn’t when I first started digging.
At the same time, given we know we are looking for the deletion of something, I would go looking for specific operations like RegDeleteKey and RegDeleteValue…

Take note of how it’s the BackgroundTaskHost again, as well as the RunTimeBroker.
Those results give us a huge hint pointing at some keys down in…
HKU:\Your-SID\Software\Microsoft\Windows\Windows\CurrentVersion\AAD\Storage\Https://Login.MicrosoftOnline.com
HKU:\Your-SID\Software\Microsoft\Windows\Windows NT\Current Version\WorkplaceJoin\JoinInfo
…That are being blown away. Importantly, those keys/values contain things we recognize like the Universal ID (A Universal ID follows the format U:Azure-Account-ID.Tenant-ID) and tenant ID belonging to the secondary account we had added and thus would have been removed during the log capture.
More confusingly, we also see some bizarre key path listed of…
\Registry\A\Some-GUID-Garble\LocalState
…with more keys and values belonging to our tenant, our secondary accounts Universal ID, and our secondary accounts outright UPN.
Well, that begs the question of what on earth this weird registry path is? A little Googling of \Registry\A will let you know this is an Application Hive so, the registry has custom-mounted some hive from somewhere and is taking action on it. So where is it? What is it?
Luckily, the filter “Operation is RegLoadKey” will take you right to that answer… (Or, I’m fairly certain what I did at the time is filter for a path containing .dat knowing that’s the typical extension for a registry hive, just like the NTUSER.DAT at the root of your Windows profile.)

…that BackgroundTaskHost.exe loaded two hives (copied below).
C:\ProgramData\Microsoft\Windows\AppRepository\Packages\Microsoft.AAD.BrokerPlugin_1000.19580.1000.0_neutral_neutral_cw5n1h2txyewy\ActivationStore.dat

C:\Users\USERNAME\AppData\Local\Packages\Microsoft.AAD.BrokerPlugin_cw5n1h2txyewy\.Settings\settings.dat
These are both hives for the AAD Broker Plugin, one of which is simply for the machine overall and the other is for our user. And sure enough, if you copy both of those files out somewhere else (you will have to catch them while not in use, which is easiest immediately after restarting), then load them like any other registry hive, you will find that the Settings.dat file contains the same keys and values that we saw get deleted (granted you would have to re-add the account to see this).
Lastly, I don’t know why but Process Monitor seems to lack a “file delete” type operation, instead categorizing it as “SetDispositionInformationFile” with a detail status that tells you it was deleted. That shows that SVChost (finally coming full circle on this) also deletes out some garble-named Tbacct files in the same token broker location. These are the actual authentication tokens for the account, along with the profile pictures in varying resolutions.

After repeating this test while logging several times in several different ways, we have our puzzle pieces in hand as far as what we need to track down and remove.
Automating it (How the Script Works):
Following the last section, we now have our map plotted with destinations and the question becomes – how do we get there?
Going back up to the filter of RegDeleteKey and RegDeleteValue, we know some of the registry keys it goes after are in the Token Broker’s application registry (Settings.dat going forward), and some are in the normal HKU paths below.
HKU:\Your-SID\Software\Microsoft\Windows\Windows\CurrentVersion\AAD\Storage\Https://Login.MicrosoftOnline.com
HKU:\Your-SID\Software\Microsoft\Windows\Windows NT\Current Version\WorkplaceJoin\JoinInfo
It didn’t take me long to come to the conclusion with how often the settings.dat file was locked that it’s best to not interact with it unless we have to. So, instead, we can use those two standard registry locations to identify if a secondary account is present. Luckily, only secondary accounts make keys here too, so we don’t have to worry about spotting the primary account and/or filtering it out. And also luckily, those keys contain the UPN, Tenant ID, and Universal ID of the accounts, giving us everything we then need to find their corresponding values in the Settings.dat and delete them.
And that alone is honestly how it works in a nutshell.
Give me more detail:
Okay, okay – I can definitely write more on this.
First, some of the things are going to need to do like mounting the registry hive you can really only do as an admin, so given this goes out as an Intune PR, we need to make our script able to run as the System. The hurdle this adds is figuring out who the current user is, or more so their SID, which then determines the path we need to check in the registry for secondary accounts. That’s handled by the scripts Get-CurrentUserSID function. There is also a Get-CurrentUser for just returning the account name which we then need for the path to the Settings.dat file. And yes, this does mean that the account must be active for this to work, I don’t much care for the concept of scanning all the registry paths, although it could be done. I think it’s pretty safe to assume though that the employee who should be using the machine will in fact be using the machine soon enough.
Next, we scan those registry keys mentioned above starting with the \AAD\Storage\Https://login.MicrosoftOnline.com key to see if there are secondary accounts to remove. We can get more details on these accounts by using the values in those keys to find the corresponding keys and values in the WorkplaceJoin\JoinInfo key.
Going up to this step is how the detection locates secondary accounts and reports on what they are. Only the deletion script continues beyond this point.
If there are secondary accounts, then we know it’s time to begin the process of removing them by mounting the Settings.dat and recursively passing through each account we found and locating their values in the Settings.dat and removing them. This is very tricky!
Why is working with the settings.dat difficult? Well, first, as I learned the hard way, you need to stop the Token Broker service to ensure the Settings.dat file is free to touch. On top of that, my script has a function Test-FileLock (Credit to Arno Peters) which double checks the file is ready for us to use. Only once the service is stopped and the file is confirmed to be free, we are ready to mount the registry hive and begin to look inside. Before this is done though, a date and time stamped copy will be made in the same folder as the original Settings.dat file.
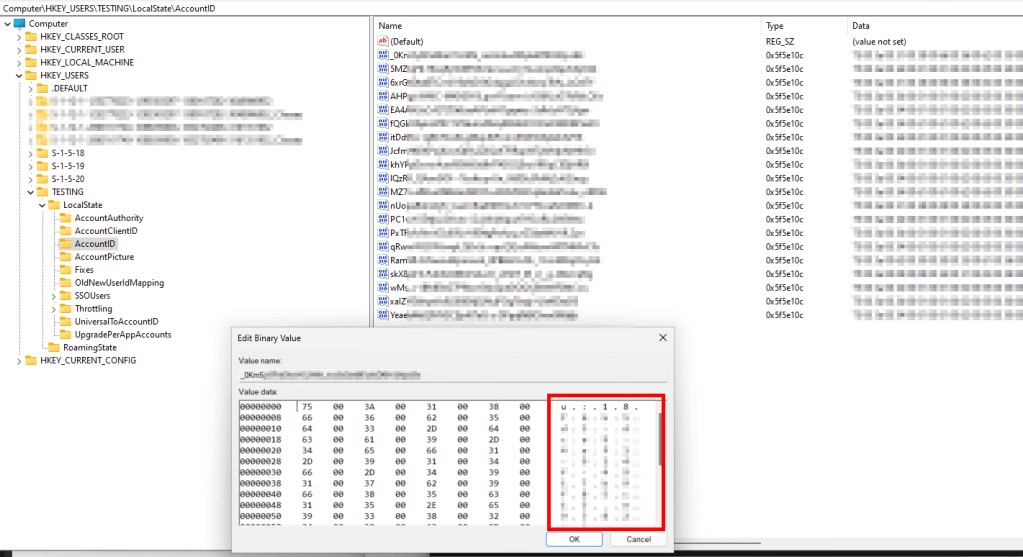
The second reason this file is difficult to work with is because nothing is as it seems in here! See below picture. The value in the Type column is garble. I can tell you that the data really is binary data. You wouldn’t think this is too much of a problem, but if you try something normal like Get-Content or Get-ChildItem, it will come back as entirely null (“$Null -eq $content” will be true) because PowerShell barfs when it sees the Type value it doesn’t understand.
This is where I finally circle back to thanking ExpendaBubble and ChrisDent on the WinAdmins Discord. They helped with suggesting using req query which, while older and less preferable, does at least pull some data. That data appears normal but has garble mixed between every character that PowerShell can’t display but you can prove the existence of if you ask for the string length. Tricky! They then helped with some suggestions to clean this out and leave us with nice clean ASCII-friendly data.
Great! We finally have some data!…. What is it and how does it help? Again referencing the below picture, those Name values are complete garble and that’s because this is all incredibly backward. The data of these is the universal ID of the various accounts on the machine, (See how it starts with U: in the edit window). So, we know which of these values(names) to delete based on the data content matching back to the universal ID of the current account we are removing.
Seemingly many of the components for the Settings Broker work this way where the name of the file or value seems like gibberish, but the content of its data contains values we can recognize and use to identify what needs to be removed.
As another example, the TBACCT files, part of which is our authentication token I believe, contain content including the Universal ID and UPN of the account they belong to. So, we can check each token’s internal content for the Universal ID of whatever account we are on, and thus find tokens matching the secondary account that need to be removed.
This is why the script highlights finding a matching Universal ID to AccountID (AccountID being the name of the parent key in the above screenshot). Similarly, it lists out finding UPNs that match to TBACCT files.

The rest of the values/files/etc it locates are all located the same way using things like the UPN and universal account ID to locate the values that belong to this specific secondary account we wish to delete. These include things like the account’s profile pictures. Everything we are locating was simply determined by looking back to the same paths and keys that were seen in our Process Monitor traces.
At the end of locating everything, we then simply action on deleting said located values/files/etc.
Lastly, we run a garbage-collect to free up any files or values we were touching, unmount the Settings.dat file, and end our logging and script.
And that’s how it works!
Troubleshooting:
Lastly, I want to talk about troubleshooting. Both scripts have a small “known issues” section but I want to talk about a few relatively common scenarios and what they mean.
In-use accounts:
Let’s say you’ve added Bob@contoso.com to your secondary accounts and have Teams actively running and on that profile. This seems to cause some similar weirdness as to what happened before I stopped the Token Broker service in that it seems Team’s has cached the account and login and thus the deletion might not fully complete. Effectively, you might not see the account vanish, or it might come back.
Solution: At the moment, this is a try, try again type situation. Importantly, it seems other apps like Outlook and Edge don’t suffer from this issue, I’ve only seen it with Teams. I’d like to think employees will be on their primary Teams account some of the time.
Manually added but not used accounts:
If an account is manually added via the Settings menu, such as the Email and Accounts menu, but never actually used to sign into an app, some of the registry keys may not exist. This prevents the script from getting the values it needs to then locate and correlate all the values to each other and delete them.
Solution: The only reason I found this was because of testing. I think in the real world, nobody is adding secondary accounts without using them. In fact, I’d say 99% of people in this situation got into it by signing into an app. So, I really wouldn’t worry about this.
Account not found:
If you have a secondary account the script can’t see, and it’s not because of either of the above – did you just add it? Because that was something else seen in testing. To explain, it takes a moment for the Settings.dat file to get all its values, and for all the registry keys to get added, so make sure you don’t add an account and then immediately try to remove it, even if you do so via signing into an application. Realistically, this is a non-issue as any employee should not have just added an account before the script runs as you should already have the policy deployed to prevent this before you ever attempt remediation.
Logging:
If you are still having issues or getting unexpected results, I would look at the logs. By default, each execution of this script will create a corresponding Log file and a full trace of the PowerShell’s execution. These files are placed in $LogFileFolder, “C:\Windows\AzureToTheMax\AzureAccountCleanup” by default. See the variables section at the top of the script and/or the configuration section of this article for more information.
Conclusion:
You should now be armed with the scripts and knowledge needed to go forth and conquer. Happy hunting and by all means, if you see a problem with the script, let me know!
Disclaimer:
The following is the disclaimer that applies to all scripts, functions, one-liners, setup examples, documentation, etc. This disclaimer supersedes any disclaimer included in any script, function, one-liner, article, post, etc.
You running this script/function or following the setup example(s) means you will not blame the author(s) if this breaks your stuff. This script/function/setup-example is provided AS IS without warranty of any kind. Author(s) disclaim all implied warranties including, without limitation, any implied warranties of merchantability or of fitness for a particular purpose. The entire risk arising out of the use or performance of the sample scripts and documentation remains with you. In no event shall author(s) be held liable for any damages whatsoever (including, without limitation, damages for loss of business profits, business interruption, loss of business information, or other pecuniary loss) arising out of the use of or inability to use the script or documentation. Neither this script/function/example/documentation, nor any part of it other than those parts that are explicitly copied from others, may be republished without author(s) express written permission. Author(s) retain the right to alter this disclaimer at any time.
It is entirely up to you and/or your business to understand and evaluate the full direct and indirect consequences of using one of these examples or following this documentation.
The latest version of this disclaimer can be found at: https://azuretothemax.net/disclaimer/
