Introduction:
With your data now ingesting into Log Analytics, granted the collectors not yet deployed, we are ready to begin setting up our workbooks to further confirm data is coming in properly.
Note: It would be a good idea to have at least a few devices manually ingest some data before starting this process.
In this section, we will cover…
- Requirements
- Downloading the Workbook
- Importing the .Workbook File
- Modifying the Queries Page
- Conclusion
Requirements:
This should be pretty obvious, but you need to have completed the prior article covering the setup and initial data ingestion and, gotten data to successfully show inside the tables (step 6). If you haven’t gotten that far, you’re not going to be able to see anything in the workbooks and that’s an issue.
Downloading the Workbook:
The App Usage.workbook file is on my GitHub here. Just hit the little download arrow near the top right.
Importing the .Workbook File:
I have good news! Assuming you have stayed in lock step with this guide, this workbook requires no lengthy pre-import modification! So, let’s get it imported.
You will need to go to Workbooks on the left, and then choose the Empty option.

Then, look for the </> icon along the top and click it.

This will open the JSON view for the workbook. You need to CTR+A and simply delete the default content present.
Then, copy and paste in the full content of the .Workbook file you just downloaded (just open it with any text editor). Once pasted in, hit Apply.

This should kick you out to the main page of the workbook shown below. Assuming your test ingestions were done in the past 30 days, you should have some data showing although, it might not look like much yet.
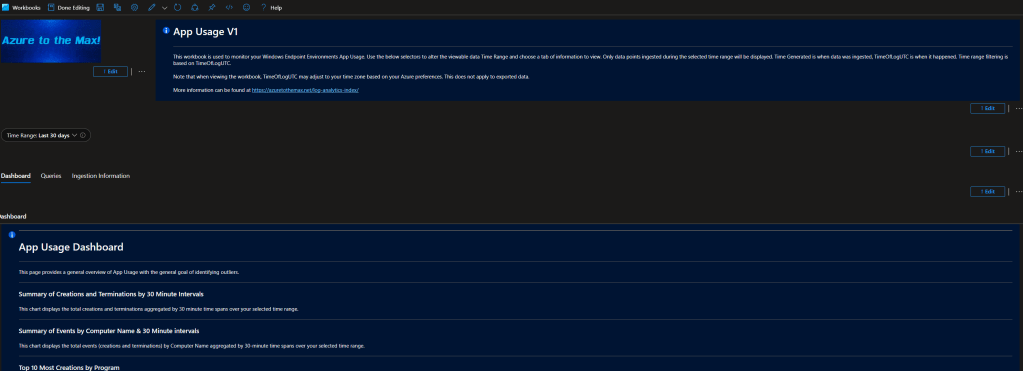
Go ahead and look at the data showing on the various tabs (the “Dashboard”, “Queries”, etc, buttons right under the time range, just under my logo). If for the most part it looks to be functional, look for the save icon (floppy disk) at the top. You will be prompted to name the workbook as part of saving it.
Note: The default queries present won’t return any results due to the default fake names typed in. That’s normal and something I will circle back to.

Once you hit Apply on the save menu, your workbook will think for a moment and then the new name will take the place of Workbook 1 at the top. You can then back out to the workbooks view and (after a few minutes) your new workbook will appear in the workbooks view. The caching for these is weird, it may not show up right away, so give it time.
Modifying the Queries Page:
There is just one simple little thing I would recommend you alter about this workbook.
Change to the queries tab and you will see the Device Filter, User ID, and Application fields have a very generic Device and User value entered by default. All I suggest is that you type in something, anything that will return an actual result. That can be a specific device, a generic username, a generic start of a device name – just change them both to something that actually returns a result. Once you change them all, hit the save icon again.
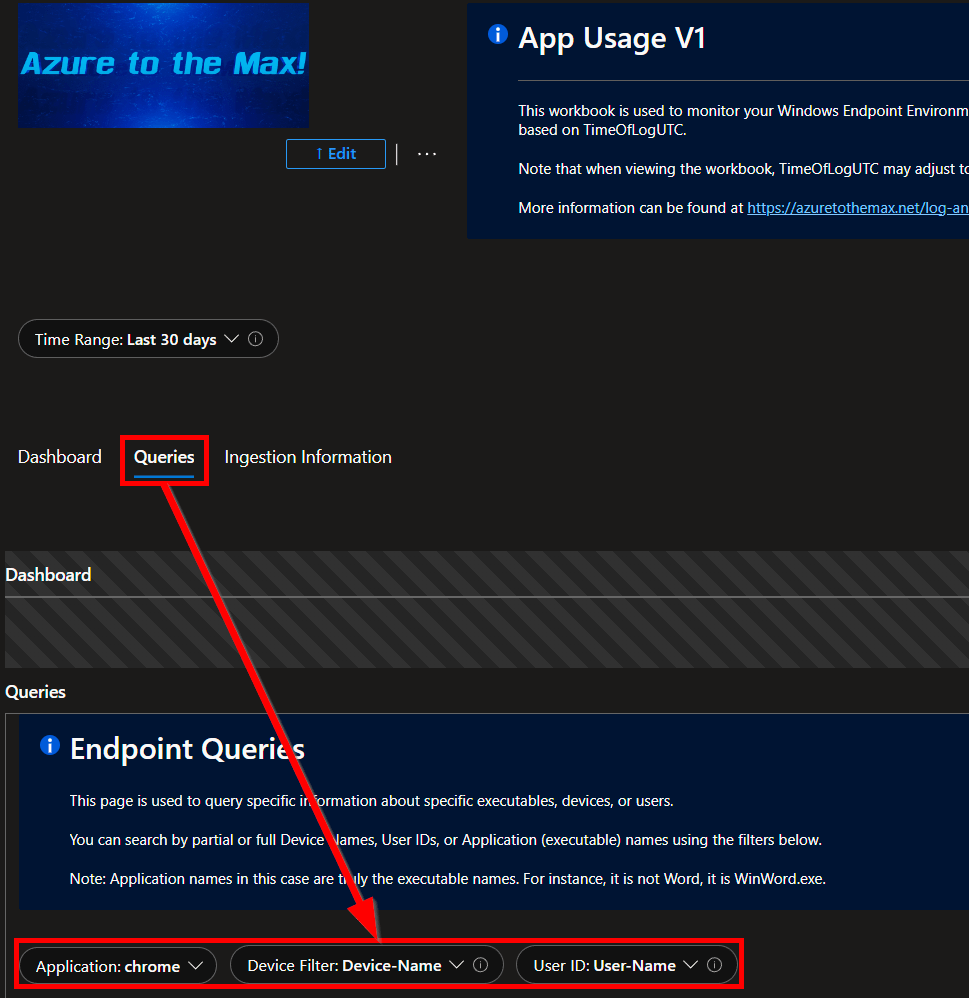
This will make it such that whenever someone opens this workbook for the first time, the value it will default to is whatever you just typed in that actually returns a result, rather than my generic values. This just helps make it look functional rather than it having a bunch of weird errors / warnings about not finding any results whenever someone first opens it.
Conclusion:
Anyone familiar with my other workbooks and deploying them is probably confused – that can’t possibly be all there is to it. I know, I feel the same way. While this is decently sized workbook, there really isn’t anything we need to change about it. It should just work. Feel free to explore it. Information on what all these things are is in the original opening article covering what the collector collects. Additionally, almost every query has an info panel in the workbook itself to explain what it does as well.
The Next Steps:
See the index page for all new updates!
Log Analytics Index – Getting the Most Out of Azure (azuretothemax.net)
I will be putting the App Usage guides on the Log Analytics Index page under the System Usage series.
Disclaimer:
The following is the disclaimer that applies to all scripts, functions, one-liners, setup examples, documentation, etc. This disclaimer supersedes any disclaimer included in any script, function, one-liner, article, post, etc.
You running this script/function or following the setup example(s) means you will not blame the author(s) if this breaks your stuff. This script/function/setup-example is provided AS IS without warranty of any kind. Author(s) disclaim all implied warranties including, without limitation, any implied warranties of merchantability or of fitness for a particular purpose. The entire risk arising out of the use or performance of the sample scripts and documentation remains with you. In no event shall author(s) be held liable for any damages whatsoever (including, without limitation, damages for loss of business profits, business interruption, loss of business information, or other pecuniary loss) arising out of the use of or inability to use the script or documentation. Neither this script/function/example/documentation, nor any part of it other than those parts that are explicitly copied from others, may be republished without author(s) express written permission. Author(s) retain the right to alter this disclaimer at any time.
It is entirely up to you and/or your business to understand and evaluate the full direct and indirect consequences of using one of these examples or following this documentation.
The latest version of this disclaimer can be found at: https://azuretothemax.net/disclaimer/
