Introduction:
With your data now ingesting into Log Analytics, granted the collectors not yet deployed, we are ready to begin setting up our workbooks to further confirm data is coming in properly. I feel like starting with Admin Inventory for some reason, so let’s go ahead and get this one knocked out.
Note: It would be a good idea to have at least a few devices manually ingest some data before starting this process.
In this section, we will cover…
- Requirements
- Your Local Admin Accounts
- Confirming the GA and Local Admin Group SIDs
- Downloading the Workbook
- Filling in your SIDs
- Importing the .Workbook File
- Excluding Other Admins – Editing the Workbook
- Conclusion
Requirements:
This should be pretty obvious, but you need to have completed the prior article and gotten data to successfully show inside the tables (step 6 of the prior). If you haven’t gotten that far, you’re not going to be able to see anything in the workbooks and that’s an issue.
Your Local Admin Accounts:
Before we get to even look at the workbook, we need to have a discussion regarding your local admin accounts. I mentioned both in the last article covering the Azure deployment side, as well as in the informatic article about what this displays, that we need to do a little work to hide some accounts you probably don’t care about existing.
You likely noticed a couple strange entries in your local admin list like the below.

On every Azure joined device (hybrid or fully) you will find at least two unique SIDs (Security Identifiers) in the Local Admins group that start with S-1-12-1. The full SID of these two objects is different per tenant, but the two SIDs are always the same between devices in the same tenant. So, what are they?
It’s the Microsoft built in Azure Global Admins group and Azure AD Joined Device Local Administrator group. While other groups, including Azure groups, can display as a proper name, for some reason these two just don’t.
That all said, since these are part of the default configuration and should be present, you likely don’t care about their presence. As such, we will exclude them from returning as a result in the queries of the Workbook.
Confirming the GA and Local Admin Group SIDs:
In order to hide the accounts, we first need to confirm these two SIDs are what we think they are.
1. First you need to get the SIDs of what you believe are likely the GA group and Local AD Joined local admin group. This can be done by either looking at your RAW data files again or, looking at the table contents via the query writer.
2. We need to take a trip over to someone else’s blog. I have this link in the Workbook itself for future reference.
PowerShell Helpers to convert Azure AD Object IDs and SIDs – Modern IT – Cloud – Workplace (oliverkieselbach.com)
Feel free to read the whole article, but we really just need this script.
https://github.com/okieselbach/Intune/blob/master/Convert-AzureAdSidToObjectId.ps1
3. Into this script, drop in your SIDs one at a time and execute it…

It should spit out a GUID like this… Notate which GUID belongs to which SID.

4. Next, we need to get the Object IDs of the Azure Groups which requires a few commands.
Note: The Connect-AzureAD command has a lot of different behavior’s depending on the authentication requirements you must meet as governed by your Tenant. I just get a simple auth popup but, it almost always pops up behind Visual Studio or ISE giving the appearance absolutely nothing is happening. Just a warning in case the same thing happens to you.
#Install the AzureAD module if you don't have it
Install-module AzureAD

#Connect to Azure AD - The auth window LOVES to popup behind VSC/ISE
Connect-AzureAD

#Pull the role IDs
Get-AzureADDirectoryRole
Once ran, it should spit out a list of your roles and their IDs, which you can confirm back to the ID you got from converting the SID.

Again, use this to confirm which SID is the GA and which is the Azure AD Joined Local Administrator group. This will be needed in a moment.
Downloading the Workbook:
The workbook is on my GitHub here. Just hit the little download arrow near the top right.
Filling in your SIDs:
Open the workbook up in your favorite text editor. Just make sure it’s one with a find and replace function.
Replace all six instances of S-1-12-1-XXXXXXXXXX with the SID of your Global Admin group.
Replace all six instances of S-1-12-1-YYYYYYYYYY with the SID of your Azure AD Joined Device Local Administrator group.
And just as easy as that, we have excluded your two SIDs from returning as a result in any query as well as filled out the information page.
Importing the .Workbook File:
We are now finally ready to head out to Log Analytics and import the Workbook file!
You will need to go to Workbooks on the left, and then choose the Empty option.

Then, look for the </> icon along the top and click it.

This will open the JSON view for the workbook. You need to CTR+A and simply delete the default content present. Then, copy paste in the full content of your now modified .Workbook file. As long as all your edits were properly done, you should not see any red markers or any errors on the scrollbar / top. If it looks good, hit Apply.

This should kick you out to the main page of the workbook shown below. Assuming your test ingestions were done in the past 30 days, you should have some data showing although, it might not look like much yet.

You will notice we have little edit buttons everywhere, that’s because the Workbook is still in edit mode. Go ahead and click on the Account Information button and scroll down a little. You should see that the two SIDs you did during your find and replace are present in this menu. There are some other admins in this list though, and we will talk about those next.

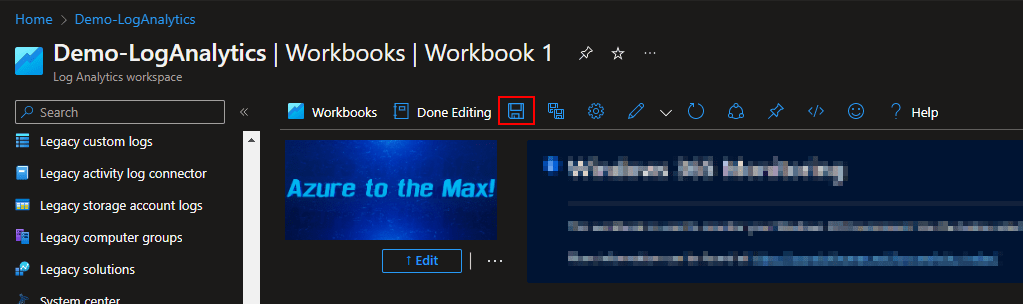
Before we do that though, you need to save your workbook.
Go ahead and look at and play around with the data showing on the Dashboard and Queries tab. If for the most part it looks to be functional, look for the save icon (floppy disk) at the top. You will be prompted to name the workbook as part of saving it.
Once you hit Apply on the save menu, your workbook will think for a moment and then the new name will take the place of Workbook 1 at the top. You can then back out to the workbooks view and (after a few minutes) your new workbook will appear in the workbooks view. This caching is weird, it may not show up right away, give it time.
Excluding Other Admins – Editing the Workbook:
You may obviously have other accounts you want to exclude such as some account your organization sticks everywhere by default. So, how do you do that?
In order to answer that we first need to discuss how to edit the workbook in general.
Hopefully your still in edit mode inside the workbook. If not, just open it up and hit Edit at the top.

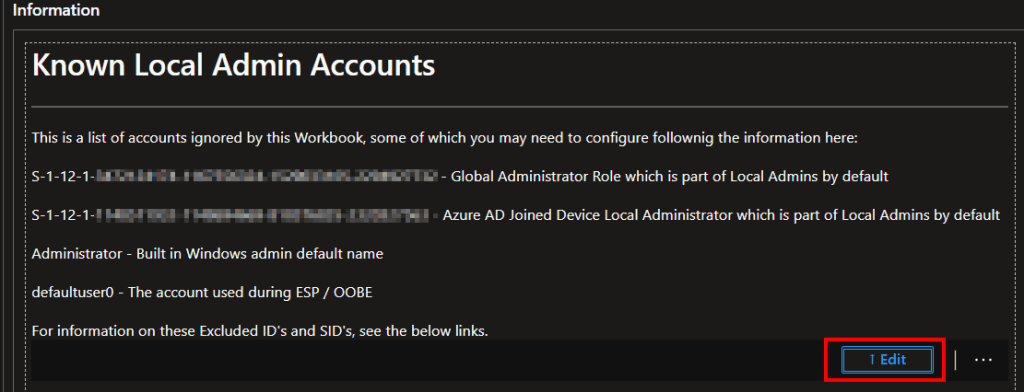
Go ahead and change back to the Account Information page and lets take a look at this other section of information.

As explained, by default the queries were also built to ignore the default Administrator account built into Windows, as well as the DefaultUser0 which is used during ESP (Autopilot) and the OOBE. Again though, you may have other accounts you want to ignore and thus you should add to this list.
So, let’s edit this list as an easy first example. To do this, you need to hit edit on the group containing these two sections of text (the group is what makes the tabs work). Again, you need to be in edit mode to do this.

Then hit edit on the text window itself.
Once you finish editing the text, you can optionally hit Done (1) on that window to finish editing just that window. Or, hit Done (2) at the top to exit editing mode entirely. Lastly, once your changes are complete on any/all items, you need to Save (3). You can save while in or out of editing mode. Exiting edit mode without saving doesn’t cause your changes to be lost, they are still active so they can be viewed in non-editing mode. Exiting the workbook itself however will cause you to loose your changes.

Now you know how to edit most anything in a workbook I make. That process being, go into edit mode, hit edit on the group, and then edit the individual item in that group. Once done, hit save.
So, how do we exclude another admin account?
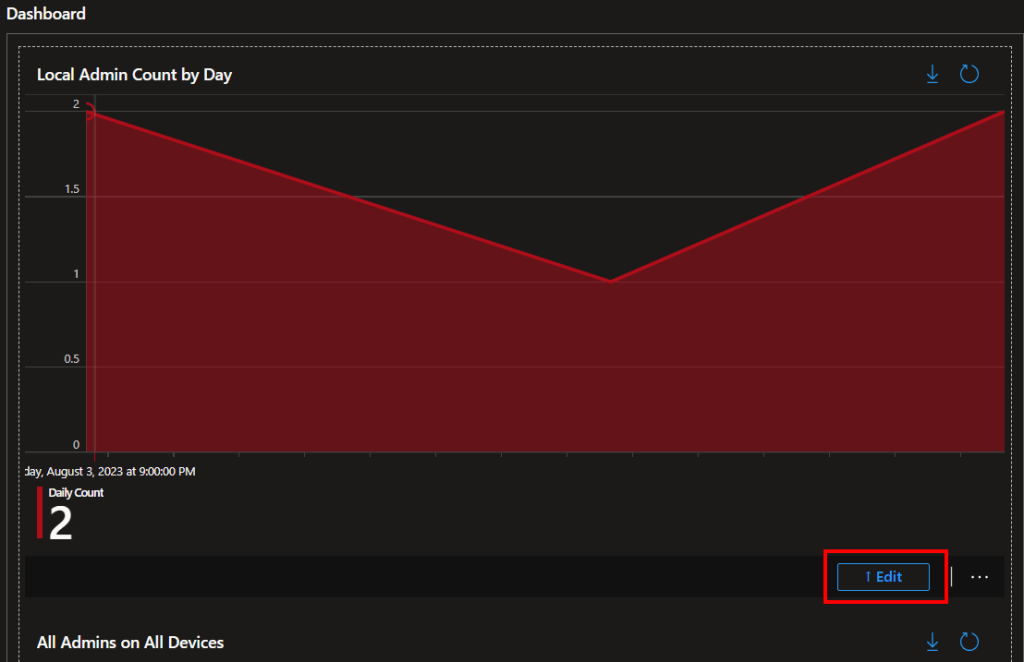
Go ahead and change to the dashboard.

Scroll down to the bottom of this group and hit edit.

Hit edit on one of the queries. I will choose the graph query.
And now you see the guts of the query that makes that graph, including the very obvious lines to exclude the aforementioned accounts. These lines exist in each query.

To exclude accounts, just add a new line like so. Here I will exclude the account named BobsAdmin.
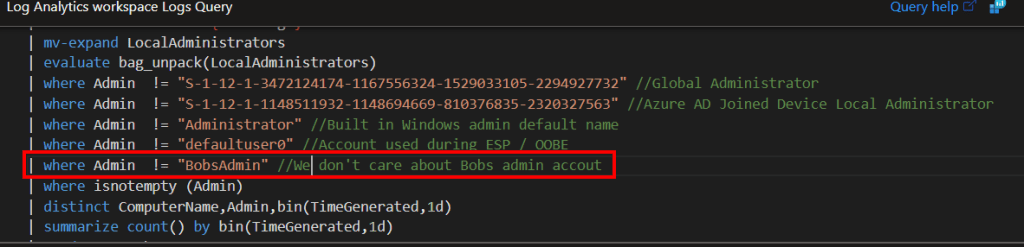
It’s as simple as that.
Unfortunately, you have to do this to all five queries in the workbook. Two are very obviously on the dashboard and two are very obviously on the queries page. The fifth query is hiding. It’s also on the queries page and it’s actually the query behind the user selector drop down.
Note: You do not need to make changes to the items under the Ingestion Information tab.
Note: This drop down query tries to make a drop down list of every unique and unknown (non-excluded) local admin you have. If that list exceeds 250, it may break. If so, the best option you have is to change this to a manually typed field. Look at the Device Name option to it’s left for an example of this.
To edit the drop-down query, first hit edit on that item.

Check the box for that parameter (the only parameter in this case) then hit the edit pencil.
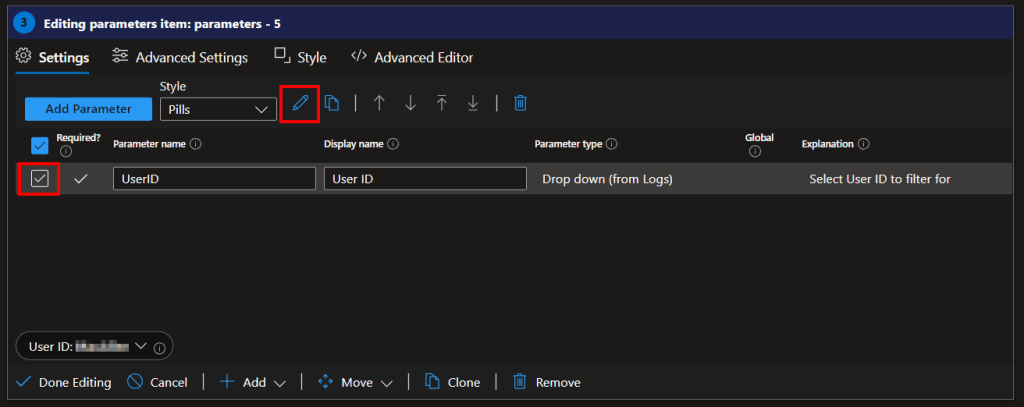
This will pop a side panel that shows the query behind this. Just edit it and then hit the save button on the popup window itself.

Conclusion:
You should now have your admin Inventory workbook up and running! Go ahead and play around with the views and queries some more, as well as check out the other tabs. We have two more workbooks to deploy, then we will talk about deploying the collector itself.
The Next Steps:
See the index page for all new updates!
Log Analytics Index – Getting the Most Out of Azure (azuretothemax.net)
I will be putting the Windows Endpoint guides on the Log Analytics Index page under the Win365 series.
Disclaimer:
The following is the disclaimer that applies to all scripts, functions, one-liners, setup examples, documentation, etc. This disclaimer supersedes any disclaimer included in any script, function, one-liner, article, post, etc.
You running this script/function or following the setup example(s) means you will not blame the author(s) if this breaks your stuff. This script/function/setup-example is provided AS IS without warranty of any kind. Author(s) disclaim all implied warranties including, without limitation, any implied warranties of merchantability or of fitness for a particular purpose. The entire risk arising out of the use or performance of the sample scripts and documentation remains with you. In no event shall author(s) be held liable for any damages whatsoever (including, without limitation, damages for loss of business profits, business interruption, loss of business information, or other pecuniary loss) arising out of the use of or inability to use the script or documentation. Neither this script/function/example/documentation, nor any part of it other than those parts that are explicitly copied from others, may be republished without author(s) express written permission. Author(s) retain the right to alter this disclaimer at any time.
It is entirely up to you and/or your business to understand and evaluate the full direct and indirect consequences of using one of these examples or following this documentation.
The latest version of this disclaimer can be found at: https://azuretothemax.net/disclaimer/
