In the last part of this series, we took a look at how the collection script works. In this part, we will look at how you can modify it to collect a new piece of data. While I would prefer you to simply follow along, the final result script created in this guide will be SampleCollectionScriptV4.ps1 which is out on the GitHub. While you can just grab that new script, you will have to manually modify the Table and DCR.
As always, I recommend the use of Visual Studio Code with the PowerShell extension.
In this section we will cover…
- Modifying the Script
- Modifying the Table to Accept New Columns
- Modifying the Data Collection Rule (kind of a pain)
- Running the New Script
- Conclusion
Modifying the Script:
If you recall from last time, I highlighted how this section is really the most important single piece for modification. On each line we add a member to the array (what later becomes a column header in Log Analytics) and then populate that property with the contents of the variable and thus the data we queried in the prior section.
$Inventory | Add-Member -MemberType NoteProperty -Name "ManagedDeviceName" -Value "$ManagedDeviceName" -Force
$Inventory | Add-Member -MemberType NoteProperty -Name "AzureADDeviceID" -Value "$AzureADDeviceID" -Force
$Inventory | Add-Member -MemberType NoteProperty -Name "ManagedDeviceID" -Value "$ManagedDeviceID" -Force
$Inventory | Add-Member -MemberType NoteProperty -Name "ComputerName" -Value "$ComputerName" -Force
$Inventory | Add-Member -MemberType NoteProperty -Name "ActiveUser" -Value "$users" -Force
$Inventory | Add-Member -MemberType NoteProperty -Name "ComputerUpTime" -Value "$ComputerUptime" -Force
$Inventory | Add-Member -MemberType NoteProperty -Name "NetworkAdapters" -Value $NetWorkArrayList -Force
$Inventory | Add-Member -MemberType NoteProperty -Name "ScriptVersion" -Value "$ScriptVersion" -Force
And indeed, this is what needs to be modified. For the sake of simplicity, I am going to pick a simple piece of data to start collecting. I want to go ahead and collect information on the devices model. For example, Surface Laptop 9000.
Before we can modify the above though, we need to figure out how to query the data we want and get it into a variable. Conveniently, we already almost have that information. On line 428 we already run…
$ComputerInfo = Get-CimInstance -ClassName Win32_ComputerSystem
All we need to do to get the model then is this command which pulls the model information from one of the many child-items packed into $ComputerInfo. On line 430 I will thus add…
$ComputerModel = $ComputerInfo.Model
Then, we simply need to add this new variable to our array. The order doesn’t really matter here but I like it to make sense so, I will put this under the ComputerName line. This is the new line I will add…
$Inventory | Add-Member -MemberType NoteProperty -Name "Model" -Value "$ComputerModel" -Force
And together it looks like this.
$Inventory | Add-Member -MemberType NoteProperty -Name "ManagedDeviceName" -Value "$ManagedDeviceName" -Force
$Inventory | Add-Member -MemberType NoteProperty -Name "AzureADDeviceID" -Value "$AzureADDeviceID" -Force
$Inventory | Add-Member -MemberType NoteProperty -Name "ManagedDeviceID" -Value "$ManagedDeviceID" -Force
$Inventory | Add-Member -MemberType NoteProperty -Name "ComputerName" -Value "$ComputerName" -Force
$Inventory | Add-Member -MemberType NoteProperty -Name "Model" -Value "$ComputerModel" -Force
$Inventory | Add-Member -MemberType NoteProperty -Name "ActiveUser" -Value "$users" -Force
$Inventory | Add-Member -MemberType NoteProperty -Name "ComputerUpTime" -Value "$ComputerUptime" -Force
$Inventory | Add-Member -MemberType NoteProperty -Name "NetworkAdapters" -Value $NetWorkArrayList -Force
$Inventory | Add-Member -MemberType NoteProperty -Name "ScriptVersion" -Value "$ScriptVersion" -Force
Now, it would also be nice if we had the Serial Number too. This is a bit trickier but on line (now) 432 I will add this.
$ComputerBiosInfo = Get-CimInstance -ClassName Win32_Bios
$ComputerSerialNr = $ComputerBiosInfo.SerialNumber
And so now we need another new line in our array maker.
$Inventory | Add-Member -MemberType NoteProperty -Name "SerialNumber" -Value "$ComputerSerialNr" -Force
And that brings us to our final result of…
$Inventory | Add-Member -MemberType NoteProperty -Name "ManagedDeviceName" -Value "$ManagedDeviceName" -Force
$Inventory | Add-Member -MemberType NoteProperty -Name "AzureADDeviceID" -Value "$AzureADDeviceID" -Force
$Inventory | Add-Member -MemberType NoteProperty -Name "ManagedDeviceID" -Value "$ManagedDeviceID" -Force
$Inventory | Add-Member -MemberType NoteProperty -Name "ComputerName" -Value "$ComputerName" -Force
$Inventory | Add-Member -MemberType NoteProperty -Name "SerialNumber" -Value "$ComputerSerialNr" -Force
$Inventory | Add-Member -MemberType NoteProperty -Name "Model" -Value "$ComputerModel" -Force
$Inventory | Add-Member -MemberType NoteProperty -Name "ActiveUser" -Value "$users" -Force
$Inventory | Add-Member -MemberType NoteProperty -Name "ComputerUpTime" -Value "$ComputerUptime" -Force
$Inventory | Add-Member -MemberType NoteProperty -Name "NetworkAdapters" -Value $NetWorkArrayList -Force
$Inventory | Add-Member -MemberType NoteProperty -Name "ScriptVersion" -Value "$ScriptVersion" -Force
Now, go ahead and change $WriteLogFile (near the top) to $True so we can see our new data in our JSON and make sure it looks right. Then execute the script with F5.
Note: if you never altered the $LogName variable, it will export as SampleCollection-X.Json – otherwise look for your altered name.
This will spit out a corresponding RAW and FULL JSON file to C:\Temp\LogAnalytics. You should have a resulting RAW file like…
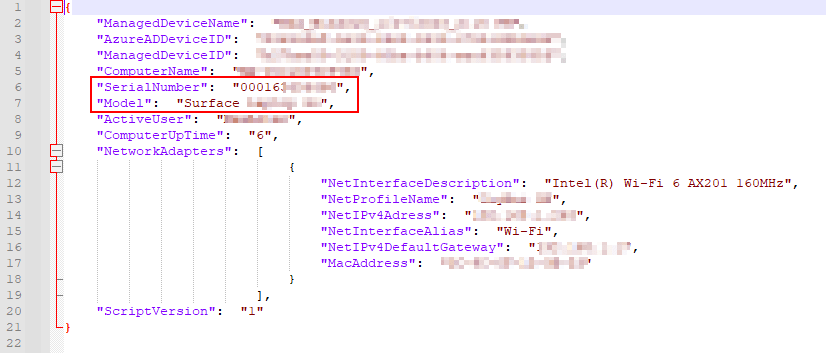
…With the two new values added.
That is the first (and easiest) part completed!
Modifying the Table to Accept New Columns:
As you may recall, we had to create a new Table and DCR and train them both how to deal with our data. Well, if you want to change that data, you need to go tell them that.
First up is the Table and it is actually very easy.
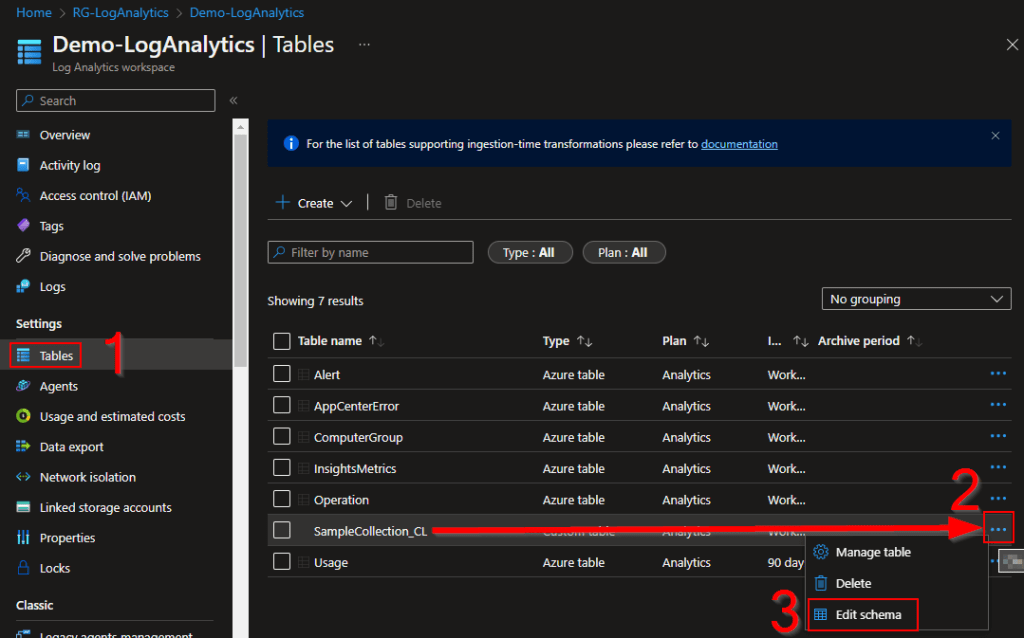
- Head into your Log Analytics Workspace
- Go to Tables
- Look for your Custom Table (Ends in _CL) and click the three dots on the far right.
- Choose Edit Schema
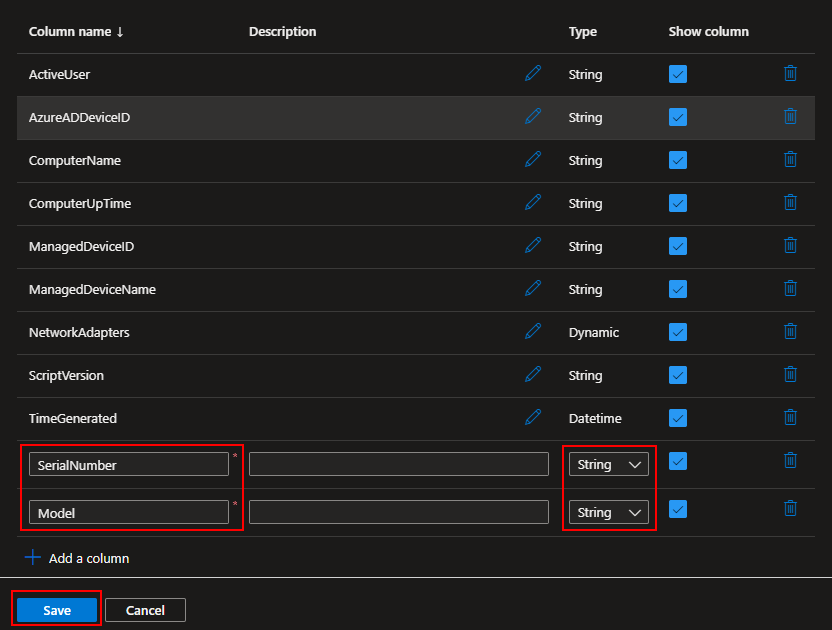
- Next, we simply need to hit Add a Column and enter in a Column Name, a Description if you wish, and a Type.
The Name needs to be the same as the one in the script. So, we need to add SerialNumber and Model. both of these values are of the type String. - Once entered, press Save.
That is the second and also rather easy part complete!
Modifying the Data Collection Rule:
While we need to do quite literally the same thing to the DCR as we just did to the Table, that being add two new values and their type, it is unfortunately much harder as of June 2023 to do this to a DCR than a Table. This is because Microsoft does not provide a cute GUI for this yet, rather it’s all PowerShell. Their original guide can be found here.
To do this, we need to first retrieve the content of our DCR via JSON, edit that JSON, and then upload the new content. You can do this via the Cloud Shell if you prefer but I tend to do these sorts of things locally.
There is a script in my GitHub to do this however, it’s not really a script in the sense that you hit F5 to run it all (it has logic to prevent that actually) but instead, it’s meant to have specific sections highlighted and then those specific sections ran with F8. There is surely a better way but frankly I do this so little it hasn’t been worth the time investment yet.
First, install the Azure PowerShell modules. This could take some time.
install-Module -Name Az -Scope AllUsers -Repository PSGallery -Force
Next, we need to fill in the variables at the top.
- Tenantid – Your Tenant ID can be found in the Azure AD overview page if you’re not familiar with it.
- Subscription – Your Subscription ID is right inside the Subscriptions Azure menu. Just search Subscriptions at the top and look for the key icon. If you have more than one subscription, grab whichever houses the DCR you want to edit.
- FilePath – This is the file we will store, edit, and then uploadthe JSON content to/from. Feel free to alter its location.
We also need to set the Resource ID. This is a path to the DCR you wish to edit. To get this, we need to go into the DCR on the web side.
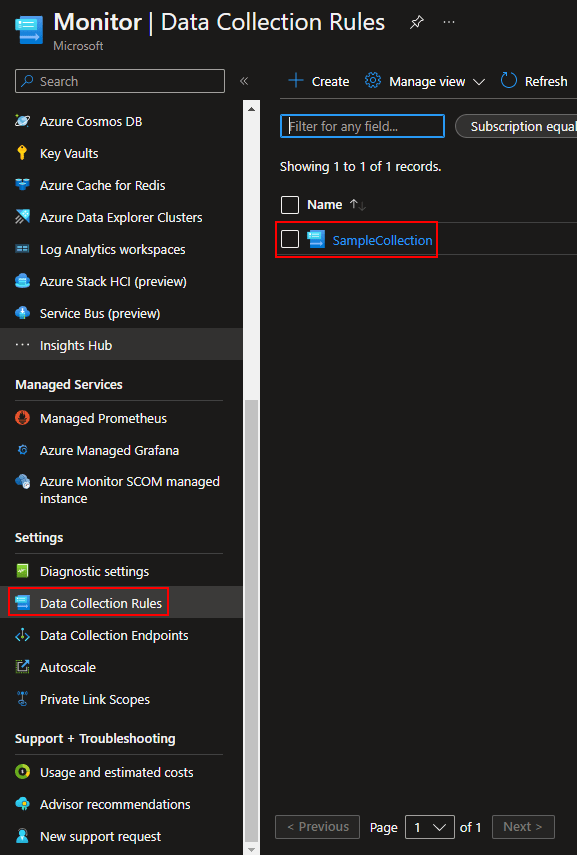
- Head to the Azure home.
- Search for Monitor and open the Monitor menu.
- Locate Data Collection Rules and then click on your rule.
- Click into the JSON view
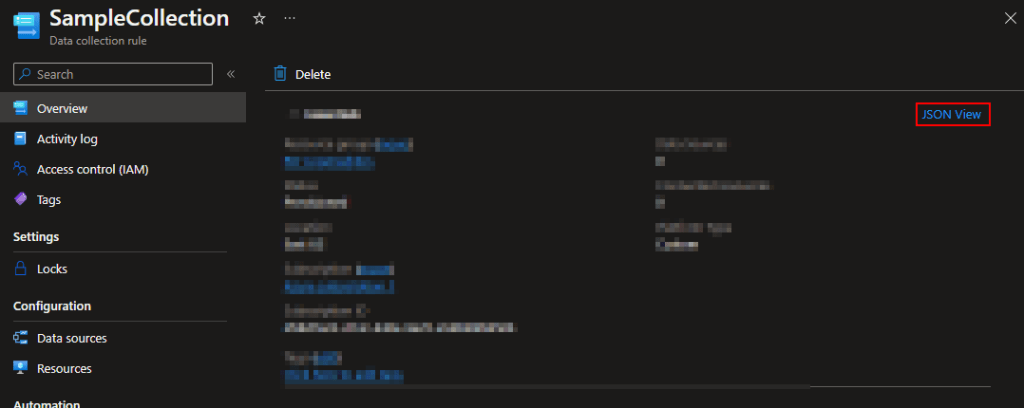
- Now, change the API version to 2021-09-01-Preview.
- The Resource ID is now directly to the left of the API box. Just use the little copy button.
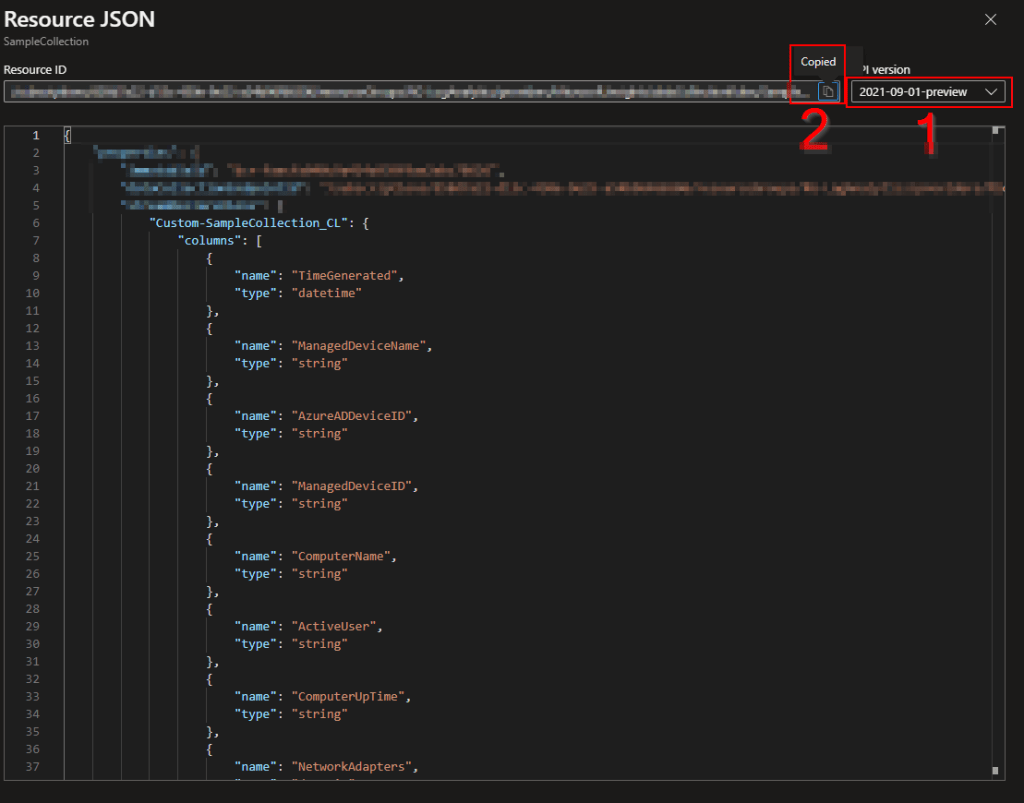
Ironically, if you look down just a little, that’s actually the JSON we are working so hard to get right there. If you want, you can just copy paste it out to a notepad and you now have the first part done. The problem is you can’t edit it via this view so, either way you will wind up doing the work of filling these options out in the script and using it to upload the data.
Frankly, it’s better to do it via the script in my opinion that way you know you have everything in the script right as you will see this same JSON when you perform the download. If you don’t see the same JSON you know your link is wrong and thus will catch that before you try to upload content to the wrong DCR.
- With all four variables filled out at the top, highlight lines 1-9 and run them with F8. This will store these values in these variables.
- Now, we can finally run lines 18 and 19 (Update-AzConfig and Connect-AzAccount) to both set the subscription we wish to login to and login to it. Highlight them and press F8.
Warning: The authentication window loves to popup behind Visual. If you don’t see anything, minimize Visual.
Note: The kind of device you are on, the requirements of the tenant you are connecting to, and the requirements of the subscription you are connecting to can all effect the requirements. For instance, my AAD device simply prompted to use a connected windows account. Other tenants may require MFA or force you to use a browser for auth. - Once ran and authentication completed, you should see something like this were the Value field matches the Subscription provided.
If the subscription does not match, which I have sometimes seen stubbornly happen despite setting the AzConfig subscription we want, you can use Set-Azcontext (line 22) to adjust the current subscription as needed. Sometimes this re-forces login / auth.

- Next, highlight lines 29 and 30 (Get DCR section) and run with F8 to pull down the DCR content to the location set earlier.
- At long last, you can open the JSON file created with your favorite tool such as NotePad++.
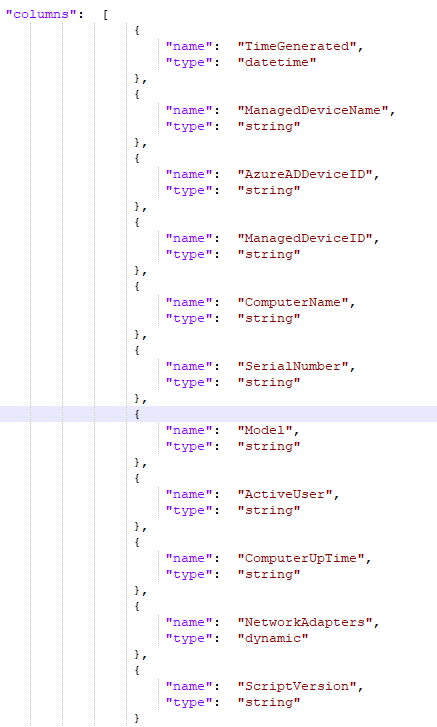
- Here you will find information confirming which table this goes with as well as list of the various columns and data types expected.

We simply need to add the same two fields as before with the same data type information following the guide of the other fields. Additionally, we can control order here so, I will make sure to keep this in line with the array builder in the script.
Here are the values I will be adding…
{
"name":  "SerialNumber",
"type":  "string"
},
{
"name":  "Model",
"type":  "string"
},
Some notes and warnings:
- Be careful with the formatting and capitalization here. It is case sensitive and, the formatting can be strange.
- The number one place I go wrong in here is with the commas, especially when adding a new field to the bottom. Be careful! The upload does do a formatting check though so you can’t go horribly wrong.
With a final result of…
Now, I save the altered file and run lines 39 and 40 with F8 to push the new content up.
This will perform a check to make sure the content is properly formatted, although it will obviously have no clue if you entered the column names and types correctly. It will also have no clue if your uploading the data to the right DCR, hence my earlier comment that you should use the script to pull the files down as well.
You should get a status 200 with a large message showing all the content.

Finally, all the editing is done!
Running the New Script:
Assuming you still have all your variables set from before, go ahead and flip $WriteLogFile back to $False and change $Delay to $False for testing. I doubt you want to wait possibly 50 minutes for this.
One last thing, change $ScriptVersion to 4, this is a new version after all!
You can now run the script with F5 and you should get a normal 204 response.
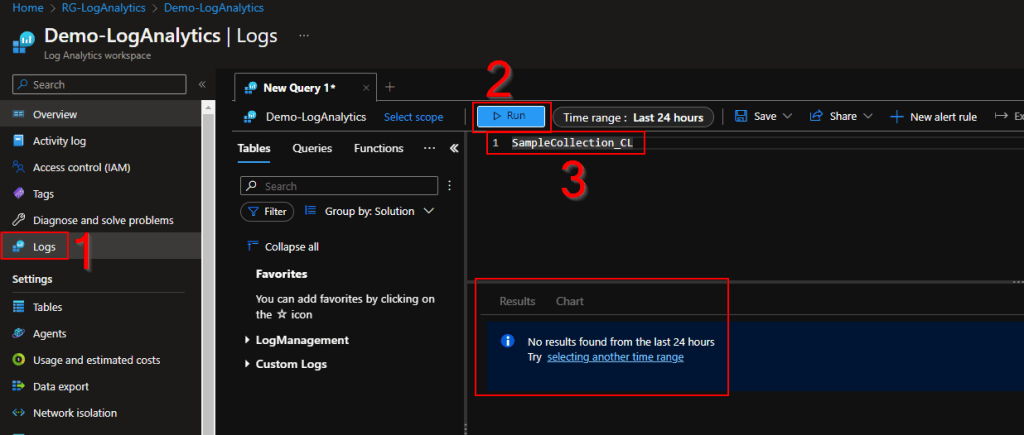
Now, if you rush out to Log Analytics, open the Logs view, and check your Table, you will likely see one of two things. You will either see…
- Absolutely nothing, as I do
- A new data point which does show version 4 but is missing the new columns.
That is NORMAL!
When you ingest data into an existing table and existing columns, it is fairly instant. When you ingest data into a table for the first time or ingest data into a new column for the first time, it is slow.
Sometimes the new data entry doesn’t show up at all, sometimes it does but it’s missing the new columns even if changes in existing columns are shown (like our change to the script version). I don’t know why it does this, it just does. Be patient and wait. Worse case, restart your browser, clear cache, sign out and in. Sometimes this menu is weird with its caching which you would think wouldn’t happen given queries don’t take place on your device.
Additionally, even after the new data does appear, the query writer may act like it has no clue what you are talking about when you type the new column names. Also normal, take the same steps.
Eventually your new data will appear, and you can write queries using it. The order might be a bit strange but that can all be adjusted in query.

Conclusion:
Obviously, the better thing to do is make a Table / DCR once you know everything you want to collect. However, that’s just not realistic sometimes as new ideas crop up later down the road. With this in hand, you should now be able to do almost everything this guide set out to teach.
The Next Steps:
See the index page for all new updates!
Log Analytics Index – Getting the Most Out of Azure (azuretothemax.net)
Disclaimer
The following is the disclaimer that applies to all scripts, functions, one-liners, setup examples, documentation, etc. This disclaimer supersedes any disclaimer included in any script, function, one-liner, article, post, etc.
You running this script/function or following the setup example(s) means you will not blame the author(s) if this breaks your stuff. This script/function/setup-example is provided AS IS without warranty of any kind. Author(s) disclaim all implied warranties including, without limitation, any implied warranties of merchantability or of fitness for a particular purpose. The entire risk arising out of the use or performance of the sample scripts and documentation remains with you. In no event shall author(s) be held liable for any damages whatsoever (including, without limitation, damages for loss of business profits, business interruption, loss of business information, or other pecuniary loss) arising out of the use of or inability to use the script or documentation. Neither this script/function/example/documentation, nor any part of it other than those parts that are explicitly copied from others, may be republished without author(s) express written permission. Author(s) retain the right to alter this disclaimer at any time.
It is entirely up to you and/or your business to understand and evaluate the full direct and indirect consequences of using one of these examples or following this documentation.
The latest version of this disclaimer can be found at: https://azuretothemax.net/disclaimer/
