Following my last post, this part will cover the deployment of the client-side script as well as detail how it works and how you can adjust it. I have written about the topic of deploying scripts via proactive remediations a few times now such as for the Log Analytics side. The deployment itself will be very similar to my other blogs but we need to talk about how to setup the script, how it works, and create a dynamic group.
Update:
Following my recent post on Security Updates for HTTP(s) Function Apps, I have started off by updating the Windows 11 Group Tag Conversion (GTC) Function App and client-side script. This means that the security concerns discussed in the prior versions of these articles no longer apply! However, as this is a major change, I decided it best to redact the previous articles and put out updated ones so folks would better see said updates. This header will be at the top of each of the new articles. The overall process is largely the same with only the authentication concerning portions and items like setup links changing.
Script Variables:
Before we shove it out in the wild, we first need to talk about how this script works and you need to fill in some blanks. And, before we do that, you need a copy!
The script can be found here on my GitHub.
Right near the top just under the Synopsis is a region labeled Variables. Each one is labeled so it’s pretty self-explanatory, but I have a bit to add here.
- $DesiredGroupTag = “Win11-Autopilot-Tag”
This is the name of the tag you want the devices to be converted to. - $CheckInPeriod = 30
Once your device establishes and then confirms it’s on the right tag, how many days should it wait before re-checking via the Function that it’s still under the right tag? - $LogFileLocation = “C:\Windows\AzureToTheMax”
This is where the log files as well as time-tracking and tag-tracking are stored. I would recommend you keep it somewhere out of the way. - $LogFileName = “Win11GroupTagConverter.Log”
This is the name of the primary log file created by the script. The logs are designed to be friendly with CMTrace or just Notepad. - $AzureFunctionURL = “Azure Function URL”
This is where you place the URL of your Function App gathered at the tail end of the last part. - $Delay = $true
Details on this in a moment. - $WriteLogFile = $false
No longer used in this new version. Previously used for easily vierwing the contents of the JSON to be sent. If someone is interested in tweaking the script, you may find it helpful to hook this section back up to the $bodytable. - $IgnoreTimeFile = $false
If you are interested in tweaking the script, this can be used to ignore the time tracking feature for faster and easier testing.
A quick loop back to $Delay which was thought up by the MSEndpointMGR team. If you were to set Proactive Remediations to run this script daily at noon, and sent that out at 6 PM the previous day, odds are by noon tomorrow many devices will be primed and ready to run the script. If you have 5,000 devices scoped to this script right off the bat, and all 5,000 hit the Function App at the same time, that’s going to be much more expensive (Function App Cost) than if they trickled in slowly.
What $Delay does when set to $True is make it such that devices which are beyond the first day of their enrollment will wait a random value of up to 50 minutes before hitting the Function App, thus spreading this out. Since Proactive Remediations typically hit at a specific time or the top of the hour, this is a good thing to leave on to help save a little money. While it’s true that the check in period for the script also reduces the odds of check ins lining up, that doesn’t work if you have a large initial audience.
How the Script Works:
I feel it important to cover an overview of the logic that will take place when the script runs. This is so you know what to expect when reviewing the logs or testing it out.
First run:
- The storage directory for the logs is created and hidden.
- Logging begins to the newly created directory.
- Various info about the machine such as it’s Name, Model, Serial Number, and OS Name are gathered.
- The OS version is checked to make sure it is Windows 11.
- The Model is checked to make sure it does not have the phrase “Virtual” in it.
- A last known tag file will not yet exist, so all time tracking is skipped.
- A JSON of data to request the device be changed to the desired tag is made. This contains our authentication information. $Delay is processed, and the request is sent to the Function App.
- The Function App will validate the request, process it, and return information.
- If that information contains a confirmation of change, the script will make sure that the returning machine name and tag match the requested ones.
- The information is processed and checked for an appropriate success status. If a success status is found, a file for the last known tag (that which was requested) is then generated and stored.
Second Run:
This run is slightly different than you may expect. Time tracking is not yet headed but a file is now created. This is on purpose for reasons that even I feel are too lengthy to explain.
- Steps 1-5 remain the same
- A last known tag file will exist. If the requested tag matches the last known tag, time tracking is evoked.
- On this run, a time tracking file will not yet exist so a file is created with the current time on it and we go ahead and call the Function again.
- The Function will again check, and this time likely confirm the tag is simply as it still should be.
- A success status is checked for and last known tag is updated once again.
Remaining runs:
- Steps 1-5 of the first run remain the same.
- A last known tag file will exist. If the requested tag matches the last known tag, time tracking in evoked.
- A time tracking file will exist. Logic will compare to see if it’s been more than the $CheckInPeriod worth of days.
- If yes, another check in will be performed to check/correct the tag and update the last known tag. If no, a check in will not be performed.
Windows 11 Dynamic Group:
You will need a dynamic group to target Windows 11 devices. That said, I would highly suggest going down the rabbit hole of dynamic group and building something to avoid things like virtual devices in the first place rather than solely relying on the scripts logic to avoid them. Unfortunately, this often involves a combination of name, make, and model avoidance which changes from organization to organization.
That said, here is a dirt simple query for pooling all Windows 11 devices together.
(device.deviceOSVersion -startsWith "10.0.2")Deploying the Script:
This is where things get very similar to my other guides.
If you are not familiar with Intune Proactive Remediations, this is how we will send our PowerShell script to client devices with a reoccurring interval. This is effectively modern enterprise Task Scheduler but does have licensing requirements. You can technically use a different means to execute the script so long as you can run it as System and the devices are Azure joined.
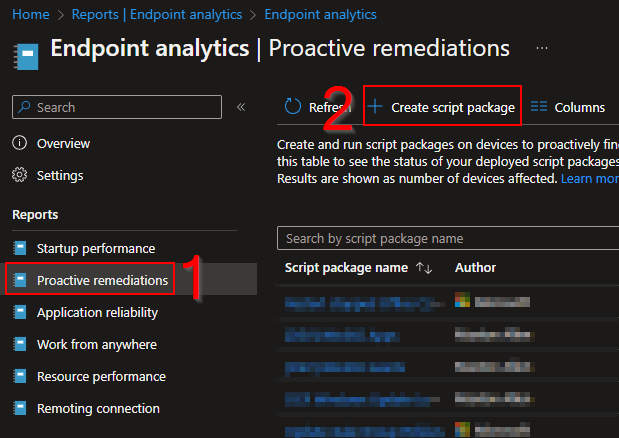
If you have never used Proactive Remediations, this menu is in a very strange location.
- Head into Intune
- Go to Reports then Endpoint Analytics

- Choose Proactive Remediations then Create Script Package. Note, if it is your first time going into this menu, you may receive a prompt to confirm your licensing.
- You will need to give the script a Name and Description. These are just friendly values.
You will then be prompted for a multitude of values. These are the only ones you need to set / change.
- Detection Script File – This is the PS1 file you filled in.
- Run Script in 64-Bit PowerShell – Change this to yes. Technically it’s not required for this script but it won’t hurt anything.
We don’t need a remediation script for this, nor do we want to run as user (we want to run as System). Script Signature Check is something you will have to look into on your own and make your own determination.
Hit Next.
Scope tags are up to you if you use them.
You will then be prompted to select your group to include.

Once a group is selected, you can then alter the schedule for that group. You can put different groups on difference schedules. For this script, it doesn’t really matter how often you tell it to run since the cost factor is calling the Function App and the script internally has logic ($delay and time tracking) to prevent it from going overboard with calls to the Function App.
That said, I would limit it too daily. Realistically, there are not going to be many folks upgrading to Windows 11 and then rushing for the wipe button. If you hover over the info dot by the time, you will see that Intune will aim for that time but otherwise go as soon as possible if it’s missed. Additionally, if NOT using UTC, you do get a natural stagger from devices in different time zones.

Once you have your groups and schedules figured out, you can go ahead and hit Next and Create.
The remediation will then begin to propagate out. They are very slow to go out, often only hitting around 10% of the target audience after 3 hours.
Conclusion:
At this point you are done. The remediation will go out to the devices, and they will begin to process it and thus check their tag or update it as needed.
Troubleshooting:
If you run into issues in testing, here are some steps you can take to look into the problem.
- Look at the scripts log file. This is located wherever you defined it using $LogFileLocation and $LogFileName.
- On the Function App, head to Functions, choose the Win11TagConverter, and choose Monitor. This will show you the results of the 20 most recent traces (log outputs from the Function App) although it seems time limited.
- Enable Application Insights (if you turned it off), try to run the script a few times, head to your Resource Group, open the FA-AI item (Application Insights), head to Logs on the left, and enter the query “traces” – this will give you more detail than the Monitor menu.
Hopefully these three locations will point you in the right direction as to what has gone wrong. You can also refer to the previous post for information on how to verify the Function App has the right permissions.
Disclaimer
The following is the disclaimer that applies to all scripts, functions, one-liners, setup examples, documentation, etc. This disclaimer supersedes any disclaimer included in any script, function, one-liner, article, post, etc.
You running this script/function or following the setup example(s) means you will not blame the author(s) if this breaks your stuff. This script/function/setup-example is provided AS IS without warranty of any kind. Author(s) disclaim all implied warranties including, without limitation, any implied warranties of merchantability or of fitness for a particular purpose. The entire risk arising out of the use or performance of the sample scripts and documentation remains with you. In no event shall author(s) be held liable for any damages whatsoever (including, without limitation, damages for loss of business profits, business interruption, loss of business information, or other pecuniary loss) arising out of the use of or inability to use the script or documentation. Neither this script/function/example/documentation, nor any part of it other than those parts that are explicitly copied from others, may be republished without author(s) express written permission. Author(s) retain the right to alter this disclaimer at any time.
It is entirely up to you and/or your business to understand and evaluate the full direct and indirect consequences of using one of these examples or following this documentation.
The latest version of this disclaimer can be found at: https://azuretothemax.net/disclaimer/
