Azure Function apps are great. They are currently (to my knowledge) the only decent gateway to upload or pull information out of Azure from client devices via PowerShell, that is without needing to store things like secret keys directly in your code which obviously you don’t want to do.
There are currently two main methods of editing a Function App. You can either go into the Function App inside Azure via your browser and edit it via the Cote + Test menu or, you can use Visual Studio Code.
This allows you to either code directly into the real Azure Function App via the web interface or, run a local simulated Function App via Visual Studio code.
This post will cover the setup of Visual Studio Code as well as an example of testing locally and pushing the function to the cloud. I have also added some known issues and how to work around them. Unfortunately, I can’t provide the example function itself at this time, but I plan to provide something you could use in the future via another post.
Let’s dive into these two options and see why you might choose one or the other.
Why use the web interface?
Using the web interface is, in my opinion, quick and simple. If you really just need to paste some pre-written code or just want to do a quick test, this is probably the way to go.
It also has one other advantage. If you are running a Function App with an App Service Plan and are granting that Function App Permissions directly (as opposed to using an App Registration and feeding the Function App a secret key to authenticate with) then this might be your only option – sort of.
The reason why using the browser may be your only option is because the Visual Studio Code on your machine isn’t going to be able to perform the same self-authentication and have the same permissions as your real cloud Function App has. So, if you’re trying to do things like graph calls using self-authentication, it’s not going to work in a local Visual Studio environment. That said, there is a workaround to this, sort of. More on this in the known issue section.
Why use Visual Studio Code?
First, a quick explanation as to what coding a Function App in Visual Studio Code does. Effectively, you can create/configure a new Function, code it, and test it, all locally. All a Function App like an HTTP trigger is, is a little website waiting for some input. Visual can just run this site locally, give you a local IP/URL to hit, and you can plug that URL into your code and run it to see if it works. It’s pretty much exactly* the same as running the Function in Azure, just locally. Visual then has an internal tool for pushing that code to a Function App once you’re ready. Once pushed to a real Function App, you then just swap out the Function URL in your code with the real Function App, and now it’s up and running.
There are a few good reasons for this option but honestly, a lot of them come down to simply not having a non-production app to play with, and/or not having the permissions to go make one. If you don’t have a non-prod copy of your real Function App to test on, you need one. The last thing you want to do is code locally and then upload straight to your prod app assuming it will work perfectly.
That said, it’s better to do things like write the update itself, plan changes, try out new things, prototype, etc etc etc – locally first. Especially if it’s for a Function App you plan to give some powerful permissions to.
Additionally, you can use Visual to update (or recreate might be better wording) a read-only Function that’s running in the “running from a package file” mode without having to delete the WEBSITE_RUN_FROM_PACKAGE key and lose the existing Function/code and suffer the downtime while you rush to create it with (I hope) a backup of whatever code was there.
*See known issue section.
How do you setup Visual Studio Code to write and test Function Apps?
I am not a big fan of remaking wheels. There is genuinely a good explanation on how to do this from Microsoft here. That said, I personally found this article a bit confusing and ran into a few hiccups my first run through, so I will briefly cover what you need.
I have notes on most every requirement, so I will cover these one by one.
Visual Studio Code
Hopefully you can figure this one out.
Azure Functions Core Tools 64-Bit
Really simple next-next-finish type install.
.Net Core 3.1 Runtime
I have used the 6.0 x64 flavor. Really simple next-next-finish type install.
PowerShell 7
Function Apps are PowerShell 7.0/7.2 so this is required for them to function (pun intended). However, this doesn’t need to be set as Visual’s primary PowerShell. Meaning, you can still code in an older version while running Function Apps, you just need version 7 installed. There is an MSI to install this if you need to go that route, but Microsoft now recommends using Winget. Just fire up an admin PowerShell or Terminal and pop this in. It should be fairly quick to complete.
winget install --id Microsoft.Powershell --source winget
Visual Studio Code PowerShell Extension
You can either go to the website, hit install, and it will call your local Visual. Or, just pull it up in your Visual Studio Code’s Extension browser.

Visual Studio Code Azure Functions Extension
Again, you can either go to the website, hit install, and it will call your local Visual. Or, just pull it up in your Visual Studio Code’s Extension browser.

Creating a new Function App Project:
Again, Microsoft’s article covers this but I had trouble following it my first time.
First, you need to login to your Azure account. That can be done by clicking the extension and hitting the sign into Azure option. This will launch a web browser, just complete the authentication and you can close the tab.

Once signed in, you can actually browse through your Azure Subscription and look at your existing Function Apps. For instance, I can see the Run.ps1 that controls a copy of the MSEndpointMGR Function App I just deployed.

But you can’t edit it this way as indicated by the “Read Only” status, so how on earth can you deploy a new Function to this Function App or edit the Function?
First, you need to make a new empty folder to store your new Function App and all it’s files. Then, go to File, Open Folder and open your empty folder.
Then, you need to make sure you are in the Azure view and hit the Create Function Icon.

At the top, you will be prompted to choose where to create said project. Choose the empty folder you created; this should be the only option that popped up.

From here on out, it’s just like creating a new Function (Not Function App) via Azure. I will be doing a PowerShell HTTP trigger for my Function. So, first I choose the language.
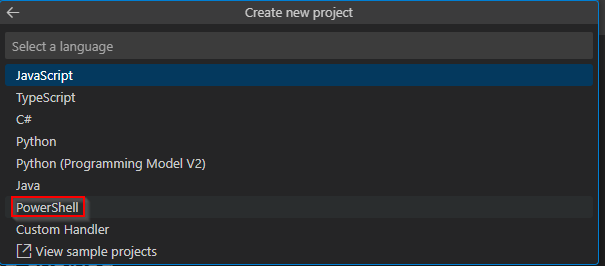
Then I chose HTTP trigger.

Name your Function, this will show in the URL when you call the Function App and its Function. Press ENTER to submit the name.

Choose an authorization level, I will be doing Anonymous*. See here for more information.
*Update regarding Authorization level: This dictation comes from the MsEndpointMgr team. However, after playing with it on my end, I don’t see any reason not to use “Function” level authentication. Read more here. The only thing this changes is that when you get the URL for the Function, choose Default (Function Key). This will provide you a URL with a key on it, and that key lets you call the function. Without that key you can’t call the Function. I wouldn’t consider this sure-fire security, but I can’t think of a reason not to use it either given you control the script that calls it. As always, see the disclaimer.
At this point, you should see something like this. You will have a local function project inside the Workspace menu, and you should see the Run.ps1 open up. By default, this just has a very generic Run file provided by Microsoft.

Run.ps1 is the file the Function will run when you execute it. This is the file to edit. This file is the Function. If you want to edit/test an existing Function, you can copy the contents of its run.ps1 into this file which you can get by browsing to it like I showed earlier.
Your empty folder will now have a multitude of files inside of it. You should see a folder named the same as what you chose for the Function itself. Inside that is where the Run.ps1 lives should you need to re-open it. To re-open this project in the future, re-open the folder that contains it all using the Open Folder function, then use the normal open function to re-open the Run.ps1 file.
Running your function app locally:
I can’t tell you how to code your Function, that’s up to you. What I can tell you is how to run it locally.
In essence, this is fairly simple. Just open up your Run.ps1 and hit F5. What you should see is some colored text, although I have found that for some reason, I have to manually change back to the Function view on the right side. You will see blue text for various output from the script, as well as notifications from the running tool. You will also see yellow text indicating the name of your Function, as well as green text indicating the local URL/IP to hit for your Function. You can then swap out the Function URL in your script for the local URL.
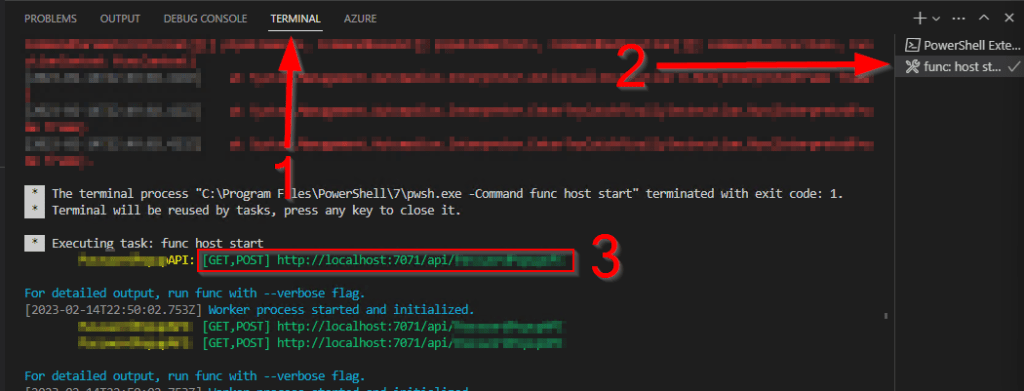
Unfortunately, try as I have, even with split terminals Visual does not want to run / debug two things at once. So, once I am ready to test, I usually open up my client side script in PowerShell ISE and run it from there via F5. You can then watch the output of the script and function to see how they interact with each other.
For example, here is me locally testing the Function App for this blog post: Windows Toast Notification Based Password Expiration Reminders – Getting the Most Out of Azure (azuretothemax.net)
On the left you can see the output from my Function, and on the right you can see the code itself I was running. While this is obviously live, you can still see how the two traded information and answers back and forth just like it’s a real live Function in the cloud.

Pushing your function to the cloud:
Once you are confident in your Function, you can push it to a Function in the cloud. This does reboot the Function and if there is an existing Function it can/will override it. I have not done a multi-function Function App before, but to my knowledge, this wipes out all the Functions on the app and replaces it with this project and cannot be reversed. So, be careful.
Go into the Azure view and locate the Deploy icon (small cloud with an up arrow) at the top of the local workspace. Click Deploy to Function App on the resulting menu.

You will then need to choose which Function App you want to deploy your Function to. Depending on your environment, this can be as simple as clicking the name of the Function App or, you might have to browse into the appropriate Subscription, then into the right Resource Group, and then into then the Function App.
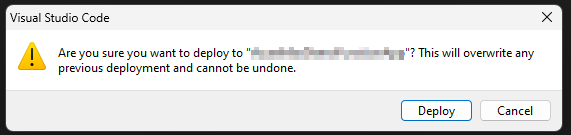
You will then get a confirmation you want to deploy the Function to Function App XYZ.
Once accepted, you should then see some popups in the lower left-hand corner indicating the status of the push. It can take a minute or so to complete.
You can also watch the Output window to see the status as it runs, and it will end by providing you the URL to hit the Function at.

You can then drop that URL into your client script and run it for real using the cloud Function App.
If you need to make edits, just edit the local files and re-push again.
Known Issues and Workarounds:
While this is all great, there are a few issues I have run into and a few answers I have found.
Enviromental Variables:
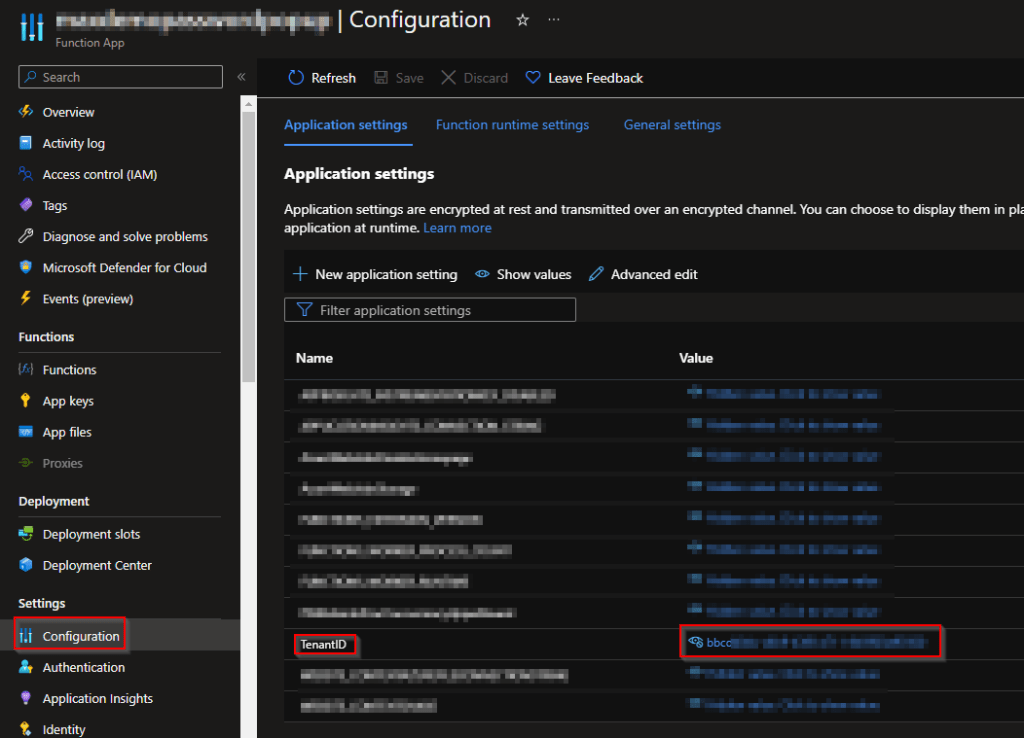
If you work on a Function, you might see lines like this…
$TenantID = $env:TenantIDWhat this is doing is pulling a variable out of the Function App’s environmental variables. You can access and edit these values on the Function App by heading into it and choosing Configuration on the left-hand side. Here you will find a table of all the values names and can click to reveal their values, as well as edit them.
Never store things like secret keys in the environment variables, use a key vault and key vault reference!
For local testing, the best option is to comment out these lines and replace them with something that sets the value statically like this.
#$TenantID = $env:TenantID

#Local Testing Only
$TenantID = "XXXXX"
Obviously, you will want to comment out your “local testing” variables, as well as likely remove their hard coded values, before uploading to the function app. The last thing you want is your Secret Key still sitting in your function in plain text due to your local testing variables.
Self-Authentication:
Something developed by the MSEndpointMGR team (as best I can tell) is the ability for the Functions Apps to have permissions granted to the Function App itself. You can then use that to get a bearer token, and then use that token to perform operations, rather than needing an App Registration and a secret key. This also eliminates the need for a key vault in some situations.
Unfortunately, the fake local Function App you are running obviously doesn’t have an Azure App Service plan behind it to grant permissions to, and thus you’re not going to be able to do that same sort of self-authentication.
Here is how you can get around this.
What you need ironically is an App Registration that has the same permissions you plan to give the Function App, the ID of that App Registration, a Secret Key Value for that App Registration, and your Tenant ID. If you’re willing to try this workaround, you’re probably familiar with how to make and get all of that. If not, perhaps I will cover it another time.
But, you can then pop that into something like this… I found this in another script, looks like it came from here.
Function Get-MSGraphAuthToken {
    [cmdletbinding()]
    Param(
        [parameter(Mandatory = $true)]
        [pscredential]$Credential,
        [parameter(Mandatory = $true)]
        [string]$tenantID
    )

    #Get token
    $AuthUri = "https://login.microsoftonline.com/$TenantID/oauth2/token"
    $Resource = 'graph.microsoft.com'
    $AuthBody = "grant_type=client_credentials&client_id=$($credential.UserName)&client_secret=$($credential.GetNetworkCredential().Password)&resource=https%3A%2F%2F$Resource%2F"

    $Response = Invoke-RestMethod -Method Post -Uri $AuthUri -Body $AuthBody
    If ($Response.access_token) {
        return $Response.access_token
    }
    Else {
        Throw "Authentication failed"
    }
}


$TenantID = ""
$ApplicationID = ""
$AppSecret = ""


$Credential = New-Object System.Management.Automation.PSCredential($ApplicationID, (ConvertTo-SecureString $AppSecret -AsPlainText -Force))
$Token = Get-MSGraphAuthToken -credential $Credential -TenantID $TenantID
And the value $Token will be is a bearer token from the App Registration. Assuming your App Registration has the same permissions, you should be able to plug that Bearer token into whatever else your Function normally does and it should work.
You can then remove this after testing, or even wrap it in logic like “If PC name equals your PC name, get bearer token this way, else get via self-authentication”
Be careful not to leave your secret value in plain text for the upload to the function! If you really need to call that value in the script, use a key vault.
My PowerShell in Visual is now version 7:
I get it, you might not want to make this switch yet. If the method you installed PowerShell through changed Visual’s default, this is how you can change it back. Original source.
If you’re not sure if it did or did not change your PowerShell version, just run this command in the Visual Terminal.
$PSVersionTableThis will spit out a table indicating what version your Visual is using.
To change Visual back…
- Open the Command Palette on Windows or Linux with Ctrl+Shift+P. On macOS, use Cmd+Shift+P.
- Search for Session.
- Click on PowerShell: Show Session Menu.
- Choose the version of PowerShell you want to use from the list.
PowerShell X64 is PowerShell 7. Windows PowerShell X64 is the older version.
Conclusion:
You should now have a great way to create and test Function Apps locally, eliminating the need to constantly spin up new test Function apps or have to troubleshoot and test via a more complex cloud environment.
Happy coding!
Disclaimer:
The following is the disclaimer that applies to all scripts, functions, one-liners, setup examples, documentation, etc. This disclaimer supersedes any disclaimer included in any script, function, one-liner, article, post, etc.
You running this script/function or following the setup example(s) means you will not blame the author(s) if this breaks your stuff. This script/function/setup-example is provided AS IS without warranty of any kind. Author(s) disclaim all implied warranties including, without limitation, any implied warranties of merchantability or of fitness for a particular purpose. The entire risk arising out of the use or performance of the sample scripts and documentation remains with you. In no event shall author(s) be held liable for any damages whatsoever (including, without limitation, damages for loss of business profits, business interruption, loss of business information, or other pecuniary loss) arising out of the use of or inability to use the script or documentation. Neither this script/function/example/documentation, nor any part of it other than those parts that are explicitly copied from others, may be republished without author(s) express written permission. Author(s) retain the right to alter this disclaimer at any time.
It is entirely up to you and/or your business to understand and evaluate the full direct and indirect consequences of using one of these examples or following this documentation.
The latest version of this disclaimer can be found at: https://azuretothemax.net/disclaimer/
